background image

25985-050106.qxp  14/03/2006  10:26  Page 1
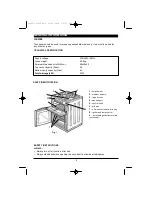
50cm DOUBLE CAVITY

GAS COOKER

Models: SC50TCWG & SC50TCSSG

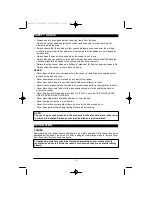
PLEASE NOTE: This appliance must be installed only by a registered corgi gas
fitter and in accordance with the local authority regulations in force.
It must be used in areas with adequate ventilation only.

Please read these instructions carefully before attempting to install or use this
product.

It is advisable to keep these instructions in a safe place for future reference.

Installation and Operating Instructions

Summary of Contents for SC50TCSSG

Page 1: ...gistered corgi gas fitter and in accordance with the local authority regulations in force It must be used in areas with adequate ventilation only Please read these instructions carefully before attempting to install or use this product It is advisable to keep these instructions in a safe place for future reference Installation and Operating Instructions ...

Page 2: ...pecially to children Then deliver the appliance to the specialised organisations dealing with the disposal of waste and purchase of recycling materials 6 The cooker should be connected to the gas system or LPG cylinder and adjusted only by a certified fitter of gas appliances or a technician of an authorised servicing company 7 The manufacturer disclaims all liability for any injury or damage resu...

Page 3: ...ON 5 POSITION 5 ELECTRICAL CONNECTIONS 7 CONNECTING THE COOKER TO THE GAS SUPPLY 7 USING THE HOB 8 COOKWARE 9 CHOICE OF UTENSILS 9 GRILL 9 OVEN 10 CLEANING AND MAINTENANCE 11 GENERAL COMMENTS 11 CLEANING THE PAN SUPPORT 11 CLEANING THE BURNERS 11 CLEANING THE OVEN 11 CLEANING THE GLASS IN TOP CAVITY DOOR 12 REPLACING THE LAMP 12 TROUBLESHOOTING 13 HELPLINE INFORMATION BACK PAGE ...

Page 4: ...D cm 90x50x60 Top cavity capacity litres 20 Bottom cavity capacity litres 42 Total wattage kW 30W PARTS IDENTIFICATION 3 4 2 1 5 6 1 small burner 2 medium burners 3 large burner 4 pan support 5 control knob 6 grill pan 8 7 x 2 wire shelves and drip tray 8 igniter and lamp control 9 removable grill deflector plate not shown 7 Fig 1 SAFETY INSTRUCTIONS ALWAYS Always turn off all controls after use A...

Page 5: ...s above the cooker that children may attempt to reach Never heat up unopened food containers as pressure can build up causing them to burst Never store chemicals food stuffs pressurised containers in the cabinets above or next to the cooker Never fill a deep fat frying pan more than 1 3 full of oil or use a lid DO NOT LEAVE UNATTENDED WHILE COOKING Never place flammable or plastic items on or near...

Page 6: ...rols The cooker is equipped with adjustable feet designed for levelling the cooker and for adjusting the upper edge of the cooker to furniture level In order to eliminate the risk of the cooker falling forward a chain has been installed at the rear side of the cooker This should be fastened securely to the wall behind the appliance with the bracket supplied Fig 3 Fig 3 Levelling the Cooker The coo...

Page 7: ...local distribution conditions nature of the gas and gas pressure In the event of incompatibility replace the nozzles and adjust the gas fittings The connection should be made in accordance with the regulations in force and by a certified installer The cooker may be connected to the natural gas supply or to an LPG cylinder LPG jets not supplied The appliance is supplied with natural gas burners fit...

Page 8: ...ver only two thirds of its surface This will reduce the gas consumption and prevent the flame from soiling the utensils The size of the flame depends on the position of the knob The full flame should be used until the dish begins to boil then it is better to use the simmering flame Burners and ignitor tips should be kept clean as dirt adversely affects the performance Before removing an item off a...

Page 9: ...ture exceeds safety limits Before using the grill for the first time it is recommended to turn and leave the grill turned on for a period so residues from manufacture are burnt away A smell on initial use is normal and not a malfunction Turn the light on by pressing only the top half of the button Fig 5 Fig 7 Turn the control knob to the large flame position and press and hold the bottom half of t...

Page 10: ...oes out repeat all the steps above keeping the knob pushed in for about 5 seconds longer Turn the knob to a setting from 1 to 8 The table below shows what setting you should select for the corresponding oven temperature The light can be turned on by pressing the top half of the ignition button Fig 5 Fig 10 Setting 1 2 3 4 5 6 7 8 Max Temp C 130 140 150 170 190 230 245 250 280 NOTE 1 When lighting ...

Page 11: ...then wash and dry it CLEANING THE BURNERS Gas burners should be cleaned regularly and after each spillage to remove cooking residuals and dirt CAP RING NOZZLE BODY Fig 11 To clean burners remove the caps and rings Fig 11 putting them separately in warm soapy water After cleaning check that the burner ports are clear The body near the nozzle should always be clean Dirt accumulating around the nozzl...

Page 12: ...screws securing the top frame Remove the top frame and slide out the glass Fig 12 To replace the glass place bottom edge of the glass in the clips Carefully lay the glass on the buffers so it rests flush with the side frame Replace the top frame and secure with the two screws GLASS SCREW BUFFER SIDE FRAME TOP FRAME SCREW Fig 12 REPLACING THE LAMP Wait for the oven to cool Unscrew and remove the di...

Page 13: ...he mains socket If the electricity supply has failed all burners may be lit with a match If one burner fails to ignite check that the burner and ignitor is clean and dry Wash and dry the burner and ignitor clean the nozzle with a thin copper wire and check if the burner ports are clear Uneven cooking Ensure that the dish is positioned centrally 13 ...

Page 14: ...25985 050106 qxp 14 03 2006 10 27 Page 14 14 ...

Page 15: ...25985 050106 qxp 14 03 2006 10 27 Page 15 ...

Page 16: ...e caused by inappropriate waste handling of this product The symbol on the product or on the documents accompanying the product the Crossed Out Wheelie Bin symbol indicates that this appliance fitting may not be treated as household waste Instead it shall be handed over to the applicable collection point for the recycling of electrical and electronic equipment Disposal must be carried out in accor...

Reviews: