background image

CHILD CAR SEAT SK6000I

INSTRUCTION MANUAL

GB

GB

202201

ECE R129

40-135

cm

Summary of Contents for SK6000I

Page 1: ...CHILD CAR SEAT SK6000I INSTRUCTION MANUAL GB GB 202201 ECE R129 40 135 cm...

Page 2: ...ed rearward facing 17 4 2 Installed forward facing 19 4 3 Installed forward facing 20 MAINTENANCE AND CLEAING THE MAIN TECHNICAL PARAMETERS 22 5 1 Daily maintenance 22 5 2 Washing instruction 23 5 3 R...

Page 3: ...nual carefully before use If you have any questions concerning the use of this child restraint system please do not hesitate to contact with us IMPORTANT DO NOT use the device in seating positions whe...

Page 4: ...he vehicle users manual If in doubt consult either the Enhanced Child Restraint System manufacturer or the retailer i Size booster seats ECRS 105 135cm Notice This is a i Size booster seat Enhanced Ch...

Page 5: ...The guide groove of the body 1 2 3 4 5 6 7 Body Angle adjuster Harness adjuster strap Support leg unlock button Rotation adjuster Base Handle of headrest ISOFIX release button ISOFIX attachment Suppor...

Page 6: ...cribed in the instructions and marked in the child restraint when in 105 135cm Please keep for furture reference a storage compartment for the instructions is located on the back of the child seat Do...

Page 7: ...kin Don t leave your child in the device unattended Any luggage or other object liable to cause injuries in the event of a collision shall be properly secured The ECRS shall not be used without the co...

Page 8: ...if the approved vehicles are fitted with 3 point safety belt approved to UN ECE Regulation No 16 or other equivalent standards Not to use rearward facing in seating positions where an active frontal a...

Page 9: ...up or down according to the child s height 9 USAGE GB GB 3 3 Checking the shoulder strap height 3 2 Adjust the headrest Always check that the shoulder straps are at the correct height for your child...

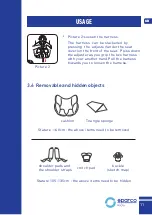
Page 10: ...locked correctly Step 3 If you want to release the safety belts it needs to press the red button then the pieces pop up 1 2 3 click Picture1 Tighten the harness Pull the harness upward to remove the...

Page 11: ...at Press down the adjuster as you grip the two harness with your another hand Pull the harness towards you to loosen the harness 3 6 Removable and hidden objects Stature 105 135cm the above items need...

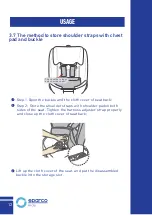
Page 12: ...sides of the seat Tighten the harness adjuster strap properly and close up the cloth cover of seat back 3 7 The method to store shoulder straps with chest pad and buckle The shoulder straps and shoul...

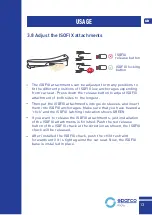
Page 13: ...put the ISOFIX attachments into guide sleeves and insert them into ISOFIX anchorages Make sure that you have heared a click and the ISOFIX latching indication shows GREEN If you want to release the IS...

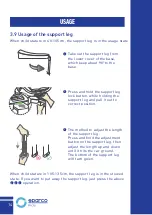
Page 14: ...p and down until it hits the car ground The bottom of the support leg will turn green 3 When child stature in 105 135cm the support leg is in the stowed state If you want to put away the support leg j...

Page 15: ...ne hand and rotate the safety seat with the other hand both left and right directions can be rotated 1 2 When child stature in 40 83cm the safety seat should rearward facing When child stature in 83 1...

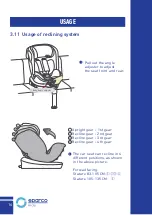
Page 16: ...ar seat can recline in 4 different positions as shown in the above picture Forwad facing Stature 83 105 CM Stature 105 135 CM Upright gear 1st gear Recline gear 2nd gear Recline gear 3rd gear Recline...

Page 17: ...base see 3 9 Second pull out the ISOFIX attachment see 3 8 Third place the child safety seat on the car seat 1 1 2 3 2 4 1 Installed rearward facing DO NOT use forward facing before the child s age e...

Page 18: ...INSTALLATION Rotate the seat to the position of the car door then put the child in the safety seat adjust the shoulder straps and lock the buckle see 3 3 3 5 Finally fix the seat in rearward 4 5 Clic...

Page 19: ...ttachment see 3 8 Third place the child safety seat on the car seat Finally put the child in the safety seat adjust the shoulder straps and lock the buckle see 3 3 3 5 4 2 Installed forward facing Sta...

Page 20: ...oulder height and fixed well Shoulder belt Lap belt 4 After belt fixed the seat buckle and belt guide hook can not be placed in this position Please contact the manufacturer if in doubt Make sure the...

Page 21: ...at the child s shoulder height and fixed well According to the installation path insert the car seat belt across the child s body into the car groove of the car seat Make sure that the car seat should...

Page 22: ...o avoid damp moldy If the child seat becomes dusty clean the seat belt and the plastic pieces by swiping them with a damp sponge and let it dry under ambiance If food or drink drop accidently on the b...

Page 23: ...n Hand wash water temperature below 30 5 3 Remove and assemble the fabric cover Firstly remove the crotch pad and buckle of the child seat Open the zip on the headrest and remove the headrest cover Te...

Page 24: ...24 THE MAIN TECHNICAL PARAMETERS Distance from front to back of the seat 565mm Distance form left to right of the seat 443mm Height of the seat 620mm Weight of the seat 11 0 5kg 620mm 443mm 565mm...

Page 25: ......

Reviews: