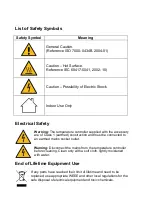
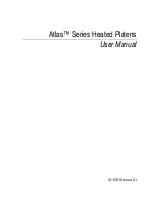
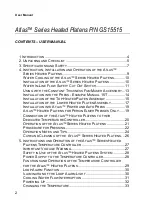
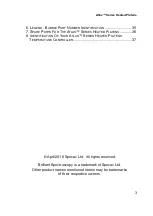
background image

  
Atlas™ Series Heated Platens 

User Manual 


2I-15515 Issue 21 

Summary of Contents for Atlas GS15515

Page 1: ...Atlas Series Heated Platens User Manual 2I 15515 Issue 21 ...

Page 2: ...with the accessory are of Class 1 earthed construction and must be connected to an earthed mains socket outlet Warning Disconnect the mains from the temperature controller before cleaning Clean only with a soft cloth lightly moistened with water End of Lifetime Equipment Use If any parts have reached their limit of lifetime and need to be replaced use appropriate WEEE and other local regulations f...

Page 3: ...Atlas Series Heated Platens User Manual 2I 15515 Issue 21 ...

Page 4: ...INSTALLATION INTO ATLAS POWER AND AUTO PRESS 19 ATLAS HEATED PLATENS FOR PERKIN ELMER PRESSES ONLY 19 CONNECTION OF THE ATLAS HEATED PLATENS TO THEIR DEDICATED TEMPERATURE CONTROLLER 20 OPERATION OF THE ATLAS SERIES HEATED PLATENS 21 PROCEDURE FOR PRESSING 22 OPERATION NOTES AND TIPS 24 CARE AND CLEANING OF THE ATLAS SERIES HEATED PLATENS 26 5 INSTRUCTIONS AND OPERATION OF THE ATLAS SERIES HEATED ...

Page 5: ...OR THE ATLAS SERIES HEATED PLATENS 36 8 IDENTIFICATION OF YOUR ATLAS SERIES HEATED PLATENS TEMPERATURE CONTROLLER 37 April 2016 Specac Ltd All rights reserved Brilliant Spectroscopy is a trademark of Specac Ltd Other product names mentioned herein may be trademarks of their respective owners ...

Page 6: ...erature by their own dedicated automatic temperature controller with a stability of 1ºC The heated platens and the controller are matched as a system for operation from either a 220 to 240 volts or 100 to 110 volts mains supply The lower heated platen assembly only is fitted with a permanent K type thermocouple that monitors the temperature close to the pressing surface of the top and lower heated...

Page 7: ...ons for use Section 4 is for instruction installation and operation of the Atlas Heated Platens themselves and Section 5 is for instruction and operation of the dedicated Atlas Heated Platens Temperature Controller that powers the heated platens It is important that both sections of this instruction manual are read carefully first to understand the equipment before using the accessory Atlas Heated...

Page 8: ...ins power cable for the Atlas Heated Platens Temperature Controller for your mains voltage supply Three 2 metre lengths of black flexible silicone rubber tubing Two matched pairs insert and body of Quick Connect couplings for cooling water tubing One in line cooling water flow safety cut out switch Four plastic cable ties One 4mm size Allen key One instruction manual for operation Carefully remove...

Page 9: ...tts each platen Water cooling Continuous less than 8 bar with a flow rate not less than 0 2 liters min recommended 1 liter min Temperature Controller Temperature range 0 to 300ºC Temperature setting 0 to 300ºC in 1ºC steps Temperature display Digital Setting accuracy 1 digit Control type PID Proportional Integral and Derivative System Specification Control stability Better than 1ºC Heating rate 30...

Page 10: ...E gloves when handling the platens and when cleaning Caution No user serviceable parts within contact the manufacturer or approved service agent for advice if the product is not functioning correctly or is visibly damaged Caution If the equipment is used in a manner not specified by the manufacturer the protection provided by the equipment may be impaired Warning Risk of burns when operated at hig...

Page 11: ...heated platens without continuous flow cooling water Water flow must be always on to avoid overheating of the heated platens and risk of damage E If the cooling water flow is interrupted the in line flow safety cut out switch will switch off power to the platens DO NOT re establish a water flow until the heated platens actual temperature falls below 80ºC F AVOID BURNS DO NOT touch the heated plate...

Page 12: ...stallation of the Atlas Series Heated Platens The Atlas Series Heated Platens can be installed into any Atlas Hydraulic Press Manual Power or Auto version The procedure for installation is described as follows Before installation into a press it is best to initially secure the black silicone rubber tubing for water cooling to the top 1 and lower 2 heated platen assemblies as shown in Fig 1 The sil...

Page 13: ...on both the water in and water out lengths of tubing in the direction of flow as shown in Fig 1 Fig 2 Insert and Body Quick Connectors The quick connectors 4 are a simple push fit insert into body which will click when fully engaged To disconnect the silver disc on the body connector is pushed down whilst the connectors are being pulled apart When these quick connections are disconnected water is ...

Page 14: ... best operation the safety cut out switch 5 should be placed between the water supply tap and the initial input water connection 3 of the lower heated platen assembly 2 Try to make the length of silicone tubing connection between the input water connection 3 on the lower heated platen 2 and the outlet side of the safety cut out switch 5 as short as practically possible There is approximately 2 met...

Page 15: ...ing any water left inside can be expelled carefully by connection of either one of the water connection ports 3 to an airline to blow the water out and away to a drain See Fig 1 and Fig 4 Using with the Constant Thickness Film Maker Accessory If the Constant Thickness Film Maker Accessory P N GS15640 is to be used with the Atlas Series Heated Platens the cooling chamber assembly 7 provided as part...

Page 16: ...ly 7 in the water cooling circuit the safety cut out switch 5 can be situated before or after the cooling chamber assembly 7 but it is important that the safety cut out switch 5 is placed before any water flows through the lower heated platens assembly 2 Installation into the Press Example Manual 15T Remove the top bolster pressing face 8 with its O ring 9 from the lead screw 10 of the press The b...

Page 17: ...ring that the water connection ports 3 are projecting outwards and pointing towards the rear of the pressing area See Fig 6 Fig 6 Top Heated Platen Assembly of Atlas Heated Platens Note The rear Perspex safety guard on the 15T Manual press should be raised or can be removed to allow for easier installation If the guard is removed it must be re attached after installation Insert the circular bolste...

Page 18: ... in the lead screw 10 for raising and lowering the top heated platen pressing surface 20 with rotation of the lead screw 10 See Fig 7 Note front and rear safety guards of the press have been removed from image for clarity Fig 7 Installation of Top Heated Platen Assembly into the Atlas Manual Hydraulic Press 10 13 12 6 20 11 ...

Page 19: ...press ensuring that the water connection ports 3 are projecting outwards and pointing towards the rear of the pressing area Note The rear Perspex safety guard on the 15T Manual press should be raised or can be removed to allow for easier installation If the guard is removed it must be re attached after installation Locate the underside recess diameter of the lower heated platen assembly 2 over the...

Page 20: ...ns into the Atlas Manual Hydraulic Press Note If the rear Perspex safety guard of the Atlas Manual Hydraulic Press has not been removed for installation of the top 1 and lower 2 heated platen assemblies it will have dropped down to rest on the water tubing and power cable connections to the top heated platen assembly 1 Although the rear guard cannot be fully closed it is safe to operate the press ...

Page 21: ...ssing operations Atlas Heated Platens for Perkin Elmer Presses Only If you have use of a Perkin Elmer manual hydraulic press that has a larger diameter pressing piston face 11 circa 90mm than that offered from the standard diameter pressing piston face 11 circa 82mm of the Specac hydraulic presses then the Atlas Heated Platens that can be supplied for installation are also different from standard ...

Page 22: ... independently connected to their sockets on the rear panel of the dedicated temperature controller via their own power cables See Fig 10 Socket 14 is for the top heated platen 1 assembly and socket 15 is for the lower heated platen 2 assembly Fig 10 Rear Panel of Atlas Heated Platens Temperature Controller for Electrical Connections 14 15 19 16 18 17 ...

Page 23: ...t the in line water cut out switch plug engages properly with the socket When the electrical connections for the top 1 and lower 2 heated platen assemblies have been made to the temperature controller 1 into 14 and 2 into 15 then the electrical mains power cable supplied for your controller can be attached The electrical mains power cable for the temperature controller plugs into the socket 19 on ...

Page 24: ... the Constant Thickness Film Maker accessory P N GS15640 is to be used Start the flow of cooling water typically at a flow rate of 0 5 to 1 0 liters min The minimum flow rate is 0 2 liters min in order to keep the in line flow cut out switch 5 open to provide power to the temperature controller Procedure for Pressing When the heated platens have been installed in the press the top heated platen as...

Page 25: ...uch that the sample work is loosely and lightly held for compression between the two heated surfaces 20 and 21 It is now at this stage usually that a temperature can be set for both heated platen surfaces 20 and 21 to start the heating of the sample whilst still under a light compressive load having been applied by hand from the lead screw 10 4 Input a set temperature value on the temperature cont...

Page 26: ...eing applied the sample may be accessed after separation of the top heated pressing surface 20 away from the lower heated surface 21 by anticlockwise rotation of the lead screw 10 Operation Notes and Tips In general the efficiency of heating operation and temperature measurement for the heated platen surfaces 20 and 21 is at an optimum when a good thermally conducting sample is placed between the ...

Page 27: ...to know if possible the melting point of the plastic sample to apply an appropriate set temperature to reach for the actual temperature for the most favourable pressing condition Do not press small hard pellet samples before they have reached a suitable plastic state as there is a very real risk of localized point loading that will cause indentation to the heated platen surfaces 20 and 21 Fig 11 H...

Page 28: ... for this increased tonnage capability of the Press alone to be attained As mentioned previously if the Atlas Series Heated Platens are not going to be used for a long period of time the cooling block parts 6 of both the top 1 and lower 2 heated platen assemblies should be stored without any water inside them After disconnection of the silicone tubing any water left inside can be expelled carefull...

Page 29: ...ins voltage Check that the voltage requirement of the heated platens assemblies 1 and 2 supplied also match the voltage requirement of the temperature controller 24 Note For operation of the Atlas Series Heated Platens temperature controller it is essential that a thermocouple is available The thermocouple used for control of the heated platen assemblies 1 and 2 is permanently fixed to the lower h...

Page 30: ...al is likely to make the apparatus dangerous Intentional interruption is prohibited When the apparatus is connected to its supply terminals may be live and the opening of covers or removal of parts except those to which access can be gained by hand is likely to expose live parts The apparatus shall be disconnected from all voltage sources before it is opened for any adjustment replacement maintena...

Page 31: ...erature Controller for the Atlas Heated Platens The top 1 and lower 2 heated platen assembly power cable leads are connected to the rear of the temperature controller into the sockets 14 and 15 respectively See Fig 10 The thermocouple lead fitted with a 2 pin plug from the lower heated platen assembly 2 is connected to the rear of the temperature controller into socket 17 See Fig 10 Take care that...

Page 32: ...ting a fault with the system and as such is a failsafe device When the Loop Alarm light is illuminated power is cut to the heated platen assemblies 1 and 2 In operation if a fault has been detected the system would automatically try to reset itself after a 1 minute time period The system will be attempting to check that the actual platen temperature is the same as the set displayed temperature If ...

Page 33: ...heated platen assemblies 1 and 2 and connected up the water cooling system when switching on for any power the Loop Alarm light 26 will be illuminated if the ambient temperature and hence the actual temperature 28 of the heated platens as indicated by the thermocouple is greater than 10 C above the indicated set temperature 27 of 0 C Raising the set temperature 27 to a value similar to or greater ...

Page 34: ...owering up the temperature controller 24 all electrical connections for the heated platen assemblies 1 and 2 MUST be made to the controller and sufficient flow of cooling water greater than 0 2 liters min MUST be established first to allow for deactivation of the in line water flow cut out switch 5 See page 21 Switch on the power supply to the Atlas Series Heated Platens temperature controller via...

Page 35: ... on Temperature Controller Note It is good practice when powering down to change the set temperature point 27 to zero before switching off Because a new set temperature will have to be input on the controller when it is next switched on this will ensure that the heated platens would not start to heat up unintentionally if a high above ambient set temperature had been retained in the memory Changin...

Page 36: ...er display 28 During the period that power is being fed to the heated platen surfaces 24 and 25 the red light in the upward arrow display 32 will be lit The rate at which power is fed to the top 24 and lower 25 heated platen surfaces and the duration that the upward arrow display 32 remains lit will depend on the temperature difference between the set value and the actual heated platen temperature...

Page 37: ...ctrical connection socket for top heated platen assembly 15 Electrical connection socket for lower heated platen assembly 16 Appliance label on temperature controller 17 Electrical 2 pin connection socket for the thermocouple 18 Electrical connection socket for the in line water flow cut out switch 19 Electrical connection socket for mains power cable 20 Heated surface of top heated platen assembl...

Page 38: ...Series Heated Platens P N GS15601 PTFE sheets 0 25mm thick for Atlas Series Heated Platens P N GS15512 Replacement heater set for Atlas Series Heated Platens 220 Volts P N GS15522 Replacement heater set for Atlas Series Heated Platens 110 Volts ...

Page 39: ...fic Atlas Series Heated Platens temperature controller Please make a note of the numbers on the appliance label in the template below This information will be useful should you need to contact Specac about your controller Important On no account should the Atlas Series Heated Platens temperature controller 24 be used with an accessory having a different part number to that shown on the rear panel ...

Page 40: ...Notes for Use of Heated Platens ...

Page 41: ...Notes for Use of Heated Platens ...

Page 42: ...ite www systems eng co jp Spain Teknokroma S Coop C Ltda Barcelona Tel 93 674 8800 Fax 93 675 2405 email comercial teknokroma es Switzerland Portmann InstrumentsAG Biel Benken Tel 061 726 6555 Fax 061 726 6550 email info portmann instruments ch Website www portmann instruments ch USA SPECAC INC 414 Commerce Drive Suite 175 Fort Washington PA 19034 USA Tel 215 793 4044 Fax 215 793 4011 United Kingd...

Page 43: ...SPECAC INC 414 Commerce Drive Suite 175 Fort Washington PA 19034 USA Tel 215 793 4044 Fax 215 793 4011 SPECAC LTD Unit 12 Science Innovation Centre Halo Business Park Orpington Kent BR5 3FQ Tel 44 0 1689 873134 Registered No 1008689 England ...

Reviews: