background image

HELMET USER MANUAL

HELMET USER MANUAL

SS1700

Summary of Contents for SS1700

Page 1: ...HELMET USER MANUAL HELMET USER MANUAL SS1700 ...

Page 2: ...with all the engineering and technology that goes into helmets not one can fully protect you against all possible impacts A helmet is designed to protect you against one impact Due to a crash the helmet will lose the ability to properly protect you any further in which case it will need to be replaced Please make sure you regularly check your helmet for any signs of damage In case of any severe si...

Page 3: ...of protection upon impact Dampen a soft cloth with water and wipe the helmet clean The best way to dry the liners are to air dry them Do not leave them out in direct sunlight A helmet is meant to be worn Do not sit on or throw the helmet under any circumstance Hanging it from the motorcycle s mirrors can damage both the helmet and mirror Do not paint over the helmet s finish Do not modify any part...

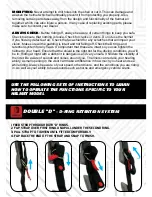
Page 4: ...y flaws It s important that these are intact so you can tighten the helmet to your head Ensure that the shield is the right tint for the driving conditions you will be in Riding at night with a dark tint is dangerous and very unsafe It hinders the visibility of the rider Be aware of sounds and noises around you The liners can reduce your hearing ability A small opening in the visor can make a diff...

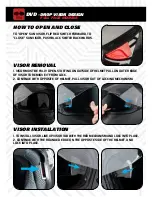
Page 5: ...N 1 VISOR MUST BE FULLY OPEN STARTING ON OUTSIDE OF HELMET PULL ON OUTER EDGE OF VISOR TO REMIOVE IT FROM LOCK 2 CONTINUE WITH OPPOSITE OF HELMET PULL VISOR OUT OF LOCKING MECHANISM 1 TO INSTALL VISOR LINE UP VISOR TAB WITH THE RED MECHANISM AND LOCK INTO PLACE 2 CONTINUE WITH THE ROUNDED EDGE ON THE OPPOSTE SIDE OF THE HELMET AND LOCK INTO PLACE FULL FACE MODELS ...

Page 6: ...E TO COMPLETE THE SHIELD REMOVAL PROCESS 1 LINE UP THE HOLE ON THE END OF THE SHIELD WITH THE LOCKING MECHANISM ON THE SIDE OF THE HELMET AND PUSH DOWN TO SEAT THE SHIELD 2 CHOOSE THE CORRECT LOCK CAP FOR THE SIDE YOU ARE INSTALLING HOLD THE CAP SO THAT THE DIRECTIONAL ARROWS ARE ON TOP 3 LINE UP THE TABS ON THE BACK OF THE CAP WITH THE SLOTS INSIDE THE LOCKING MECHANISM 4 LEFT SIDE TURN SHIELD LO...

Page 7: ...EFORE RIDING SINGLE ACTION CHIN BAR RELEASE 1 LOCATE SWITCH AT THE BOTTOM OF THE CHIN BAR 2 PULL SWITCH DOWN TO DISENGAGE CHIN BAR 3 PULL UP ON CHIN BAR UNTIL IT REACHES MAXIMUM OPEN POSITION 1 GRAB THE CHIN BAR FROM IT S OPEN POSITION AND PULL DOWN UNTIL IT LOCKS BACK INTO CLOSED POSITION ...

Reviews: