GETTING TO KNOW YOUR ZERO GRAVITY MICRO™ WALL RACER
The Air Hogs
®
Zero Gravity Micro
TM
Wall Racer
defies gravity with its wall climbing ability!
Featuring a
suction throttle
, that allows the
wall racer to perform full function while climbing
walls.
FOR INDOOR USE ONLY.
ADULT SUPERVISION RECOMMENDED!
PROBLEMS!
Before you return to retailer,
please call our HOTLINE for assistance,
1-800-622-8339
TO GET THE MOST OUT OF
YOUR ZERO GRAVITY MICRO™
WALL RACER PLEASE READ
THESE INSTRUCTIONS FIRST !
NOTE: USE ON SMOOTH, CLEAN
SURFACES ONLY!
Check to make sure contents are
complete:
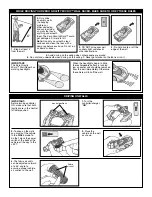
• 1 Radio-Controlled Zero Gravity
Micro™ Wall Racer
• 1 Controller/Charger
Left
Joystick
Right
Joystick
INSTRUCTIONS
TM
®
AH Zero Gravity Micro™
Wall Racer
Controller/Charger
CAUTION – ELECTRICALLY OPERATED
PRODUCT: Not recommended for
children under 8 years of age. As with
all electric products, precautions
should be observed during handling
and use to prevent electric shock.
BATTERY INSTALLATION
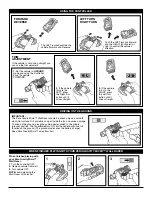
1.
Loosen screw and remove the battery
compartment door.
2.
Install six
1.5-V alkaline batteries (not
included) in the battery compartment
as shown.
Make sure to follow the
correct positive (+) and negative (-)
polarities with the corresponding
markings inside the battery compartment.
3.
Re-install the battery compartment door
and tighten the hold down screw.
Controller/Charger
Battery
Compartment
Door
Six
1.5-V
Alkaline
Batteries
1
2
Your Zero Gravity Micro™ Wall Racer
has pre-installed rechargeable battery
inside the vehicle body.
Battery
Compartment
CHARGING YOUR ZERO GRAVITY MICRO™ WALL RACER
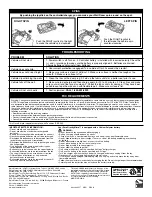
1.
Make sure the vehicles
ON/OFF
switch is in the
“OFF”
position. The
Zero Gravity Micro™ can
only be charged when
the vehicle is in the
“OFF”
position.
3.
Access
the charge
cable.
4.
Plug the
charging
cable into
the port in
the back of
the vehicle.
Make sure
the arrow is
on top.
6.
The green charging
light will begin to
flash. When the green
light turns OFF, the
vehicle is fully
charged.
• Charging should take between 20 and 40 minutes depending on how much
charge is left in the battery. •
NOTE:
Do not charge the battery immediately
after use. Let the battery cool for at least 10 minutes. If charging is not
complete after a long period of time, replace the charger batteries.
2.
Make sure
the controller/
charger switch
is in the
“OFF”
position.
5.
Slide the
switch on the
controller/
charger to the
CHARGE
position.
7.
When charging
is complete, turn
the controller/
charger switch
to the “
OFF”
position.
8.
Store the
charge cable in
the storage
compartment.


