background image

1

A

UFBAUANLEITUNG UND

W

ARNHINWEISE

Giant Pro
5m Series PVC

5x6m/5x8m/5x10m/5x12m

Aufbauanleitung

Assembly instruction

Notice de montage

Bitte lesen Sie sich die Warn- und

Aufbauhinweise vor Aufbau des

Zeltes sorgfältig durch

Bitte beachten Sie die Pflegehinweise

damit Sie lange Freude an Ihrem Zelt

haben

Please read the assembly instructions

and warnings carefully before setting

up the tent.

Please follow the care instructions so

you enjoy your tent for a long time.

Veuillez lire attentivement toutes les

consignes de montage et les

avertissements avant de monter la

tente

Veuillez respecter les consignes

d’entretien pour pouvoir vous servir

de votre tente pendant longtemps

Deutsch

1

English

10

Hergestellt für:

Stabilepartyzelte
Andy Kaiser
Wandersmannstr. 60a
665205 Wiesbaden

France

18

Summary of Contents for Giant Pro PVC 5m Series

Page 1: ...elt haben Please read the assembly instructions and warnings carefully before setting up the tent Please follow the care instructions so you enjoy your tent for a long time Veuillez lire attentivement...

Page 2: ...itgelieferten Spannseilen abspannen und sichern Bei starkem Wind und Windb en muss das Zelt abgebaut werden PE Planen sind im Gegensatz zu PVC Planen nicht langzeit witterungsbest ndig und somit nur f...

Page 3: ...aufe der Zeit an Ihrem Pavillongestell kleine Roststellen auftreten lassen sich diese schnell und unproblematisch mit einem handels blichen Tupflack berdecken Rost an Gest nge oder sen stellt keinen S...

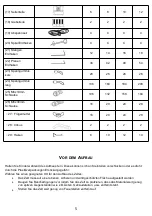
Page 4: ...14 4 25x440mm St tze 4 5 6 7 5 50x1888mm 2488mm Stange 8 10 12 14 6 38x1580mm Stange 6 6 6 6 7 110 3 Wege Verbinder 4 4 4 4 8 140 3 Verbinder 2 2 2 2 9 140 4 Verbinder 2 3 4 5 10 110 4 Verbinder 4 6 8...

Page 5: ...ie das Zelt so platzieren dass das Material weit genug von spitzen Gegenst nden wie z B sten Geb udeteilen usw entfernt steht Stellen Sie das Zelt weit genug von Feuerstellen entfernt auf 17 Seitentei...

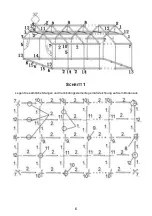
Page 6: ...6 SCHRITT 1 Legen Sie s mtliche Stangen und Verbindungselemente gem Zeichnung auf dem Boden aus...

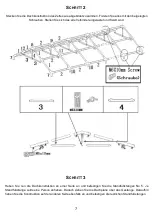
Page 7: ...erbinder eingerastet und fixiert sind SCHRITT 3 Heben Sie nun die Dachkonstruktion an einer Seite an und befestigen Sie die Standfu stangen No 5 Je Standfu stange sollte eine Person anheben Danach zie...

Page 8: ...den Grundrahmen Nutzen Sie hierf r die F e 13 14 15 sowie die Stangen 2 6 Mit den Stangenerdhaken k nnen Sie nun das Gest nge am Boden befestigen Die Haken nutzen Sie um die Seiten der Dachplane am u...

Page 9: ...ebelteil nutzen Sie die kurzen Spanngummis Fixieren nun ebenfalls das Zeltgest nge mit den Abspannseilen Abschlie end spannen Sie die Seiten und Giebelw nde mit den Planen Erdhaken am Boden ab ASSEMBL...

Page 10: ...lins in contrast to PVC tarpaulins are in no way weather resistant in the long term and therefore are only suitable for occasional and short term use PVC pavilions must be stored for 24 hours prior to...

Page 11: ...re sealed after few weeks due to dirt and dust particles If over the course of time small rust spots appear on your pavilion frame these can be covered quickly and easily with a commercially available...

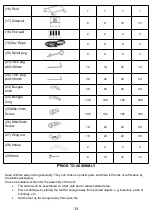
Page 12: ...x440mm Brace 4 5 6 7 5 50x1888mm 2488mm Pipe 8 10 12 14 6 38x1580mm Pipe 6 6 6 6 7 110 3 Way Connector 4 4 4 4 8 140 3 Way Connector 2 2 2 2 9 140 4 Way Connector 2 3 4 5 10 110 4 Way Connector 4 6 8...

Page 13: ...ge by placing the tent far enough away from pointed objects e g branches parts of buildings etc Set the tent up far enough away from open fire 16 Roof 1 1 1 1 17 Sidewall 6 8 10 12 18 End wall 2 2 2 2...

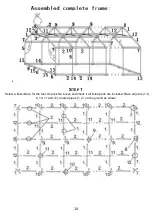
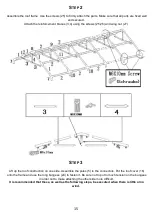
Page 14: ...14 STEP 1 Select a flat surface for the tent Unpack the boxes and check it all listed parts are included Place all joints 7 8 9 10 11 and 12 related pipes 1 2 on the ground as shown...

Page 15: ...wing nut 27 STEP 3 Lift up the roof construction on one side Assemble the poles 5 to the connectors Put the roof cover 16 onto the frame and use the long bungees 24 to fasten it Be sure not to put to...

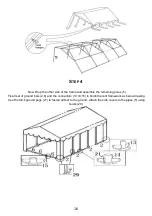
Page 16: ...d assemble the remaining poles 5 Fix all set of ground bars 2 6 and the connectors 13 14 15 to finish the tent framework as below drawing Use the thick ground pegs 21 to fasten all feet to the ground...

Page 17: ...me using the long bungees 24 Attach the end walls directly to the roof by using the short bungees 23 Use the thin ground pegs 22 to fasten the end walls and side walls to the ground The Guy rope runs...

Page 18: ...monter la tente Les b ches en PE la diff rence des b ches en PVC ne sont pas pr vues pour une utilisation de longue dur e ni r sistent aux intemp ries et conviennent donc uniquement une utilisation o...

Page 19: ...semaines en raison des d p ts de particules de salet et de poussi re Si on devait observer dans certaines pi ces du pavillon des petites taches de rouille vous pourrez les liminer facilement et rapid...

Page 20: ...20 WEITERE ARTIKEL BEI UNS ERH LTLICH...

Reviews: