background image

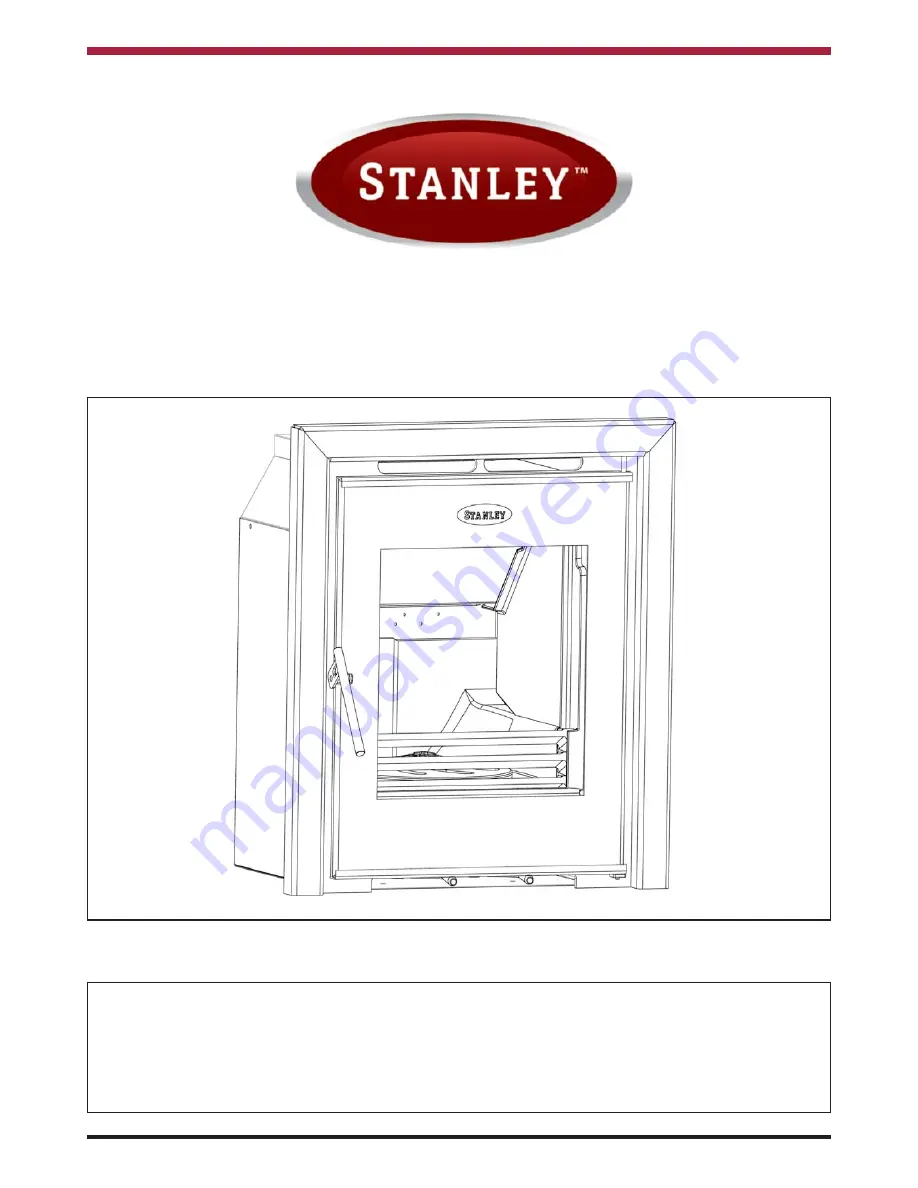
Cara Glass Non Boiler

Insert  Stove 

PLEASE RETAIN

INSTALLATION AND OPERATING INSTRUCTIONS

This appliance is hot while in operation and retains its heat for a long period of time after use.  Children,
aged or infirm persons should be supervised at all times and should not be allowed to touch the hot
working surfaces while in use or until the appliance has thoroughly cooled.

When using the stove in situations where children, aged and/or infirm persons are present a fireguard
must be used to prevent accidental contact with the stove.  The fireguard should be 
manufactured in accordance with BS 8423:2010.

Summary of Contents for Cara Glass

Page 1: ...ed or infirm persons should be supervised at all times and should not be allowed to touch the hot working surfaces while in use or until the appliance has thoroughly cooled When using the stove in situations where children aged and or infirm persons are present a fireguard must be used to prevent accidental contact with the stove The fireguard should be manufactured in accordance with BS 8423 2010...

Page 2: ...4 Location 13 15 Clearance to Combustibles 13 16 Floor Protection 14 17 Stove Dimensions 14 18 Commissioning Handover 15 19 Operation 15 20 Air Controls 15 21 Recommended Fuels 15 22 Technical Data 16 23 Lighting 16 24 Lighting The Stove 16 25 Refuelling 17 26 Slow Burning 17 27 De Ashing 17 28 Disposal of Ashes 17 29 Monthly Maintenance 18 30 Grate Removal Cleaning 18 31 Periodic Maintenance 18 3...

Page 3: ...he Installation requirements or Building Regulations will void your warranty Waterford Stanley reserve the right to replace any part due to manufacturing defect that fails within the warranty period under the terms of the warranty The unit must be used for normal domestic purposes only and in accordance with manufacturer s operation instructions 3 LIMITS OF LIABILITY The warranty does not cover Sp...

Page 4: ...erve any other appliance 8 Access should be provided to the chimney serving the appliance to allow for cleaning 9 It is a requirement by Building Regulations to have a carbon monoxide alarm fitted to any room with a solid fuel appliance Location 10 Clearance to combustible materials must be adhered to as described in the Clearance to Combustible section 11 The stove must be installed on a floor pr...

Page 5: ...ter and cleaner burning See Re Fuelling section 6 Never allow a build up of ashes in the ash pan as this will cause the grate to burn out prematurely Empty the ashpan when refuelling 7 Avoid slow burning of damp or unseasoned fuel as this will result in tarring flue ways and chim ney i e peat or timber 8 Allow adequate air ventilation to ensure plenty of air for combustion 9 Do not burn rubbish ho...

Page 6: ...pliance The complete installation must be done in accor dance with current Standards and Local Codes It should be noted that the requirements and these publications may be superseded during the life of this manual Please refer to the current standards BS EN 15287 1 2007 Design Installation and Commissioning of chimneys BS EN 14336 2004 Heating Systems in Buildings Installation Commissioning of Wat...

Page 7: ...that has proved to be unsatisfactory particu larly with regard to down draught should not be used for venting this appliance until it has been examined and any faults corrected An existing masonry chim ney should be inspected and if necessary repaired by a competent mason or relined using an approved lining system The stove must be connected to a chimney with a minimum continuous draught of 0 06 w...

Page 8: ...e spigot to the end of the15 degree adaptor Fix the 15 degree adaptor to the flue spigot using the grub screws provided Then pass the 15 degree adaptor through the flue opening and connect it to the extension pipe Step 8 Then using the M6 x 10mm screws secure the stove to the convection chamber Push the insert stove against the fireplace before fully tightening these bolts Step 9 Pull the flue lin...

Page 9: ...sembly instructions prior to lifting it Fig 5a Fig 5b Step 3 Measure the distance to the flue outlet of the stove and compare to the chimney decide on best orien tation of the offset adaptor Step 4 Push the offset adaptor into position and make a seal using approved fire cement between the adap tor and the clay liner The seal should be tapered to allow any condensation that may occur in the chimne...

Page 10: ...Fig 6 1 Grate Support 2 Fixed Baffle 3 Cast Iron Side Liners 4 Loose Baffle 5 Grate 6 Back Bricks 7 Side Bricks 8 Fire Fence 1 Grate Support Tilt the grate support up on one side and pass it carefully through the door opening it should then rest on three supports approx 100mm from the floor of the stove 2 Fixed Baffle The baffle fits to the roof of the stove using the two M6 bolts and L shaped sta...

Page 11: ...ees These can deflect wind to blow directly down the flue or create a zone of low pressure over the terminal A suitable terminal or cowl will usually effectively combat direct down blow but no cowl is likely to pre vent down draught due to a low pressure zone See Fig 9 Fig 7a Fig 7b Three Sided Frame Fit the three sided frame by placing the top section of the frame over the top hinge point for the...

Page 12: ...ea of any vent Air vents should be positioned so that they are not liable to blockage Air vents direct to the outside of the building should be located so that any air current produced will not pass through normally occupied areas of the room An air vent outside the building should not be locat ed less than the dimensions specified within the Building Regulations and B S 8303 Part 1 from any part ...

Page 13: ...ting a location for your Stanley Glass Stove a Position in the area to be heated central locations are usually best b Allowances for proper clearances to combustibles c Allowances for proper clearances for mainte nance work Clearances to Combustibles This appliance must be installed in a recess the recess should not contain any combustible material Wood battens and plaster board should not be used...

Page 14: ...nd 350mm in front of the unit and 250mm from the sides of the front edge This will provide protection from sparks and embers which may fall out when stoking on refuelling 14 STOVE DIMENSIONS Fig 13 WARNING DO NOT OBSTRUCT PRIMARY AIR SUPPLY TO THE STOVE Note Dimensions stated are in millimetres unless otherwise stated and may be subject to a slight variation 3 SIDED FRAME 4 SIDED FRAME ...

Page 15: ...the fire door Slide left to close and right to open Note When the stove is hot use the glove provided to operate the air controls Fig 14 RECOMMENDED FUELS All fuels should be stored under cover and kept as dry as possible prior to use This appliance has been tested using seasoned wood logs and manufactured briquetted smokeless fuel Ancit for closed appliances sized between 20g and 140g Other fuels...

Page 16: ... when burning wood and closed when burning coal anthracite 4 Place pieces of paper and kindling on top of the grate and add a small quantity of fuel Light the fire and close the firebox door 5 When a good fire is established open the fire door and load the fuel as required 6 Adjust the primary and secondary air controls as required depending on the fuel type being used and the heat output required...

Page 17: ... ash is disposed of replace the empty ashpan Do not leave the fire unattended with the fire door open even for a minute Fig 15 DISPOSAL OF ASHES Your stove is provided with a stainless steel ashpan This ashpan should be emptied every day If ashes are allowed to build to grate level you could damage the firebars by overheating We recom mend that you remove ashes after you have riddled the fire when...

Page 18: ...CLEANING The chimney should be cleaned twice annually or if the stove is not used for a prolonged period during the summer period it should be cleaned prior to commencement of usage The chimney can be cleaned through the stove depending on the flue configuration and the flue liner should be cleaned in accordance with manufacturer s instructions Always use a brush with plastic bristles that is the ...

Page 19: ...fixing screws See fig 18 c Lift the glass free for the bottom retaining brack et d Before fitting the new glass check the glass sealing on the door frame and replace if neces sary e Replace the sealing rope in the door if necessary CO ALARM The fitting of CO Alarms in the same room as the appliance is a compulsory requirement under cur rent Building Regulations For ROI an additional CO Alarm must ...

Page 20: ...AXX 15 DOOR FRAME 4 SIDED F01337AXX 16 STEEL DOOR F01338AXX 17 GLASS RETAINER TOP F01339AXX 18 GLASS RETAINER BOTTOM F01340AXX 19 DEFLECTOR PLATE F01344AXX 20 LH BACK BRICK H00203AXX 21 SIDE BRICK H00207AXX 22 RH BACK BRICK H00208AXX 23 DATA PLAQUE N00546AXX 24 SERIAL NUMBER PLATE F00234AXX 25 FLUE GASKET P00102AXX 26 5 FLUE Q00752AXX 27 TOP BAFFLE Q00761AXX 28 LH SIDE PLATE Q00790AXX 29 RH SIDE P...

Page 21: ...NOTES 21 ...

Page 22: ...NOTES 22 ...

Page 23: ...NOTES 23 ...

Page 24: ...N00547AXX Rev 013 YS 101017 Manufactured by Waterford Stanley Ltd Unit 401 403 IDA Industrial Estate Cork Road Waterford Ireland Tel 051 302300 Fax 051 302315 24 ...

Reviews: