background image

DO NOT REMOVE PRIOR TO SALE!

Model Nos. 4430 or 6340 –

OWNER’S MANUAL

HIGH WEARABILITY TYPE V

USER ASSISTED INFLATABLE BELT

PERSONAL FLOTATION DEVICE

ADULT UNIVERSAL – FOR PERSONS OVER 80 POUNDS

I.  APPROVAL CONDITIONS and CARRIAGE REQUIREMENTS

This 

inflatable

 belt is approved by the U S Coast Guard as  a  Type

V User Assisted Personal Flotation Device (PFD). It is  APPROVED

ONLY WHEN WORN for  use  as  a  Flotation  Aid,  Type  I I I   PFD  for

recreational  use  on  calm  inland  waters. 

It  is  not  approved  for

water  skiing  or  other  high-speed  activity.

 This  inflatable  was

designed to be more comfortable and less  restrictive  to  wear  than

inherently  buoyant  PFDs.  When  used  and  serviced  according  to

this  owner’s  manual,  this  personal  flotation  device  (PFD)  can

greatly  increase  your  chances  of  survival.  Not  recommended  for

non-swimmers or weak swimmers.  Users  of  inflatable  PFDs  must

be at least 16 years of age.

See Page 3 for Conditions for Type V Approval.

WEAR  YOUR  PFD!

  Most  drowned  victims  of  boating  accidents

owned  PFDs,  but  were  not  wearing  them  when  they  died.  Most

drowning  occurs  in  inland  waters,  not  way  out  at  sea,  and  most

within  a  few  feet  of  safety. 

If  you  DO  NOT  intend  to  wear  this

PFD,  then  SELECT  ONE  that  you  will.

   Doing  this  provides

feedback to manufacturer's, as to what makes a PFD wearable.
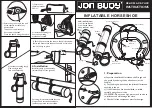
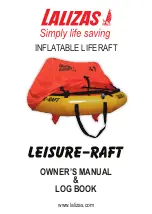
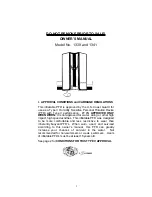
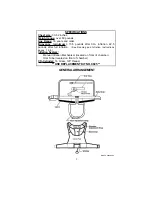
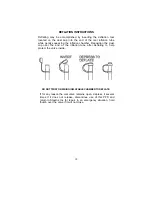
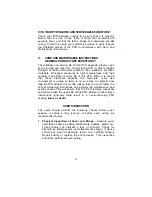
Deflated

Inflated

Summary of Contents for 4430

Page 1: ... designed to be more comfortable and less restrictive to wear than inherently buoyant PFDs When used and serviced according to this owner s manual this personal flotation device PFD can greatly increase your chances of survival Not recommended for non swimmers or weak swimmers Users of inflatable PFDs must be at least 16 years of age See Page 3 for Conditions for Type V Approval WEAR YOUR PFD Most...

Page 2: ...5 pounds after CO2 inflation 22 5 pounds after full inflation See Donning and Inflation instructions pages 7 8 Inflation System Manual Inflation Mechanism located on front of chamber Oral Tube located on front of chamber CO2 Cylinder 16 Gram 3 8 thread USE REPLACEMENT KIT NO 0925 GENERAL ARRANGEMENT Revised 2006 05 08 ...

Page 3: ...de as much buoyancy as a Type III inflatable PFD However the buoyancy that a CO2 cylinder provides is enough to turn many people to a stable face up position so that they can add additional buoyancy if necessary by blowing air into the chamber through the oral tube When fully inflated using both the CO2 cylinder and a few additional puffs of air through the oral tube the buoyancy of this PFD is eq...

Page 4: ...s to check its performance This device is not recommended for non swimmers since panic by the user in an emergency situation can prevent proper donning and inflation This PFD is not approved for children under 16 PRE DONNING INSTRUCTIONS Check the following before using this PFD 1 Inspect PFD for damage 2 Examine inflation mechanism status indicators 3 Examine CO2 cylinder face for puncture hole 4...

Page 5: ...nctured or damaged in any way discard it and install a new undamaged cylinder in the mechanism If the cylinder is OK you must properly screw it back into the mechanism 4 Cylinder Tightness When screwing the cylinder back into the PFD make sure it is snug Over tightening can damage the inflator seal but if not snug the cylinder can unscrew during use and may leak or not be punctured when the Jerk t...

Page 6: ... NEVER inflate in a tightly confined space NEVER inflate with any type of pump NEVER actuate with CO2 inflator if the belt is already fully inflated NEVER use in below freezing temperatures unless worn partly inflated At or below 40 ºF inflation time with CO2 gas will be longer Wearing a partially inflated PFD under these conditions will provide some initial buoyancy while the PFD fully inflates C...

Page 7: ...ree end of the belt Secure the excess strap by tucking it under the belt Always position the belt with the center window in front The Velcro opening should be on the bottom The Jerk to Inflate lanyard should be hanging downward Adjust Shoulder Straps to a comfortable fit 2 Pull down on the Jerk to Inflate lanyard to inflate chamber 3 Grasp the neck adjustment strap tucked under the inflated chambe...

Page 8: ...the plastic slide to loosen Shoulder Straps may need to be Loosened to adjust Waist Strap 5 After CO2 inflation the performance of the PFD may be satisfactory without further action However higher buoyancy is easily available through second stage inflation Using the oral inflation tube you may top off buoyancy to the desired level Step 4 Adjust neck strap Step 5 Oral Inflate ...

Page 9: ... of the water as much as possible to reduce the chance of inhaling water Most but perhaps not all people will be able to get their heads completely out of the water by placing their bodies in a near vertical position and float with their arms extended out over the top of the chamber see figure 1 below Once in the water with the PFD inflated you should be able to float comfortably on your back see ...

Page 10: ...ber Reposition the dust cap over the end of the inflation tube after deflating to help protect the valve inside DO NOT TWIST OR WRING INFLATABLE CHAMBER TO DEFLATE If for any reason the oral valve remains open depress it several times If it does not release discontinue use of this PFD and return to Stearns Inc for repair In an emergency situation hold thumb over the valve if it will not close ...

Page 11: ...the rearming process we suggest you throw away the old CO2 cylinder now STEP 2 Close manual inflator arm within inflator body and carefully insert a new green indicator tab so that it fully covers the red semi circle on the body STEP 3 Look into threaded cylinder receiver and view the gasket If worn contact Stearns Inc 1 800 STEARNS for the nearest certified Stearns Repair Facility ...

Page 12: ...ale Compare the weight printed on the cylinder to the actual weight If they do not match get another cylinder STEP 5 Screw new cylinder in a clockwise direction firmly into the inflator Do not over tighten but ensure the fit is tight STEP 6 Check the inflator arming indicator every boating trip The indicator and cylinder tightness tell you if there is a need for service Check the cylinder face reg...

Page 13: ...hown in Fig 1 Reference General Arrangement on page 2 Step 2 Fig 2 Roll up the air chamber on top of the neck strap with mechanism remaining on top Step 3 Fig 3 Close the cover with its tape fasteners aligning the indicator s ready status indicator to be visible through the window Step 4 Fig 4 Be sure to leave the Jerk to Inflate tab exposed at the bottom of the belt ...

Page 14: ...ese elements degrade the materials every use environment is unique so there is no sure way to estimate how long the PFD will last It is for this reason that you must follow the care and cleaning instructions and perform the maintenance and service checks This will assure that the PFD remains functional and will maximize the useful life of this PFD Failure to follow these instructions rigorously co...

Page 15: ... remove the dust protection cap and test the valve by pushing it down using the tab provided on the cap refer to Page 10 The valve should depress easily and when depressed air should escape When released the valve should automatically return to the closed position and reseal REARMING KIT S Use replacement kit no 0925 See Rearming Instructions on pages 11 and 12 CARE AND CLEANING INSTRUCTIONS Dryin...

Page 16: ...67 for your nearest certified Stearns Repair Facility VI WHY ARE PFDs REQUIRED SAFETY EQUIPMENT Drownings are the leading cause of fatalities involving recreational boating A PFD provides flotation to help keep your head above water help you stay face up in the water and increase your chances for survival and rescue Most adults only need an extra 7 to 12 pounds of flotation to keep their heads abo...

Page 17: ... you will need to use following this test 2 Put on the PFD 3 Actuate the inflation system by jerking firmly downward on the pull tab The PFD should fully inflate within 5 seconds 4 Pull neck strap over head and adjust See MAXIMIZING PERFORMANCE on Page 9 5 Get into shallow water just deep enough that you can stand with your head above the surface 6 See if the PFD will float you on your back or jus...

Page 18: ...ell enough to complete inflation without touching bottom either orally or manually Note this level of inflation because it is the minimum needed for you to safely use this inflatable PFD 6 Fully inflate the PFD using the oral inflator 7 See if the PFD will float you on your back or slightly back of vertical In a relaxed floating position verify that your mouth is well above the water s surface Not...

Page 19: ...19 ...

Page 20: ...pothermia HOW HYPOTHERMI A AFFECTS MOST ADULTS Water Temperature C F Exhaustion or Unconsciousness Expected Time of Survival 0 3 0 3 TO 4 4 4 4 TO 10 10 TO 15 6 15 6 TO 21 1 21 1 TO 26 7 Over 26 7 32 5 32 5 to 40 40 to 50 50 to 60 60 to 70 70 to 80 Over 80 UNDER 15 MIN 15 TO 30 MIN 30 TO 60 MIN 1 TO 2 HOURS 2 TO 7 HOURS 2 TO 12 HOURS INDEFINITE 15 TO 45 MIN 30 TO 90 MIN 1 TO 3 HOURS 1 TO 6 HOURS 2...

Page 21: ...eat loss and increase your survival time 3 To conserve body heat use the standard H E L P position Keep your arms as close to your body as possible to reduce the amount of skin surface that is exposed to the water Keeping water out of your arm pits is especially important Drawing your legs up into a seated position with your knees together will also help to conserve body heat 4 Keep a positive att...

Page 22: ...FD If it doesn t fit properly get one that does An altered device is no longer Coast Guard approved 7 Your PFD is not intended for use as a fender or kneeling pad 8 If your PFD is wet allow it to dry thoroughly before storing it Store it in a well ventilated area 9 Do not dry your PFD in front of a radiator or other source of direct heat XI ADDITIONAL INFORMATION If you need more information about...

Page 23: ...ber fabric over time Oral inflation will be necessary to maintain full buoyancy BUDDY LINE INFORMATION Buddy lines when provided are to be used by people adrift in the water to attach themselves to one another and aid in staying together Buddy lines are not designed for lifting IF YOU HAVE ANY QUESTIONS ABOUT THE INITIAL ARMING REARMING REPACKING OR NEAREST CERTIFIED STEARNS REPAIR FACILITY CALL 1...

Reviews: