background image

electric


towel


radiator


e

-

vento

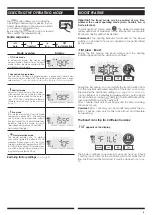
OPTIONAL: RF REMOTE CONTROL

User-/installation manual

Safety instructions ................................2
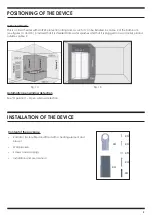
Positioning of the device....................3
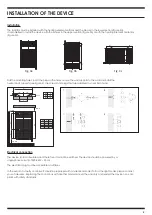
Installation of the device ...................3
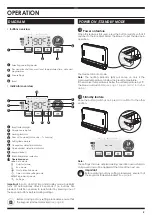
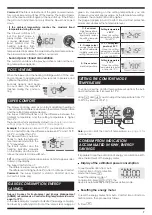
Operation.............................................5
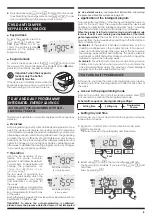
User settings .......................................14
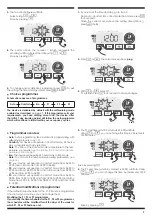
Installler settings .................................17
Expert settings ....................................20
Maintenance tips ..............................24
Technical data ..................................25

EN

Summary of Contents for E-VENTO 0184B0002

Page 1: ...ONAL RF REMOTE CONTROL User installation manual Safety instructions 2 Positioning of the device 3 Installation of the device 3 Operation 5 User settings 14 Installler settings 17 Expert settings 20 Maintenance tips 24 Technical data 25 EN ...

Page 2: ...cted to ensure the safety of the installation and of the user Should any problem arise please contact your professional installer Please keep away from children aged less than 3 unless they are under permanent supervision Children aged 3 to 8 are only permitted to turn the device on or off if the device has been placed or installed in a normal position and if the children are supervised or have be...

Page 3: ...d that it is shielded from water splashes and that it is plugged in a wall socket placed outside volume 2 Automatic open window detection See Operation Open window detection INSTALLATION OF THE DEVICE Content of the package Radiator factory filled and fitted with a heating element and blower Wall brackets Screws and wall plugs Installation and user manual x4 x4 x4 x4 x8 x4 x4 Fig 1a Fig 1b ...

Page 4: ...your kind of wall RL 90 110 40 F 30 150 MIN H2 H1 RH 200 MIN 150 MIN RL F 495 320 585 410 RH H1 H2 Lorem ipsum 775 255 450 1181 255 856 1411 255 1086 1763 255 1438 Electrical connection The device is class II insulated and therefore it cannot be earthed The device should be powered by a single phase current of 220 240V 50 Hz The electrical plug must be accessible at all times In the event of a fau...

Page 5: ...o set temperatures time date and programmes 2 Indicators overview Before carrying out any setting procedures ensure that the keypad is indeed unlocked see page 8 POWER ON STANDBY MODE Power on feature When this feature is first used press the button switch so that it switches to the I located below the blower to put the device in operation The device is in Auto mode Note The heating indicator ligh...

Page 6: ...is mode when you will be away from your home for a long time more than 5 days Important the Boost mode can be enabled at any time whatever the current operating mode Auto Comfort Eco or Frost protection To activate Boost mode press the desired temperature setting will be set at maximum for the time period you request 60 minutes display will flash by default Comment if the heating indicator is swit...

Page 7: ...perature set up from the Auto and Comfort Mode It is preset to 19 C SETTING THE COMFORT MODE TEMPERATURE It is possible to see the estimation of energy consumption in kWh since the last reset of the energy meter CONSUMPTION INDICATION ACCUMULATED IN KWH ENERGY SAVINGS Display of the estimated power consumption To reset the energy meter from Auto Comfort Eco or Frost pro tection mode then proceed a...

Page 8: ...ly the new pro gram for the next 7 days Then week after week the device will continue to optimize the intelligent program Auto adjusting the Comfort and Eco periods to fit closely to your lifestyle When the product is in Frost protection mode or in standby mode for more than 24 hours learning and optimization of the intelli gent program stops the device stores the previously recorded program from ...

Page 9: ...m 09 00 to 16 00 and from 22 00 to 06 00 P3 your device will operate in Comfort mode from 06 00 to 08 00 from 12 00 to 14 00 and from 18 00 to 23 00 and in Eco mode from 23 00 to 06 00 from 08 00 to 12 00 and from 14 00 to 18 00 1 If you just set the time and day go to step 2 From Auto Comfort Eco or Frost protection mode press for 5 seconds When the cursor moves above the setting time symbol pres...

Page 10: ...nce days numbers Monday 1 Tuesday 2 Wednesday 3 Thursday 4 Friday 5 Saturday 6 Sunday 7 Prior information display area 2 1 If you just set the time and day the cursor moves automati cally under PROG From Auto Comfort Eco or Frost protection mode then press for 5 seconds When the cursor positionned under the set time symbol press again 5 Once you have chosen a programme for each day confirm your se...

Page 11: ...he favoured location another location Overview Lowering temperature cycle by setting frost protection during ventilation of a room by opened window You can access the open window detection from the Comfort Eco and Auto mo des Two ways to enable the detector Automatic activation the lowering temperature cycle starts as soon as the blower detects a temperature change Manual activation the cycle of l...

Page 12: ...e ring of the setting temperature resulting in energy savings To ensure proper operation do not block the sensor s field of view by any obstacle curtains furniture Lowering the temperature during unoccupied periods Unchangeable factory settings Unoccupied periods Value of lowering setting temperature 20 minutes Comfort 1 C 40 minutes Comfort 1 5 C 1 hour Comfort 2 C 72 hours Frost protection Note ...

Page 13: ... described in this instructions manual For installing and using the remote control refer to its instructions manual 1 From Frost protection mode press for 5 seconds 5 sec RF pairing between the remote control and the blower The remote control and the blower are not bonded together at the factory then proceed as follows 2 The blower is in pairing mode Then proceed to the remote control pairing refe...

Page 14: ... 5 C Important whatever the lowering level is set at the Eco setting temperature will never exceed 19 C 3 Press or to obtain the temperature level you require SETTING THE FROST PROTECTION TEMPERATURE Your device is preset at 7 C You can adjust the Frost protection temperature from 5 C to 15 C by intevals of 0 5 C 6 Press to save and move to the next setting To exit the user settings press twice 5 ...

Page 15: ... to change it press the device changes automatically to set the maximum setting To exit the user settings press twice 2 1 10 To change the maximum temperature setting press or To save and move automatically to the next setting press To exit the user settings press twice 2 1 SETTING OF THE MAXIMUM DURATION OF AUTHORISED BOOST The maximum duration of Boost is preset at 60 minutes You can adjust it f...

Page 16: ...the temperature unit press rest appears on the display 2 NO appears Press or to select YES yes Factory settings reset NO Factory settings not reset 3 Press the key for 5 seconds The device returns to its initial configuration and goes back automatically to the home dis play of the user settings 5 sec Parameters Factory settings Operation Comfort setting temperature 19 C Boost duration 60 min Keypa...

Page 17: ...save and move automatically to the next setting press To exit the user settings press 3 times DUAL OPTIMIZATION FEATURE Overview Dual function optimization priority to comfort or energy sa vings the choice is yours Depending on various parameters room inertia ambient temperature desired temperature the device calculates and optimizes the programming for each heating period whether set to Comfort o...

Page 18: ... window detection settings Setting the Eco mode temperature lowering level Setting the Frost protection temperature Optimization choice Occupancy detection settings 3 important steps are needed for the first use of the PIN code lock 1 PIN code initialisation enter the preset PIN code 0000 to access the feature 2 Activation of the PIN Code to lock settings which will be protected by the PIN code 3 ...

Page 19: ...c 1 When On appears press for at least 5 seconds 5 sec To exit the user settings press twice 2 The 0000 code appears and the first number blinks Press or to select the first desired number then press to save and exit Repeat this operation for the next 3 numbers 1 2 Settings Factory settings Operation Comfort setting temperature 19 C Boost duration 60 min Keypad lock Disabled User settings Backligh...

Page 20: ...e for a deviation from 5 C to 5 C by intervals of 0 1 C Important Before carrying out the calibration it is recommended to wait for 4h after the setting temperature modification to insure that the ambient temperature is stabilized Ambient temperature sensor adjustment 1 If the room temperature difference is negative example Setting temperature what you want 20 C Ambient temperature what you read o...

Page 21: ...ral heating installation to control an hydraulic towel rail In this case the blower will manage a motorized valve installed on the towel rail By default the blower has been configurated to control an electrical towel rail 1 ELEC appears on the display By pressing or you can change the energy type used by the towel rails ELEC electric energy HYdr hydraulic energy Not available in this version To op...

Page 22: ...f the Boost 35 C Temperature unit C Installer settings Automatic open window detection Enabled Occupancy detection Enabled Dual optimization feature Opti comfort PIN code protection Disabled Value of the PIN code 0000 Expert settings Energy type Elec Power 500W Internal temperature monito ring 65 C If the PIN code protection is disabled the user installer and expert settings are re initialized 1 F...

Page 23: ...g the filter let it dry Important it is recommended to clean the filter at least once a month unless the writing FILT appears on the display prematurely Before any action of filter removal switch off the device by pressing the button located under the blower 3 Once cleaned and dried replace the filter in its slot by inser ting it into the runners IN CASE OF POWER CUT BACKUP After short power cuts ...

Page 24: ...professional actions of such a kind immediately cancel the warranty Waste disposal The symbol on the product label indicates that the product may not be handled as domestic waste but must be sorted separately When it reaches the end of its useful life it shall be returned to a collection facility for electrical and electronic products By returning the product you will help to prevent possible nega...

Page 25: ...A kW two or more manual stages no room temperature control No Maximum heat output Pmax c 1 35 1 55 1 65 1 85 1 95 kW with mechanic thermostat room temperature control No Auxiliary electricity consumption with electronic room temperature control No At nominal heat output Elmax None kW with electronic room temperature control plus day timer No At minimum heat output Elmin None kW with electronic roo...

Page 26: ......

Reviews: