background image

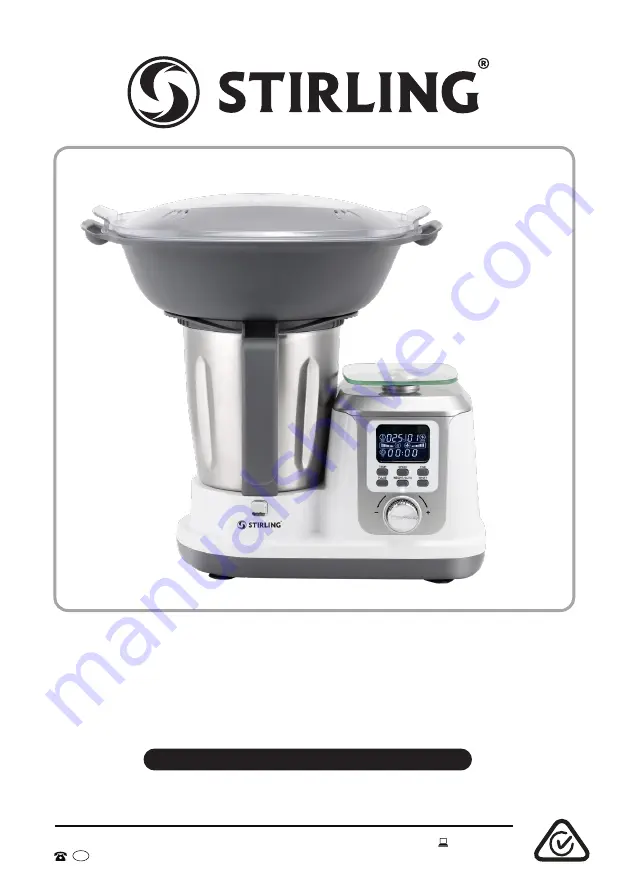
Model Number TC936

Thermo Cooker

INSTRUCTION MANUAL

AUS

AFTER SALES SUPPORT

MODEL: TC936   PRODUCT CODE:  708322   3/2022

1300 112 534

tempo.org/support

Summary of Contents for TC936

Page 1: ...Model Number TC936 Thermo Cooker INSTRUCTION MANUAL AUS AFTER SALES SUPPORT MODEL TC936 PRODUCT CODE 708322 3 2022 1300 112 534 tempo org support ...

Page 2: ... choosing to buy a STIRLING product All products brought to you by STIRLING are manufactured to the highest standards of performance and safety and as part of our philosophy of customer service and satisfaction are backed by our comprehensive 3 Year Warranty We hope you will enjoy using your purchase for many years to come ...

Page 3: ...4 tempo org support Contents 02 Welcome 04 Warranty Details 05 General Safety Instructions 09 Product Overview 14 Getting Started 15 Parts Assembly and Removal 19 Instructions 31 FAQs and Error Messages 32 Other Useful Information 35 Repair and Refurbished Goods or Parts Notice ...

Page 4: ...that the consumer has under the Competition and Consumer Act 2010 and similar state and territory laws Our goods come with guarantees that cannot be excluded under the Australian Consumer Law You are entitled to a replacement or refund for a major failure and to compensation for any other reasonably foreseeable loss or damage You are also entitled to have the goods repaired or replaced if the good...

Page 5: ... outer housing in or under running water If the appliance is accidentally immersed or liquid is spilled into the controls immediately unplug the appliance dry it and have it checked by qualified service personnel Moisture Ensure your hands are dry before handling the plug or switching on Protect the power cord Unwind the power cord fully before use Do not kink bend strain or damage the cord and pr...

Page 6: ...d use and only use it as described in this manual Do not use it in moving vehicles or boats Do not operate it without food in the jug Misuse may cause injury and or damage We accept no responsibility for any eventual injury or damage caused by improper or faulty use or noncompliance with these instructions Indoor use Do not use the appliance outdoors or in areas of high humidity Accessories Only u...

Page 7: ...y increase the speed when the temperature is or has been set to more than 60 C When processing hot food above 60 C do not touch the measuring cup or press the pulse button CAUTION HOT Do not touch hot surfaces The hot surface marking inside the jug indicates that the jug surfaces will be high during use and retain heat for some time after the machine has been switched off Do not touch hot surfaces...

Page 8: ...ot marking in the jug for heating and processing food and liquid 0 5 L maximum capacity when heating milk do not fill past the lowest marking in the jug when heating milk 0 5 L minimum quantity of water required when steaming food This quantity is sufficient for steaming food for 30 minutes Automatic speed level and temperature adjustments The machine will automatically adjust the speed level or s...

Page 9: ...er the page for an illustration of the accessories Rear view Fig 2 12 13 A Thermo cooker 1 Measuring cup lid closure 2 Jug lid 3 Jug with blade inside 4 Jug handle 5 Electronic scales 6 LCD display 7 Control panel 8 Adjustment knob 9 Main appliance base 10 Jug release button 11 Slip resistant feet 12 Power cord connection 13 Power ON OFF switch Angled front view Fig 1 ...

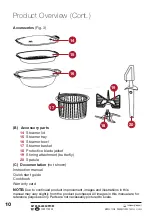
Page 10: ...t purchased All images in this manual are for reference purposes only Parts are not necessarily pictured to scale Product Overview Cont 17 18 19 20 14 15 16 B Accessory parts 14 Steamer lid 15 Steamer tray 16 Steamer bowl 17 Steamer basket 18 Protective blade jacket 19 Stirring attachment butterfly 20 Spatula C Documentation not shown Instruction manual Quick start guide Cookbook Warranty card Acc...

Page 11: ...ng 1 5 L Maximum capacity for heating food Do not fill past this line for heating and processing food and liquid The hot surface marking indicates that the jug can get hot during use and retain heat for some time after the machine has been switched off CAUTION Do not touch hot surfaces with bare hands Take care to avoid scalding 0 5 L Minimum amount of water required when steaming food 0 5 L Maxim...

Page 12: ...mperature indicator C Range 37 C 40 C 50 C 60 C 70 C 80 C 90 C 100 C 110 C 120 C B Heating indicator bar flickers when the heating function is in use C Time indicator min sec D Speed level indicator 1 to 10 1 to 3 or number of automatic program E Speed indicator bar flickers when the motor is working F Weight indicator g A B C D E F 1 2 3 4 5 6 7 8 9 Fig 5 ...

Page 13: ...crease or to the left to decrease the temperature time or speed 6 TIME button Press to select the timer function When the time icon is flashing turn the ADJUSTMENT knob to set the desired time range 1 second to 60 minutes From 1 30 seconds the time is adjusted in 1 second steps From 30 seconds onwards the time is adjusted in 10 second steps 7 RESET button Press and hold for 3 seconds to clear all ...

Page 14: ...terials are to be disposed of please recycle them where possible Plastic wrapping can be a suffocation hazard for babies and young children so ensure all packaging materials are out of their reach and disposed of safely Inspect all parts of the appliance for visual damage Unwind the power cord to its full length and inspect the cord and plug for damage Do not use the appliance if any part of the a...

Page 15: ...rrow on the handle with the open lock icon on the lid Fig 7 Then press down firmly and turn the lid clockwise to lock until the arrow on the handle is aligned with the closed lock icon Fig 8 A B and the lip with the front of the jug Fig 9 D Fig 6 Fig 7 Fig 8 Fig 9 Installing the measuring cup Use the supplied measuring cup to cover the pouring hole in the lid Turn it clockwise to secure it in plac...

Page 16: ...assembly at the bottom of the jug may be removed for cleaning Fig 10 CAUTION The blade is very sharp handle it with utmost care Only hold the blade by the upper part The sealing ring must be fitted on the blade Without this sealing ring the food to be processed or heated may leak out and damage the appliance Please use the protective blade jacket when assembling or disassembling the blade to preve...

Page 17: ...ism at the underside of the jug Fig 14 in anticlockwise direction so the closed lock icon is aligned with the arrow Fig 15 When the blade is securely attached turn over the jug ready for use Fig 16 Removing the blade Before removing the blade from the jug take the jug off the base of the appliance With one hand hold the blade carefully by the upper part and with the other hand carefully turn the l...

Page 18: ... part of the butterfly and pull it off the blade while rotating it gently in both directions Parts Assembly and Removal Cont Fig 17 Using the electronic scales Plug the machine into an appropriate electrical outlet and switch on the power to the outlet Set the ON OFF switch at the back of the machine to the ON position I The LCD shows the current room temperature and 00 00 Press the WEIGHT button ...

Page 19: ...st select the program and leave the rest to the machine There are automatic programs for sautéing emulsifying stirring pureeing milling mixing kneading steaming whipping up smoothies and crushing ice Usage descriptions for these programs and a table with their parameters are provided on the following pages For manual operation of the Stirling Thermo Cooker please refer to the general usage instruc...

Page 20: ...onfirm The program will start immediately and the display will show the speed 1 temperature 100 C and time 06 00 counting down 2 Press and hold the WEIGHT button for 2 seconds to select the Emulsify program The display will show 0 turn the adjustment knob to 2 then press the knob to confirm The program will start immediately and the display will show the speed 4 temperature room temperature no hea...

Page 21: ...ounting down 7 Press and hold the WEIGHT button for 2 seconds to select the Knead program The display will show 0 turn the adjustment knob to 7 then press the knob to confirm The program will start immediately and the display will show the speed 3 temperature room temperature no heating and time 02 00 counting down 8 Press and hold the WEIGHT button for 2 seconds to select the Steam program The di...

Page 22: ... 5 Plug in the appliance and switch it on using the POWER switch at the back of the appliance 6 Set the required time max 1 hour and select the speed 1 10 1 3 If you select the speed more than 6 including 6 the setting time should be less than half an hour 7 Press the START PAUSE button The appliance will start working and the timer starts counting down or up if you skip the timer setting 8 Five s...

Page 23: ...ding to your recipe 7 Press the START PAUSE button The appliance will start working and the timer starts counting down or up if you skip the timer setting 8 Five seconds before the end of the set time the appliance will emit a beep sound to alert you that the program is about to finish 9 At the end of the operation the LCD backlight will start flashing and the machine will start beeping every 20 s...

Page 24: ...rding to your recipe NOTE For egg whites set the speed to 4 and the time to 2 3 minutes 8 Press the START PAUSE button The appliance will start working and the timer starts counting down or up if you skip the timer setting 9 Five seconds before the end of the set time the appliance will emit a beep sound to alert you that the program is about to finish 10 At the end of the operation the LCD backli...

Page 25: ...ds pause 10 seconds forward 1 2 seconds pause 10 seconds in reverse and so on until the end of the set time 8 Press the START PAUSE button The appliance will start working and the timer starts counting down or up if you skip the timer setting 9 Five seconds before the end of the set time the appliance will emit a beep sound to alert you that the program is about to finish 10 At the end of the oper...

Page 26: ...iance will emit a beep sound to alert you that the program is about to finish 11 At the end of the operation the LCD backlight will start flashing The machine will start beeping every 20 seconds for about 1 minute After another minute the LCD backlight will stop flashing and the screen will turn off after another minute 12 If you want to heat your food for a few more minutes set the speed back to ...

Page 27: ...g on the base of the main appliance 2 Add between 0 5 L and 1 5 L of water for steaming into the jug IMPORTANT The minimum amount of water required is 0 5 L This amount is sufficient for steaming food for 30 minutes 3 Put the food to be steamed into the small steamer basket For a pictorial representation of the jug assembly with the steamer basket please refer to Fig 18 Fig 18 4 Cover the jug with...

Page 28: ...ll stop flashing and the screen will turn off after another minute 13 After use switch off and unplug the appliance 14 Remove the jug from the jug socket on the base take off the jug lid 15 The steamer is hot so take care when you remove it from the jug so that you do not burn your skin You can use the hook A on the scraper blade to grip the handle of the steamer basket B and remove the basket wit...

Page 29: ...g chapter 1 Install the blade on the bottom of the jug and then install the jug on the base of the main appliance Fig 21 2 Add between 0 5 L and 1 5 L of water for steaming into the jug IMPORTANT The minimum amount of water required is 0 5 L This amount is sufficient for steaming food for 30 minutes 3 Cover the jug with the lid turning it firmly until it is locked in position Do NOT add the measur...

Page 30: ...ng every 20 seconds for approximately 1 minute After another minute the LCD backlight will stop flashing and the screen will turn off after another minute 14 After use switch off and unplug the appliance 15 Lift the steamer assembly off the jug holding it carefully by the handles CAUTION Hot steam may escape and or hot water may drop off the steamer surfaces Handle with care to avoid scalding 16 R...

Page 31: ...ade does not rotate The appliance is incorrectly assembled Make sure all parts of the appliance are properly assembled see the Parts Assembly and Removal chapter for instructions The display screen shows error code E02 The sensor cannot connect or is broken The appliance has failed and needs to be serviced Call our after sales support centre for advice The display screen shows error code E03 The b...

Page 32: ... every use Before you start cleaning the appliance make sure to switch off and unplug the appliance and let the appliance cool down Blade When the jug has cooled down remove the blade from the jug CAUTION The blade is very sharp Handle it with care Only hold it by the upper part Clean the blade carefully in hot soapy water Make sure to remove any food residues from around the sealing ring Rinse an...

Page 33: ...e appliance Only the blade will benefit from occasional lubrication If the appliance requires repair or service please contact our after sales support centre for advice Our after sales support centre stocks the following spare parts for the appliance To purchase a part call the centre on 1300 112 534 or access support online via tempo org support Blade Butterfly stirring attachment Jug Jug lid Mea...

Page 34: ...omplies with the relevant guidelines of the ACMA as well as corresponding government requirements for the safety of electrical devices Responsible disposal Packaging materials are recyclable Please dispose of them responsibly for recycling At the end of its working life do not throw this appliance out with your household waste Electrical and electronic products contain substances that can have a d...

Page 35: ...ocess of repair some or all of your stored data may be lost We recommend you save this data elsewhere prior to sending the product for repair You should also be aware that rather than repairing goods we may replace them with refurbished goods of the same type or use refurbished parts in the repair process Please be assured though refurbished parts or replacements are only used where they meet ALDI...

Page 36: ...orm to your expectations make sure to contact our After Sales Support Centre on 1300 112 534 for advice For an electronic copy of this manual please contact our after sales support centre Instruction Manual Revision Index Version No Issue Date Description V1 5 9 December 2020 Original 2021 release V2 0 18 November 2021 2022 release V2 1 7 December 2021 Minor update page 11 Please read the manual I...

Reviews: