Tent
Body
A
B
C
Roll out tent body and bottom tray on floor.
Assemble bottom pole sections and corner
connectors inside the bottom tray.
2
L (3x3) Model Shown
XL (4x4)≈ Model Shown
ASSEMBLY INSTRUCTIONS
Start at the bottom.
Insert pole sections into bottom corner
connectors. Use pole connectors as needed
to build vertical pole sections (A & B). Place
corner connectors at the very top of each
vertical pole (C).*
3
Assemble vertical poles.
1
Identify and organize parts.
All models have similar parts to those shown below. Lay
out all parts in groups, allowing plenty of space for assembly.
4
Connect roof frame.
Insert pole sections between top corner
connectors.* Make sure pole sections are
inserted all the way into connectors.
5
Work tent body over frame.
Raise roof of tent body and gently work over
top of frame.
NOTE: 2 people are required for
4x8 model assembly.
6
Install extra supports.
Attach end clips to remaining pole sections.
Install in roof as desired for your model,
depending on where you plan to install
support for lights, fans, etc.
7
Install liner and cover(s).
Fold out tray liner in bottom tray and smooth
flat, making sure it reaches all corners. Secure
vent cover(s) over vents if desired.
8
Start growing!
Smooth out any remaining folds and wrinkles.
Check all zippers to make sure they work
smoothly. START GROWING!
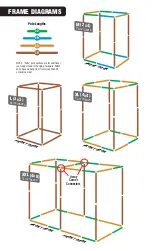
4x8 model – Connectors
with 4 holes go on both
middle poles on 8’ sides.
B
F
G
D
E
C
A
A
Vent Cover(s)
B
Tray Liner
C
Corner Connectors
D
End Clips
E
Pole Connectors
F
Pole Sections
G
Tent Body
*Refer to Frame Diagrams on
reverse for pole positioning
on your particular model.
2 PEOPLE
Recommended
for Assembly
SEE
ASSEMBLY
VIDEO
http://youtu.be/qCy5H6-ipBE


