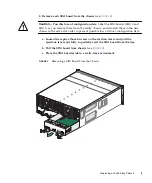
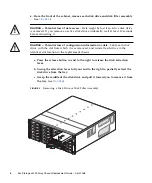
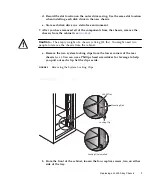
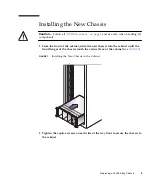
background image

Sun Microsystems, Inc.
www.sun.com

Submit comments about this document at:

http://www.sun.com/hwdocs/feedback

Sun Storage J4400 Array

Chassis Replacement Guide

Part No. 820-4601-10
April 2008, Revision A

Summary of Contents for Sun Storage J4400

Page 1: ...Sun Microsystems Inc www sun com Submit comments about this document at http www sun com hwdocs feedback Sun Storage J4400 Array Chassis Replacement Guide Part No 820 4601 10 April 2008 Revision A ...

Page 2: ...yright 2008 Sun Microsystems Inc 4150 Network Circle Santa Clara Californie 95054 Etats Unis Tous droits réservés Sun Microsystems Inc a les droits de propriété intellectuels relatants à la technologie qui est décrit dans ce document En particulier et sans la limitation ces droits de propriété intellectuels peuvent inclure un ou plus des brevets américains énumérés à http www sun com patents et un...

Page 3: ... Array Chassis 1 Prerequisites 1 Verifying a Chassis Failure 1 ESD Precautions 2 Removing a Chassis 2 Installing the New Chassis 9 Installing CRUs Into a New Chassis 11 Completing the Chassis Installation 14 Related Documentation 15 ...

Page 4: ...iv Sun Storage J4400 Array Chassis Replacement Guide April 2008 ...

Page 5: ...l authorized for access have been instructed on the reasons for the restrictions and any precautions that need to be taken Prerequisites Before you start to replace a failed chassis you must Back up all data stored on the array Stop all system I O to the array Verify that the failed chassis is ready to be removed Prepare the work site and observe all ESD Precautions on page 2 Remove all power from...

Page 6: ...ded surface After removing a CRU from the cabinet immediately place it on an antistatic mat Handle any card that is part of a CRU by its edges only and avoid touching the components or circuitry Do not slide a CRU over any surface Limit body movement which builds up static electricity during the removal and replacement of a CRU Removing a Chassis Caution You must remove power from the chassis that...

Page 7: ...ini SAS cable connection see FIGURE 1 for reconnection to the same connectors on the replacement chassis For example Tray 1 SIM Link Out to Tray 0 Host or SIM Link IN 4 Disconnect the labeled mini SAS cables from each SIM board a Grasp the metal body of the connector with one hand and use your other hand to firmly grasp and pull the tab b Pull the tab gently toward the connector body and then with...

Page 8: ...it see FIGURE 1 Caution Electrical Shock Hazard The power supplies in this equipment can produce high energy hazards Only instructed personnel with authorized access to this equipment can remove and replace modules in the system a Loosen the two captive thumb screws on the power supply ejection levers and swing the ejection levers fully outward to partially eject the power supply from the tray see...

Page 9: ...s and reinstall them in the new chassis in the same slot order to prevent possible loss of driver configuration data a Loosen the captive thumb screws on the ejection levers and pull the ejections levers out fully to partially eject the SIM board from the tray b Pull the SIM board from chassis see FIGURE 3 c Place the SIM board aside in a static free environment FIGURE 3 Removing a SIM Board From ...

Page 10: ...ution Potential loss of configuration information or data Label each disk drive with the slot from which it was removed and reinstall each drive in the identical slot location in the replacement chassis a Press the release button in and to the right to release the disk extraction lever b Swing the extraction lever fully out and to the right to partially extract the disk drive from the tray c Grasp...

Page 11: ... see FIGURE 6 Caution The empty weight of a chassis is 14 kg 32 lbs You might need two people to remove the chassis from the cabinet a Remove the two system locking clips from the lower corners of the rear chassis see You can use a Phillips head screwdriver for leverage to help you pull out each clip Set the clips aside FIGURE 5 Removing the System Locking Clips b From the front of the cabinet loo...

Page 12: ... 2008 c Grasp each side of the chassis and pull it toward you and remove it from the cabinet see FIGURE 6 FIGURE 6 Removing the Failed Chassis From the Cabinet d Package the failed chassis and return it to Sun if instructed to do so or properly dispose of it ...

Page 13: ...ling all components 1 From the front of the cabinet slide the new chassis into the cabinet until the front flanges of the chassis touch the vertical face of the cabinet see FIGURE 7 FIGURE 7 Installing the New Chassis in the Cabinet 2 Tighten the captive screws on each side of the tray front to secure the chassis to the cabinet ...

Page 14: ...f the cabinet slide a system locking clip onto each lower corner of the chassis see FIGURE 8 You can use a Phillips head screwdriver for leverage to help you push in the clip FIGURE 8 Installing the System Locking Clips Locking Clip Installed Locking Clip Mounting Rail J4400 Tray ...

Page 15: ...moved in the failed chassis as defined by the notation written on the drive outer case when each drive was removed a Unlatch and swing the extraction lever to its fully open position b Align the disk component with the open slot and slide the drive into the tray until the extraction lever engages with the tray connectors and the lever begins to swing closed c Press the extraction lever closed unti...

Page 16: ...m which they were removed in the failed chassis For each SIM board a Swing both extraction levers to the fully open position b Align the SIM board with the open slot and slide it into the tray until it engages with the tray connectors and the extraction levers begin to swing closed c Simultaneously push both extraction levers toward the middle of the board to seat it in the tray d Tighten the extr...

Page 17: ...tion b Align the power supply with the open slot and slide it into the tray until it engages with the tray connectors and the extraction levers begin to swing closed c Simultaneously push both extraction levers toward the middle of the power supply to seat it in the tray d Tighten the extraction lever captive screws to secure the power supplies FIGURE 11 Installing a Power Supply ...

Page 18: ... on each SIM board in the new chassis 1 From the back of the cabinet see FIGURE 12 reconnect the country specific power cables into each of the power supply connectors 2 Replace the power cord tie strap on each power cord 3 Turn on power to both power supplies FIGURE 12 Reconnecting the Mini SAS and Power Cables Connection Between Tray 0 and Tray 1 Power Cord Connection from Host or SIM Link IN to...

Page 19: ... shut off once the second power cord is connected Related Documentation For additional information about the Sun Storage J4400 Array chassis see the following product documentation Application Title Part Number Regulatory and safety information Sun StorageTek Regulatory and Safety Compliance Manual 96272 Revision A Multilanguage safety information Important Safety Information for Sun Hardware Syst...

Page 20: ...orage J4200 J4400 Array Disk Drive Replacement Guide 820 3225 nn SIM board replacement procedures Sun Storage J4200 Array SIM Board Replacement Guide 820 3226 nn SIM board replacement procedures Sun Storage J4400 Array SIM Board Replacement Guide 820 4600 nn Power supply replacement procedures Sun Storage J4200 Array Power Supply Replacement Guide 820 3227 nn Fan replacement procedures Sun Storage...

Page 21: ...Replacing a J4400 Array Chassis 17 ...

Reviews: