background image

SunFounder Pironman

www.sunfounder.com

Nov 01, 2022

Summary of Contents for Pironman

Page 1: ...SunFounder Pironman www sunfounder com Nov 01 2022 ...

Page 2: ......

Page 3: ... Screen 16 5 5 Set up the Pironman 23 5 1 Change the config txt 23 5 2 Install pironman module 23 5 3 Modify the Configuration 24 6 6 About Hardware 27 6 1 Features 27 6 2 Main Board 29 6 3 OLED Screen 30 6 4 Cooling Fan 31 6 5 WS2812 RGB Strip 31 6 6 Power Button 32 6 7 IR Receiver 32 6 8 M 2 SATA SSD 33 7 7 Appendix 39 7 1 Remote Desktop 39 7 2 Install Kodi on Raspberry Pi Use OSMC 48 i ...

Page 4: ...ii ...

Page 5: ...9 C at 25 C room temperature 0 96 OLED Display showing Raspberry Pi s CPU usage temperature disk usage IP address RAM usage etc Onboard USB to M 2 SATA SSD TRIM supported RGB Fan with GPIO control 16 WS2812 Addressable RGB LEDs IR Receiver for multi media center like Kodi or Volumio External GPIO extender with pin name label Power status memory remembers the power status automatically boot after a...

Page 6: ...SunFounder Pironman 2 CONTENTS ...

Page 7: ...he M 2 SSD interface only supports SATA protocol not NVME PCIe For more information on how to mount SSD to Pironman and the related configuration please refer to M 2 SATA SSD In the Pironman s mainboard there is an M 2 SSD connector for installing your M 2 SSD An M 2 SSD is a small form factor solid state drive SSD that is used in internally mounted storage expansion cards M 2 SSDs conform to a co...

Page 8: ...oard and a USB mouse are also needed Sound or Earphone The Raspberry Pi is equipped with an audio port about 3 5 mm that can be used when your screen has no built in speakers or when there is no screen operation 4 Chapter 1 1 What Else Should We Prepare ...

Page 9: ...at all parts and components have been included If there are any missing or damaged components please contact SunFounder immediately at cs sunfounder com to resolve the issue as soon as possible Please follow the steps on the following PDF for assembly instructions PDF Component List and Assembly of Pironman 5 ...

Page 10: ...SunFounder Pironman 6 Chapter 2 2 Component List and Assembly Instructions ...

Page 11: ...on for most users as it will download the image and install it automatically to the SD card Visit the download page https www raspberrypi org software Click on the link for the Raspberry Pi Imager that matches your operating system when the download finishes click it to launch the installer Step 2 When you launch the installer your operating system may try to block you from running it For example ...

Page 12: ...like to install it on Note You will need to be connected to the internet the first time That OS will then be stored for future offline use lastdownload cache C Users yourname AppData Local Raspberry Pi Imager cache So the next time you open the software it will have the display Released date cached on your computer Step 5 Select the SD card you are using 8 Chapter 3 3 Installing the OS ...

Page 13: ...ow that the Raspberry Pi doesn t have a default password you will need to set it yourself Also the username can be changed For remote access you will also need to enable SSH manually Then scroll down to complete the wifi configuration and click SAVE Note wifi country should be set the two letter ISO IEC alpha2 code for the country in which you are using 9 ...

Page 14: ...SunFounder Pironman your Raspberry Pi Step 7 Click the WRITE button 10 Chapter 3 3 Installing the OS ...

Page 15: ...Founder Pironman Step 8 If your SD card currently has any files on it you may wish to back up these files first to prevent you from permanently losing them If there is no file to be backed up click Yes 11 ...

Page 16: ...SunFounder Pironman Step 9 After waiting for a period of time the following window will appear to represent the completion of writing 12 Chapter 3 3 Installing the OS ...

Page 17: ...SunFounder Pironman 13 ...

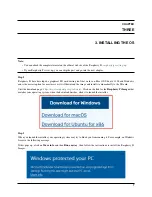
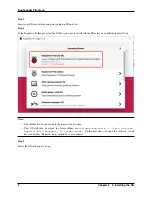
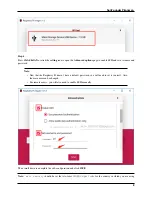
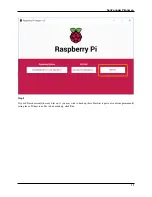
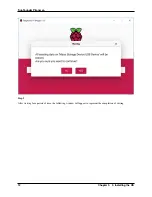
Page 18: ...SunFounder Pironman 14 Chapter 3 3 Installing the OS ...

Page 19: ...ard Micro SD card you ve set up with Raspberry Pi OS into the micro SD card slot on the Pironman 2 Plug in the Mouse and Keyboard 3 Connect the screen to Raspberry Pi s HDMI port 4 Power the Pironman with a 5V 3A Type C cable and press the power button on the Pironman to turn it on 5 After a few seconds the Raspberry Pi OS desktop will be displayed 15 ...

Page 20: ...y However you need to get the IP address of the Raspberry Pi first and then use an application to log in to the Raspberry Pi as SSH Note In order to login remotely to Raspberry Pi you must enable SSH set up a username and password and configure the correct Wi Fi when installing Raspberry Pi OS Please refer to Step 6 of 3 Installing the OS for a detailed tutorial Don t forget to press the power but...

Page 21: ...pberry Pi on the admin interface of router The default hostname of the Raspberry Pi OS is raspberrypi and you need to find it If you are using ArchLin uxARM system please find alarmpi Network Segment Scanning You can also use network scanning to look up the IP address of Raspberry Pi You can apply the software Advanced IP scanner and so on Scan the IP range set and the name of all connected device...

Page 22: ...itten in C that is the bridge linking the customers and Unix Linux Moreover it can help to complete most of the work needed For Linux or Mac OS X Users Step 1 Go to Applications Utilities find the Terminal and open it Step 2 Type in ssh pi ip_address pi is your username and ip_address is your IP address For example ssh pi 192 168 18 197 Step 3 Input yes 18 Chapter 4 4 Login to Raspberry Pi ...

Page 23: ...SunFounder Pironman Step 4 Input the passcode and the password Step 5 We now get the Raspberry Pi connected and are ready to go to the next step 4 2 If You Have No Screen 19 ...

Page 24: ...rd For Windows Users If you re a Windows user you can use SSH with the application of some software Here we recommend PuTTY Step 1 Download PUTTY Step 2 Open PuTTY and click Session on the left tree alike structure Enter the IP address of the RPi in the text box under Host Name or IP address and 22 under Port by default it is 22 20 Chapter 4 4 Login to Raspberry Pi ...

Page 25: ...en the PuTTY window prompts login as type in pi the user name of the RPi and password Note When you input the password the characters do not display on window accordingly which is normal What you need is to input the correct password If inactive appears next to PuTTY it means that the connection has been broken and needs to be reconnected 4 2 If You Have No Screen 21 ...

Page 26: ...t steps Note If you are not satisfied with using the command window to control the Raspberry Pi you can also use the remote desktop function which can help us manage the files in the Raspberry Pi easily For details on how to do this please refer to Remote Desktop 22 Chapter 4 4 Login to Raspberry Pi ...

Page 27: ... Install pironman module Use the following commands to download and install the pironman module cd git clone https github com sunfounder pironman git cd pironman sudo python3 install py After installation the program will start automatically Here are the basic configurations for Pironman The OLED screen will display the CPU RAM and ROM Usage CPU Temperature and IP Address of the Raspberry Pi After...

Page 28: ...n the WS2812 RGB strip so that it displays in color 0a1aff and in breath mode change rate is 50 You can also modify these configurations to suit your needs Use pironman or pironman h or pironman help to view the instructions as follows Usage pironman OPTION input Options start start pironman service stop stop pironman service restart restart pironman service h help help show this help c check show...

Page 29: ... rgb blink speed 0 100 default 50 For example to turn off the automatic execution of programs at boot pironman a off Or reset the color of WS2812 RGB strip pironman rc ff8a40 Those configurations are stored in config pironman config txt and you can also make changes directly in this file sudo nano config pironman config txt Press Ctrl X Y Enter to save and exit editing Note For details on the intr...

Page 30: ...SunFounder Pironman 26 Chapter 5 5 Set up the Pironman ...

Page 31: ...Pi s CPU usage temperature disk usage IP address RAM usage etc External GPIO extender with pin name label for easy access Power status memory remembers the power status incase accident power cut off Re wiring the microSD card for easy access Aluminum main body with clear Acrylic side panel Parameters 1 Dimension 112 45x68 2x118 92mm 2 Material a Main body aluminum alloy b Both sides and front pane...

Page 32: ... button 8 OLED screen 0 96 128x64 resolution 9 Infrared receiver 38KHz 10 Cooling fan size 40x40x10mm 11 WS2812 RGB LED 16xWS2812B 5050 Pin Functions Shutdown Signal Pin By pressing the power button the Raspberry Pi will power off while setting GPIO26 to a high level and if the Main Board detects this high level it will power cut Dimensional Drawing 28 Chapter 6 6 About Hardware ...

Page 33: ...SunFounder Pironman 6 2 Main Board About the Jumper Caps 6 2 Main Board 29 ...

Page 34: ...set to high level so the motherboard and Raspberry Pi can power on off synchronously Power Button IO16 If you pull out this jumper cap the power button will not work Besides the power button is also used to wake up the OLED screen in Sleep Mode Power Cut Memory When the Pironman suddenly loses power the chip of the Main Board will record this state and will automatically power on the next time 6 3...

Page 35: ... connected to GPIO12 The WS1812 RGB Strip is a light strip with 8 RGB LEDs that can be used to display Pironman s status You can use commands to make it turn on or off or to modify its color default is blue display mode and change rate Turn on the WS2812 RGB Strip pironman rw on Turn it off pironman rw off Change its color using hexadecimal color values pironman rc fe1a1a Changing the display mode...

Page 36: ... will let the Pironman power cut but this method may damage the Raspberry Pi s files or leave some changes unsaved 2 Safe Shutdown There is also a way to safely turn off the Pironman by pressing and holding the power button for 2 seconds after configuring it 6 7 IR Receiver Note The IR receiver is connected to GPIO13 if you want to change it to another pin please refer to Change the config txt Bef...

Page 37: ...M 2 SSD hard drive interface only supports SATA protocol not NVME PCIe In the Pironman s mainboard there is an M 2 SSD connector for installing your M 2 SATA SSD Various lengths of M 2 SATA SSD can be mounted 22mm x 30mm 42mm 60mm and 80mm supporting SSD TRIM function Assemble the SSD 1 Take off the base plate of the Pironman 6 8 M 2 SATA SSD 33 ...

Page 38: ...SunFounder Pironman 2 Remove the screw for the M 2 SATA SSD 34 Chapter 6 6 About Hardware ...

Page 39: ...SunFounder Pironman 3 Insert your M 2 SATA SSD 4 Screwed in place 6 8 M 2 SATA SSD 35 ...

Page 40: ...SunFounder Pironman 5 Put the base plate back on 6 Plug in SSD Bridge and 5V 3V power supply 36 Chapter 6 6 About Hardware ...

Page 41: ...Updating the Bootloader sudo apt update sudo apt full upgrade sudo rpi update sudo rpi eeprom update d a After setting reboot to take effect 2 Use the following command to view the name of the storage device sudo fdisk l 6 8 M 2 SATA SSD 37 ...

Page 42: ...D card to the M 2 SATA SSD Where if is followed by the sd card name and of is followed by the M 2 SSD name sudo dd if dev mmcblk0 of dev sda bs 4M 4 Pull out the Micro SD card connect the M 2 SATA SSD and then power on the Pironman 38 Chapter 6 6 About Hardware ...

Page 43: ...7 1 1 VNC You can use the function of remote desktop through VNC Enable VNC service The VNC service has been installed in the system By default VNC is disabled You need to enable it in config Step 1 Input the following command sudo raspi config Step 2 Choose 3 Interfacing Options by press the down arrow key on your keyboard then press the Enter key 39 ...

Page 44: ...SunFounder Pironman Step 3 P3 VNC Step 4 Select Yes OK Finish to exit the configuration 40 Chapter 7 7 Appendix ...

Page 45: ...o VNC Step 1 You need to download and install the VNC Viewer on personal computer After the installation is done open it Step 2 Then select New connection Step 3 Input IP address of Raspberry Pi and any Name 7 1 Remote Desktop 41 ...

Page 46: ...SunFounder Pironman Step 4 Double click the connection just created 42 Chapter 7 7 Appendix ...

Page 47: ...SunFounder Pironman Step 5 Enter Username pi and Password raspberry by default 7 1 Remote Desktop 43 ...

Page 48: ...SunFounder Pironman Step 6 Now you can see the desktop of the Raspberry Pi 44 Chapter 7 7 Appendix ...

Page 49: ...ical login to remote machines using RDP Microsoft Remote Desktop Protocol Install XRDP Step 1 Login to Raspberry Pi by using SSH Step 2 Input the following instructions to install XRDP sudo apt get update sudo apt get install xrdp Step 3 Later the installation starts Enter Y press key Enter to confirm 7 1 Remote Desktop 45 ...

Page 50: ...he Remote Desktop feature that comes with Windows If you are a Mac user you can download and use Microsoft Remote Desktop from the APP Store and there is not much difference between the two The next example is Windows remote desktop Step 2 Type in mstsc in Run WIN R to open the Remote Desktop Connection and input the IP address of Raspberry Pi then click on Connect Step 3 46 Chapter 7 7 Appendix ...

Page 51: ...ops out Please type in your username and password After that please click OK At the first time you log in your username is pi and the password is raspberry Step 4 Here you successfully login to RPi by using the remote desktop 7 1 Remote Desktop 47 ...

Page 52: ...re to play music videos and even show your images With Kodi you can scan and sort all your media files It will download information about your files and present it to you in an attractive manner You can install Kodi directly on your Raspberry Pi system or you can just use a distribution with Kodi pre installed such as and In this tutorial we will show you how to install and set up OSMC Media Cente...

Page 53: ... in Kodi functionality For example we can easily set up Netflix on it because we can easily access the backend For the best experience with Kodi we recommend that you use the Raspberry Pi 4 or newer The stronger processor and increased RAM will help Kodi run at its best 7 2 1 Components List Required Pironman Micro SD card 8GB Ethernet cable or Wi Fi HDMI cable Monitor Keyboard and mouse Optional ...

Page 54: ...sed to be Etcher and Win32 disk imager but Raspberry Pi has now developed Raspberry Pi Imager which is an all in one image and tool that makes image installation easy 1 If you don t have please download it 2 Open Raspberry Pi Imager and click CHOOSE OS 3 Click the Media player OS button This button will bring up 2 images for Kodi 50 Chapter 7 7 Appendix ...

Page 55: ...SunFounder Pironman 4 Here we choose OSMC 5 Raspberry Pi 0 1 2 3 4 400 versions are provided please select the appropriate version 7 2 Install Kodi on Raspberry Pi Use OSMC 51 ...

Page 56: ...SunFounder Pironman 6 After selecting the appropriate drive then click Write 7 Once the installation success message appears you can pull out the Micro SD 52 Chapter 7 7 Appendix ...

Page 57: ...to an SD card we will walk you through the process of its initial set up process 1 Now pull out the Micro SD card and insert it into the card slot of the Piron 2 Connect your display to the Pironman with the HDMI cable then turn it on with the power switch 7 2 Install Kodi on Raspberry Pi Use OSMC 53 ...

Page 58: ...omplete you will need to reboot Pironman You can reboot by long pressing the power switch or by re plugging the power cable 5 The configuration page will appear once you have rebooted and it will ask you to select the language Select Yes to continue the setup after selecting a language for OSMC 6 Next you will be asked to select the time zone Make sure to select the relevant time zone where you li...

Page 59: ... like to rename your device here Default device name is osmc and it is recom mended to change to another name 8 You can disable or enable the SSH service in this section OSMC s setup tool will enable SSH by default Click Accept to continue the installation 7 2 Install Kodi on Raspberry Pi Use OSMC 55 ...

Page 60: ...l be asked to agree to OSMC s and Kodi s terms of service Please select the Continue option after reading the license and agreeing to it 10 Select a theme of your choice For this guide we will use the default OSMC theme 56 Chapter 7 7 Appendix ...

Page 61: ... For this guide we will continue using the No thanks option 12 At this point you have now finally completed the initial configuration process of OSMC on your Raspberry Pi You can take yourself to the Kodi main screen by selecting the Exit option 7 2 Install Kodi on Raspberry Pi Use OSMC 57 ...

Page 62: ...n 7 2 4 Configuring Network in OSMC In this section we will show you how to configure the network for your device using the OSMC interface 1 Go to the Settings option 2 Then go to the My OSMC menu 58 Chapter 7 7 Appendix ...

Page 63: ...configure OSMC on your Raspberry Pi 4 You can configure WIFI in this option or just plug in a network cable after which you will see information about the connection and remember this IP address which you will need to access OSMC remotely later in the guide 7 2 Install Kodi on Raspberry Pi Use OSMC 59 ...

Page 64: ...For the sake of simplicity we will focus only on SFTP using FileZilla since it works out of the box on all three platforms Windows macOS and Linux with no additional changes to OSMC required the SSH has been enabled When you open FileZilla for the first time you will not connect to anything you will need to provide the host username and password Host sftp ip address of your osmc User name osmc Pas...

Page 65: ... transfer files using SMB server which is a more intuitive and useful way But you need to go to OSMC and install this server first as follows 1 Go to the My OSMC menu page and select the App Store icon 7 2 Install Kodi on Raspberry Pi Use OSMC 61 ...

Page 66: ...SunFounder Pironman 2 Select Samba SMB Server 3 Select Install 62 Chapter 7 7 Appendix ...

Page 67: ...SMB server installation 5 A popup will appear in the upper right corner to prompt you to install Once the installation is complete you will be able to access your Raspberry Pi files from your own computer 7 2 Install Kodi on Raspberry Pi Use OSMC 63 ...

Page 68: ...SunFounder Pironman 6 On Windows use Win R to open Run Box 7 Type ip address in the input box 8 Now you will see a shared drive called osmc 64 Chapter 7 7 Appendix ...

Page 69: ... videos or movies to them 7 2 6 Adding OSMC s videos to Scrape In this section we will show you how to add a video folder for OSMC to scrape Scrapping video is a fairly simple process and is one of the main features of Kodi 1 First we need to go to the Video menu 7 2 Install Kodi on Raspberry Pi Use OSMC 65 ...

Page 70: ...u will allow you to browse through the imported folders or add additional folders 3 Next select the Add video option In this option we will add folders for OSMC s Kodi to scan into its library 4 In this menu you need to select the Browse or Add option 66 Chapter 7 7 Appendix ...

Page 71: ... click OK Make sure you separate movies and TV shows in separate folders This is because if they are contained in the same folder Kodi s scrapers will not be able to distinguish between them 5 OSMC divides videos into three separate categories Movies Music Videos and TV Shows Select the option that is most relevant to your video The options you select will affect how OSMC obtains information from ...

Page 72: ...o scrape your library OSMC will scan your video and search for its name in a database on the Internet This scan allows it to retrieve posters actors messages and other interesting information about your video After selecting Ok the scrape process should start automatically You should begin to see that your movie or TV show has been added to the OSMC interface 68 Chapter 7 7 Appendix ...

Page 73: ...you can use the remote control to control your Kodi 1 Configure IR receiver 1 Go to the Settings My OSMC menu and select the Raspberry Pi icon 2 Select Hardware Support and add the pin number to 13 in gpio_pin Once set you will be prompted to reboot to make this configuration effective 7 2 Install Kodi on Raspberry Pi Use OSMC 69 ...

Page 74: ...icon to go to the configuration page 2 Choose the brand of remote you are using from the list Kodi can now be controlled with your remote For more information please refer to https osmc tv wiki 3 Manually add a remote Manually configuring a remote is a way to get your conf file that fits your remote add it to the Remotes list and select it as the one to use at this time 70 Chapter 7 7 Appendix ...

Page 75: ...s should have an SSH client already You can find your device s IP address in Settings Systems Network Windows Run PuTTY and enter the IP address of your device and click OK When prompted enter osmc for both username and password Linux OS X Open a Terminal interface and run the following command ssh osmc ip address of your device You will be prompted to accept the SSH key if this is the first time ...

Page 76: ... string of pulse data appears osmc osmc etc lirc sudo mode2 driver default device dev lirc0 Using driver default on device dev lirc0 Trying device dev lirc0 Using device dev lirc0 Running as regular user osmc space 16777215 pulse 9083 space 4442 pulse 628 space 509 pulse 626 space 508 pulse 596 space 543 pulse 593 space 538 5 Now stop lircd sudo killall lircd 6 Get all available KEY_codes to match...

Page 77: ...hold a key to sample until Please enter the name appears Refer to the previous command to define all the keys After configuring all the keys on the remote press Enter to exit You can use the ls command to see if the conf file you configured exists 8 Now go back to OSMC and click Settings My OSMC Remotes 7 2 Install Kodi on Raspberry Pi Use OSMC 73 ...

Page 78: ...SunFounder Pironman 9 Select the conf file under your Home folder by Browse 10 Once selected press OK to select and then confirm your change 74 Chapter 7 7 Appendix ...

Page 79: ...SunFounder Pironman At this point you can use your remote to control OSMC 7 2 Install Kodi on Raspberry Pi Use OSMC 75 ...

Reviews: