background image

USER S MANUAL

SJS/A-BA2

R

Direct-Drive, Automatic 
2-Needle Belt Loop Sewing
Machine
(Electric Electronic Part)

Summary of Contents for SJS/A-BA2

Page 1: ...USER S MANUAL SJS A BA2 R Direct Drive Automatic 2 Needle Belt Loop Sewing Machine Electric Electronic Part ...

Page 2: ...e powerful operation enhanced durability and more sophisticated design to meet a number of user s needs 2 Please read this user s manual thoroughly before using the machine Make sure to properly use the machine to enjoy its full performance 3 The specifications of the machine are subject to change aimed to enhance product performance without prior notice 4 This product is designed manufactured and...

Page 3: ...r Type Setting 13 3 4 Power Cord Plugging 14 3 5 Voltage Changing Method 17 3 6 Control Box LED Checking 17 3 7 Control Box Cleaning 18 3 8 Fuse Replacement 18 4 Operation of Belt Loop Sewing Machine 20 4 1 OP Box and Key Names 20 4 2 Operational Workflow 21 4 3 Power On 22 4 4 Initial Setting 22 4 5 Initial Design of SUNSTAR Beltloop 22 4 6 OP Box Operation 23 4 6 1 Air Supply 23 4 6 2 Operation ...

Page 4: ...Download 35 4 8 Check Function 36 4 8 1 Initial Screen 36 4 8 2 Step Move operation by step 37 4 8 3 Solenoid Test 37 4 8 4 Sensor Test 38 4 8 5 Setting function 39 4 9 Function 39 4 9 1 Function 39 4 9 2 Sewing machine testing 40 4 10 ROM Installation and Replacement 42 4 10 1 ROM Type and Distinction 42 4 10 2 Checkpoints for ROM Installation and Installation Position 42 Error List 43 Troublesho...

Page 5: ...lt Warning Danger Caution No Name Description Caution Warning Danger Caution If the machine is not properly handled it may cause injury to users or physical damage to the machine If the machine is not properly handled it may cause death or severe injury to users If the machine is not properly handled it may cause death or severe injury to users and the urgency of the danger is very high Warning Da...

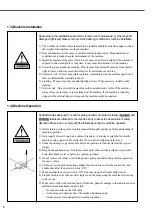
Page 6: ...lift shall be big enough to endure the weight of the sewing machine and carry the machine 2 Use the palette when lifting the machine Set the center of gravity of the machine center of the left and right sides at the fork arm of the forklift and carefully lift the machine Ban people from standing under the machine and remove obstacles near the machine Mark Description Make sure to maintain the bala...

Page 7: ...ght be capsized 1 4 Machine Operation SJS A BA2 was designed to conduct sewing on fabric or similar materials and labels are attached to the machine body to stress the observation of safety directions Make sure to comply with the followings during the machine operation 1 Before turning on the power read this manual thoroughly and have a full understanding of machine operation 2 Get properly dresse...

Page 8: ...ut finger guard and safety devices Before threading changing bobbin and needle and cleaning turn off the main switch High voltage will cause injury Be sure to wait for at least 360 seconds after turning off the main switch and unplugging a power cord if the cover needs to be opened CAUTION 경 고 Do not operate without finger guard and safety devices Before threading changing bobbin and needle cleani...

Page 9: ...전류에 의해 감전될 수 있으므로 커버를 열 때는 전원을 내리고 전원 플러그를 뽑고 나 서 360초간 기다린 후 여십시오 CAUTION 경 고 Do not operate without finger guard and safety devices Before threading changing bobbin and needle cleaning etc switch off main switch 손가락 보호대와 안전장치 없이 작동하지 마십시오 실 보빈 바늘교환시나 청소전에는 반드시 주전원의 스위치를 꺼 주십시오 Injury may be caused by winding Be sure to turn off the power before cleaning lubricating adjusting or repairing WARNING...

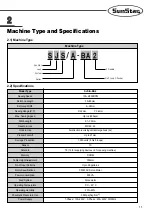
Page 10: ...ature Operating Humidity Pneumatic Pressure in Use Power Supply SunStar Jean System Series Belt Loop Attacher 2 Needle S J S A BA 2 SJS A BA2 100 2 800RPM 30 85mm 8 22mm X 22mm Y 3 2mm Up to 2 800spm 0 1 10mm MR4 0 4 5 All direction revolving vertical large hook 2x Up to 21mm 1 900 units 8 hrs 5 loops 10 18 14 for supplying devices 4 for sewing machine P ROM 300mm Up to 99 patterns 550W AC Servo M...

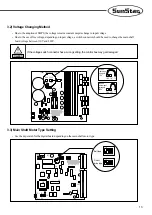
Page 11: ...anging Method to change the voltage used 1 Phase connection 100V 110V 120V 200V 220V 240V 3 Phase connection 200V 220V 240V 380V 이 기계의 전기 사양은 공장 출고 시 아래의 표기되로 결선되어 있습니다 V 단상 1 Phase 삼상 3 Phase 110V 120V 220V 240V 220V 240V V V The Electric Specification of This Machine is Connected Under Marked V In case of 3 phase 380V a separate transformer box should be installed on the table check it out when ...

Page 12: ... 220V In case where input voltage is 110V In case where input voltage is 220V Input voltage setting 110V CN6 CN7 CN2 CN5 CN4 CN3 CN1 220V CN6 CN7 JP1 CN6 CN7 JP1 CN3 BZ1 U8 U7 SW1 U6 U10 U11 Belt type Direct drive type CN1 CN2 L1 VR2 U26 SW2 VR1 LED1 5V LED1 12V 3 3 Main Shaft Motor Type Setting Use the dip switch for the digital board depending on the main shaft motor type If the voltage switch c...

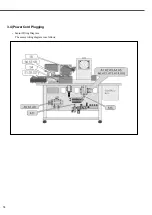
Page 13: ...14 3 4 Power Cord Plugging Sensor Wiring Diagram The sensor wiring diagram is as follows ...

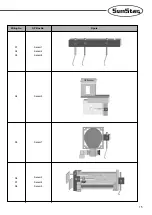
Page 14: ...15 Wiring No OP Box No Figure Sensor 1 Sensor 4 Sensor 8 S1 S2 S3 Sensor 5 S4 Sensor 7 S5 Sensor 3 Sensor 6 Sensor 2 S6 S7 S8 OP Bracket ...

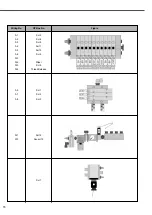
Page 15: ...16 Wiring No OP Box No Figure Sol 5 Sol 6 Sol 8 Sol 11 Sol 13 Sol 4 Wiper Sol 9 Thread Release A1 A2 A3 A4 A5 A6 A12 A14 A13 A16 Sol 1 Sol 2 Sol 3 A9 A7 A8 Sol 12 Sensor 10 A11 S10 Sol 7 ...

Page 16: ...tting 110V CN6 CN7 CN2 CN5 CN4 CN3 CN1 220V CN6 CN7 JP1 CN6 CN7 JP1 3 6 Control Box LED Checking LED indicates power supply status to each board It enables easy detection of problem areas when abnormal operation occurs LED LED Power Supply Status Power Supply Status LED1 LED5 Digital board 5V input Main shaft board 220V input LED2 LED6 Digital board 12V input Main shaft board 5V input LED3 LED7 St...

Page 17: ...r mid connection cable When laser pointer is used Foot pedal jumper cable Pedal switch input cable Head safety switch cable Pneumatic output and auxiliary input cable XY origin sensor cable External power input cable Unused Unused Unused 22 21 CN17 CN18 CN19 CN7 CN25 CN36 CN22 CN23 CN24 CN25 CN29 CN30 Machine Control Box C6 CN14 CN16 CN8 CN25 CN26 CN34 CN38 C26 CN30 CN29 CN32 CN36 CN33 CN35 CN13 C...

Page 18: ...9 Main shaft encoder input cable OP unit connection cable OP power input cable Cable Name Machine Control Box Unused CN26 CN27 CN28 Control Box Right Side Cover Control Box Left Side Cover CN28 CN26 CN27 ...

Page 19: ...te the presser foot ESC KEY Used to cancel a function READY KEY Used to operate supply devices DOWN KEY Used to decrease a value ENTER KEY Used to complete an input UP KEY Used to increase a value PARA LED Displays parameter mode AIR LED Checks the air pressure condition ERROR LED Displays various error messages TEST KEY Used to move down and test the machine PARA KEY Used to move up the machine a...

Page 20: ...firm Switch On Sewing Test Select 1 T 1 2 T 2 3 T 3 4 T 4 5 T 5 FUNCTION Select 1 A1 2 A2 3 A10 4 B27 5 C1 6 C2 7 C4 8 C5 Mode Select 1 MODE 1 2 MODE 2 3 MODE 3 4 MODE 4 5 MODE 5 PARA Select 1 Version 2 Initialize 3 Count 4 Make 5 Delay 6 R_Move 7 Origin 8 Bobbin 9 Para 10 SSP D L Test Select 1 Step 2 Solenoid 3 Sensor 4 Setting ...

Page 21: ...e of wrong sensor position Error occurs setting required Test the supply device Go to 18 times in Step Move Operate the supply device Press two times Return to the initial screen Create patterns and conduct test sewing Select and press two times Basic pattern length 120 width 26 zsti 15 Enter Initial screen Start Switch Operate the supply device and start sewing When the power is turned on the ima...

Page 22: ...rror message pops up Error 41 Error 49 2 Check the sensor if error message appears Check the sensor check function and the sensor wiring diagram in the sensor test 3 Check whether the sensor s red LED is on or off to find out the proper position of the sensor 4 6 1 Air Supply When READY LED is off press READY and then READY LED is on Then the supply device is operated and READY LED is on Mode 1 2 ...

Page 23: ... READY LED is off and the information of the current pattern number appears Select a pattern number using keys Press ENTER to select the current pattern number Press ESC to return to the previous screen without value saving 4 6 6 Pattern Number Change Select MODE while READY LED is off Use UP DOWN keys to move around items Press ENTER to enter and press ECS to return to the previous screen without...

Page 24: ...e previous screen without saving 4 6 8 Speed Change Set C2 of Para No 11 at On When PF and UP are pressed at the same time CUT starts operating 4 6 9 CUT function Be careful while the machine is in cutting motion Caution 4 6 10 Jog function In the ready mode When Ready LED is on Select the Right key and the Down key at the same time When the Right Left key is pressed needle forward backward is sel...

Page 25: ...return to the previous screen without saving Press the PF key and the ESC key at the same time In a few seconds the sewing machine and the OP box sewing data are initialized Upon formatting 28C010 sewing data it takes over 10 seconds When formatting is completed the screen returns to the previous screen 28C010 sewing data 4 6 11 Format sewing data initialization Press ENTER to initialize the OP BO...

Page 26: ...he power 24C04 Sewing machine parameter initialization Sewing machine Con Box initialization The sewing machine Con Box initialization is conducted with button operations right after power supply Power OFF Select ENTER squa1 Start position of square pattern 2nd origin block Block pattern X desi X shape pattern Twin Twin pattern 4 7 5 Make Square Pattern When using the patterns expanded both in the...

Page 27: ...ain patt Pattern number X_len length Basic 6 22 mm Extended 6 30 mm Y_hei height 1 3 2 mm Zigz No of zigzag 6 35 X_bar Number of stitches in the straight line at the beginning 2 10 BAR Zigzag for all straight lines Bar Start from Origin 2 Ori Start from Origin One No 1 at the left end from the center No no Bar move Offset function 2 2mm x_pit Length of pitch automatic calculation Stay stitch type ...

Page 28: ... Select the straight line before zigzag Bar Start from Origin 2 Ori Start from Origin One No 1 at the left end from the center No no Bar move offset function 2 2mm block of blocks Select the ENTER key squa1 Square pattern block Block pattern X_desi X shape pattern Twin Twin pattern When the READY key is pressed basic patterns appear Block pattern block Zigz X len Y hei When the value is not within...

Page 29: ...s B Set No 7 item of Parameter No 9 to be on X_p On Use Up Down keys to select among patt desi X_len Y_hei zsti and y_hei Press keys to set a value Press ENTER to create a pattern patt Pattern number X_wid width Basic 6 22 mm Extended 6 27 mm Y_hei height Basic 2 6 mm Extended 8 10 mm Zigz No of zigzag 6 35 y_hei height of pattern 1 3 2 mm move offset function 2 2mm mid Choose between first zigzag...

Page 30: ...ct among patt X_len Y_hei Space Zigz x_bar Bar move Use the keys to set a value When the ENTER key is pressed a pattern is created When the READY key is pressed basic patterns appear Press the ENTER key squa1 Square pattern block Block pattern X_desi X shape pattern Twin Twin pattern Twin pattern Notice A Replace the presser foot before sewing B Set No 7 item of Parameter No 9 at On X_p On ...

Page 31: ...2 Ori Start from Origin One No 1 at the left end from the center No no Bar move offset function 2 2mm space Zigz X len Y hei If the entered value is out of the range error ERR occurs ERR53 Length X_len ERR54 Height Y_hei ERR55 Pitch pit ERR56 bar ERR57 space Press the ESC key and enter a value again Select a pattern number using keys When starting the downloaded pattern through SSP the screen in t...

Page 32: ...upply device moves forward and descends Delay before the presser foot is pressed Delay before the clamp moves forward Delay before the clamp moves forward Delay before Mode 2 stops in the middle Delay between wire down and cutting Delay between the first and second V cut Unused Oil spray time Delay before the pin spins during loop origin Delay of the shock absorbing solenoid when the supply device...

Page 33: ...g on 6 Cut V 17 X P off 18 010 on 19 C 7 on 10 B1 4 11 C2 off 12 S7 20 13 L1 Off Description of Para Item Setting Range Default Unit Function and Description Air A_T S_T S 9 Tag Cut X_p 010 C 7 B1 C2 S7 L1 On Off 20 800ms 20 800ms On Off On Off V On Off On Off On Off 1 20 On Off 1 800ms On Off On 300ms 80ms On On V Off On On 4 Off 20ms Off 4ms 4ms Air pressure checking Duration of maintaining the ...

Page 34: ... SSP When SSP D L is selected in the parameter mode the screen on the right hand side appears Use the keys to select a pattern number SSP Program Produce a design using the SSP program Select the serial communication icon and set the baud rate at 38400 for the selected port ...

Page 35: ...on Press to return to the previous screen 4 8 1 Initial Screen 36 Select the icon transfer When the transfer is performed without problem the dialog box as below appears When the data transfer from SSP is complete the message asking for selecting ENTER or ECS appears Press the ENTER key to save Press the ESC button to cancel ...

Page 36: ...on 4 8 12 16 Select Continue and press ENTER Then continuous motion is set Press ESC to return to the previous screen Fabric is held Middle part pressing increases Clamp fully moves back Middle part pressing decreases Clamp moves to the middle Cutter descends Pin spins Presser foot descends Pin spins Supply device moves to the middle Cutter ascends Supply device descends Presser foot ascends Clamp...

Page 37: ...or 5 Sensor 7 Sensor 9 No Description Sensor 2 Sensor 4 Sensor 6 Sensor 8 Sensor 10 Supply device moves forward Clamp moves to the middle Cutter descends Supply device stops in the middle Middle clamp is pressed Left right cutter movement Pin spins Supply device moves to the middle Supply device ascends Clean Supply device stops in the middle Clamp moves forward Wire descends Presser foot descends...

Page 38: ...he current time If the difference between set and time is significant the speed can be adjusted with the pneumatic valve While the power is off press the No key and the Speed key at the same time and turn on the power Use the UP DOWN keys to select an item and press the ENTER key The value is automatically filled When the ESC key is pressed the value is not automatically filled When the Enter or E...

Page 39: ... 1st stitch 100 900 2nd stitch 100 2800 3rd stitch 100 2800 4th stitch 100 2800 5th stitch 100 2800 99 99 0 358 0 100ms 0 900ms use no use 100 1000 0 250 0 1 1 50 4 900ms 2800 300 500 900 1500 2800 24 350 30ms 180ms no use 500 215 0 30 60ms 100 100 1 1 1ms 4ms 100 1 1 1 Set the sewing speed ceiling spm Set the start speed for first 1 to 5 stitches spm XY feed starting angle setting Upper stop posi...

Page 40: ... key When the Enter key is pressed the main motor is in operation The Right Left keys change the speed encoder Test Press the Ready key When the sewing machine pulley is turned the angle appears When the ESC key is pressed the screen returns to the test screen Syncro Test Select the Ready key Whenever the pulley is turned around the counter appears Pressing the ESC key makes the screen return to t...

Page 41: ...ove the existing ROM use an IC remover or a small screwdriver Take caution not to cause damage to the board and carefully remove the ROM 5 After ROM replacement please conduct the initialization and formatting for the OP box Caution 4 10 ROM Installation and Replacement 4 10 1 ROM Type and Distinction Program ROM A ROM saved with the programs necessary for sewing machine and OB Box operation When ...

Page 42: ... ERR10 ERR11 ERR12 ERR13 ERR14 ERR15 ERR16 ERR17 ERR18 ERR19 ERR20 ERR21 ERR22 ERR23 ERR30 ERR31 ERR32 ERR33 ERR34 ERR35 ERR36 ERR41 ERR42 ERR43 ERR44 ERR45 Error Message Description Alarm Pin No Pattern cannot be called Zoom in out error Needle bar position error Feed limit error Clamp position error Failure to move to X origin within given time ROM version error not compatible with new digital v...

Page 43: ...e The set value is out of the Space range Incorrect LRC value upon SSP download Excessive stitch volume upon SSP download Error in synchoronizer contact Error in the X Servo motor Error in the Y Servo motor Error in the sewing machine digital board Error in the input signal from the sensor Communication error in the sewing machine digital board CPU Mismatch in ROM version between OP Box and digita...

Page 44: ...Check if AT28C010 is installed at the OP Box Conduct initialization Press PF ESC and Power On at the same time Generate patterns after initialization Check the air pressure Check the pneumatic sensor on the rear side of the sewing machine Press key and change Para No 9 value Parameter change Press key and set Parameter No 9 Air at off Check if input voltage is unstable or power is turned off Check...

Page 45: ...46 Belt loop OP box board and control box digital board Belt loop OP Box board Control box digital board Extended Pattern ROM Program ROM Extended Pattern ROM Program ROM ...

Page 46: ...47 Belt Loop Cable Block Diagram ...

Reviews: