background image

SC936 CHASSIS SERIES

USER’S MANUAL 


1.0c

SC936E1-R710B

SC936A-R900B

SC936E1-R900B
SC936E2-R900B

SC936A-R1200B


S

UPER

®

Summary of Contents for Supero SC936 Series

Page 1: ...SC936 CHASSIS SERIES USER S MANUAL 1 0c SC936E1 R710B SC936A R900B SC936E1 R900B SC936E2 R900B SC936A R1200B SUPER ...

Page 2: ...RED OR USED WITH THE PRODUCT INCLUDING THE COSTS OF REPAIRING REPLACING INTEGRATING INSTALLING OR RECOVERING SUCH HARDWARE SOFTWARE OR DATA Any disputes arising between manufacturer and customer shall be governed by the laws of Santa Clara County in the State of California USA The State of California County of Santa Clara shall be the exclusive venue for the resolution of any such disputes Super M...

Page 3: ...micro SC936 chassis features a unique and highly optimized design with Intel AMD based DP UP processors The chassis is equipped with a 900W or 1200W high efficiency power supply High performance fans provide ample opti mized cooling for FB DIMM memory modules and hot swappable drive bays offer maximum storage capacity This document lists compatible parts available when this document was published ...

Page 4: ...er here for details on this chassis model including the control panel buttons LEDs and drives Chapter 4 Chassis Setup and Maintenance Follow the procedures given in this chapter when installing removing or reconfiguring your chassis Chapter 5 Rack Installation Refer to this chapter for detailed information on chassis rack installation You should follow the procedures given in this chapter when ins...

Page 5: ...nterface 3 1 Overview 3 1 3 2 Control Panel Buttons 3 2 3 3 Control Panel LEDs 3 2 Chapter 4 Chassis Setup and Maintenance 4 1 Overview 4 1 4 2 Removing the Chassis Cover 4 2 4 3 Installing Hard Drives 4 4 4 4 Installing the Motherboard 4 5 I O Shield 4 5 Permanent and Optional Standoffs 4 5 Add on Card Expansion Slot Setup 4 6 4 5 Installing the Air Shroud 4 7 4 6 System Fans 4 8 4 7 Power Supply...

Page 6: ...fying the Sections of the Rack Rails 5 4 Locking Tabs 5 5 Releasing the Inner Rail 5 5 Installing The Inner Rails on the Chassis 5 6 Installing the Outer Rails on the Rack 5 7 Standard Chassis Installation 5 8 Optional Quick Installation Method 5 9 Appendix A Cables Screws and Other Accessories Appendix B Power Supply Specifications Appendix C SAS 936A Backplane Specifications Appendix D SAS 936EL...

Page 7: ... and four hot swappable drive bays offer maximum storage capacity 1 2 Shipping List Part Numbers Please visit the following link for the latest shipping lists and part numbers for your particular chassis model http www supermicro com Chapter 1 Introduction 1 1 Legend DP Dual Processor Support FF Full height Full length UP Single Processor Support SC936E1 Chassis Model CPU HDD I O Slots Power Suppl...

Page 8: ...em To ensure the highest level of professional service and technical support we strongly recommend purchasing exclusively from our Supermicro Authorized Distributors System Integrators Resellers A list of Supermicro Authorized Distributors System Integrators Reseller can be found at http www supermicro com Click the Where to Buy link ...

Page 9: ...ddress Super Micro Computer B V Het Sterrenbeeld 28 5215 ML s Hertogenbosch The Netherlands Tel 31 0 73 6400390 Fax 31 0 73 6416525 Email sales supermicro nl General Information support supermicro nl Technical Support rma supermicro nl Customer Support Asia Pacific Address Super Micro Computer Inc 4F No 232 1 Liancheng Rd Chung Ho 235 Taipei County Taiwan R O C Tel 886 2 8226 3990 Fax 886 2 8226 3...

Page 10: ...must be mailed when service is complete For faster service RMA authorizations may be requested online http www supermicro com support rma Whenever possible repack the chassis in the original Supermicro carton using the original packaging material If these are no longer available be sure to pack the chassis securely using packaging material to surround the chassis so that it does not shift within t...

Page 11: ...at electrical noise and eletromagnetic fields are generated You will also need it placed near at least one grounded power outlet When con figured the SC936 chassis includes two power supplies R models a redundant power supply and require two grounded outlets 2 3 Preparing for Setup The SC936 chassis includes a set of rail assemblies including mounting brackets and mounting screws you will need to ...

Page 12: ...ction from electrical shock Instead use rubber mats that have been specifically designed as electrical insulators The power supply power cord must include a grounding plug and must be plugged into grounded electrical outlets Motherboard battery CAUTION There is a danger of explosion if the on board battery is installed upside down which will reverse its polarities This battery must be replaced onl...

Page 13: ... ensuring that all connections have been made 2 6 System Safety Electrostatic discharge ESD is generated by two objects with different electrical charges coming into contact with each other An electrical discharge is created to neutralize this difference which can damage electronic components and printed circuit boards The following measures are generally sufficient to neutralize this difference b...

Page 14: ...s or contacts When handling chips or modules avoid touching their pins Put the motherboard and peripherals back into their antistatic bags when not in use For grounding purposes make sure your computer chassis provides excellent conductivity between the power supply the case the mounting fasteners and the motherboard ...

Page 15: ...o keep you constantly informed of the overall status of the system as well as the activity and health of specific components Most SC936 models have two buttons on the chassis control panel a reset button and an on off switch This chapter ex plains the meanings of all LED indicators and the appropriate response you may need to take Figure 3 1 Control Panel ...

Page 16: ...ust unplug system completely before servicing Reset The reset button is used to reboot the system 3 3 Control Panel LEDs The control panel located on the front of the SC936 chassis has five LEDs These LEDs provide you with critical information related to different parts of the system This section explains what each LED indicates when illuminated and any corrective action you may need to take Power...

Page 17: ...icates an overheat condition which may be caused by cables obstructing the airflow in the system or the ambient room temperature being too warm Check the routing of the cables and make sure all fans are present and operating normally You should also check to make sure that the chassis covers are installed Finally verify that the heatsinks are installed properly This LED will remain flashing or on ...

Page 18: ...SC936 Chassis Manual 3 4 Notes ...

Page 19: ...hassis The only tool you will need to install components and perform maintenance is a Phillips screwdriver Print this page to use as a reference while setting up your chassis Review the warnings and precautions listed in the manual be fore setting up or servicing this chassis These include infor mation in Chapter 2 System Safety and the warning precau tions listed in the setup instructions ...

Page 20: ...time Once the top cover is released from the locked position slide the cover back 2 toward the rear of the chassis Lift the cover off the chassis 3 Figure 4 1 Removing the Chassis Cover Warning Except for short periods of time do NOT operate the server without the cover in place The chassis cover must be in place to allow proper airflow and prevent overheating Release Tab 3 2 1 1 ...

Page 21: ...le to pull the drive out of the chassis The drives are mounted in 2 drive carriers to simplify their installation and removal from the chassis These carriers also help promote proper airflow within the drive bays Warning Except for short periods of time while swapping hard drives do not operate the server with any drive carrier removed Release Button 1 Figure 4 2 Removing Drive Carriers ...

Page 22: ...assis Make sure to close the drive carrier 6 handle to lock the drive carrier into place Drive Carrier SAS or SATA Hard Drive Figure 4 4 Installing the Hard Drive Installing a Hard Drive to the Hard Drive Carrier Remove the screws securing the dummy drive to the drive carrier 1 Remove the dummy drive Place the hard drive carrier on a flat surface such 2 as a desk table or work bench 4 Figure 4 3 R...

Page 23: ...ld the I O shield in place 4 Permanent and Optional Standoffs Standoffs prevent short circuits by securing space between the motherboard and the chassis surface The SC936 chassis includes permanent standoffs in locations used by most motherboards These standoffs accept the rounded Phillips head screws included in the SC936 accessories packaging Some motherboards require additional screws for heats...

Page 24: ... board Secure the CPU s heatsinks and other components to the motherboard as 6 described in the motherboard documentation Connect the cables between the motherboard backplane chassis front pan 7 el and power supply as needed Also the fans may be temporarily removed to allow access to the backplane ports Add on Card Expansion Slot Setup SC936 chassis include I O slots for add on cards and expansion...

Page 25: ...e rear fan by pressing the fan release tab and pulling 1 the fan from the chassis Move the cables from the power supply and power distributor to the bottom of 2 the chassis You may have to bind the cables together Slide the air shroud extension into the groove behind the fan closest to the 3 power supply The extension should almost touch the side of the chassis Slide the air shroud into the chassi...

Page 26: ... drive carriers in the drive bays Use only 2 recommended server parts Make sure no wires or foreign objects obstruct air flow through the chassis 3 Pull all excess cabling out of the airflow path or use shorter cables The control panel LEDs inform you of system status See Chapter 3 System 4 Interface for details on the LEDs and the control panel buttons In most cases the chassis power supply and f...

Page 27: ...outlet 3 Remove the failed fan s power cord from the motherboard 4 Press the fan release tab to lift the failed fan from the chassis and pull it com pletely from the chassis 5 Place the new fan into the vacant space in the housing while making sure the arrows on the top of the fan indicating air direction point in the same direction as the arrows on the other fans 6 Power up the system and check t...

Page 28: ... necessary a new unit can be ordered directly from Supermicro see contact information in the Preface Changing the Power Supply This chassis includes a redundant power supply which allows the server to 1 remain running and one power supply to be removed Remove the AC power cord from the failed module Push the release tab on the power supply as illustrated 2 Pull the power supply out using the handl...

Page 29: ...pply from the motherboard 2 backplane and other components Also remove both power supplies Locate the power distributor between the power supply and the fan row 3 Remove the three screws securing the power supply 4 Gently pull the power distributor from the chassis Gently guide all the cables 5 through the power distributor housing Slide the new power distributor module into the power distributor ...

Page 30: ...SC936 Chassis Manual 4 12 Notes ...

Page 31: ...enerated The system needs to be placed near a grounded power outlet Be sure to read the Rack and Server Precautions in the next section 5 3 Preparing for Setup The box your chassis was shipped in should include two sets of rail assemblies and the mounting screws needed for installing the system into the rack Also included is an optional square hole to round hole converter bracket for use in racks ...

Page 32: ...ent at a time extending two or more si multaneously may cause the rack to become unstable General Server Precautions Review the electrical and general safety precautions that came with the com ponents you are adding to your chassis Determine the placement of each component in the rack before you install the rails Install the heaviest server components on the bottom of the rack first and then work ...

Page 33: ... that the amount of airflow required for safe operation is not compromised Mechanical Loading Equipment should be mounted into a rack so that a hazardous condition does not arise due to uneven mechanical loading Circuit Overloading Consideration should be given to the connection of the equipment to the power supply circuitry and the effect that any possible overloading of circuits might have on ov...

Page 34: ...ack between 26 5 and 36 4 deep Identifying the Sections of the Rack Rails The chassis package includes two rail assemblies in the rack mounting kit Each assembly consists of three sections An inner chassis rail which secures directly to the chassis an outer rail that secures to the rack and a middle rail which extends from the outer rail These assemblies are specifically designed for the left and ...

Page 35: ...fully extended from the rack This prevents the server from coming completely out of the rack when when the chassis is pulled out for servicing Releasing the Inner Rail Releasing Inner Rail from the Outer Rails Identify the left and right outer rail assemblies as described on page 5 4 1 Pull the inner rail out of the outer rail until it is fully extended as illustrated 2 below Press the locking tab...

Page 36: ... inner rails have been correctly identified 1 Place the inner rail firmly against the side of the chassis aligning the hooks 2 on the side of the chassis with the holes in the inner rail Slide the inner rail forward toward the front of the chassis until the rail clicks 3 into the locked position which secures the inner rail to the chassis Secure the inner rail to the chassis with the screws provid...

Page 37: ...cessary use screws to secure the outer rails to the rack as illustrated above Pull out the rear of the outer rail adjusting the length until it fits within the 4 posts of the rack Hang the hooks of the rear portion of the outer rail onto the slots on the rear 5 of the rack If necessary use screws to secure the rear of the outer rail to the rear of the rack Repeat steps 1 5 for the remaining outer ...

Page 38: ...t locking position of the middle rail Align the chassis inner rails with the front of the middle rails 4 Slide the inner rails on the chassis into the middle rails keeping the pressure 5 even on both sides until the locking tab of the inner rail clicks into the front of the middle rail locking the chassis into the fully extended position Depress the locking tabs of both sides at the same time and ...

Page 39: ...sis onto a rack Installing the Chassis into a Rack Install the whole rail assembly onto the rack as described on page 5 7 1 Release the inner rail without retracting the middle rail 2 Install the inner rails on the chassis as previously described on page 5 6 3 Install the chassis onto the middle rail as described in the previous section 4 ...

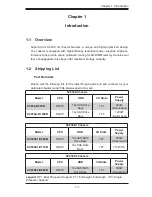
Page 40: ...SC936 Chassis Manual 5 10 Notes ...

Page 41: ...nents and configurations For more compatible cables refer to the manufacturer of the motherboard you are using and our Web site at www supermicro com A 2 Cables Included with SC936 Chassis SC936A R900B SC936E1 R900B and SC936E2 R900B Part Type Length Description CBL 0087 Cable 20 20 Front control cable Round 16 to 16 pin Ribbon CBL 0160L Cable 6 16AWG Power Cord 6 CBL 0217L Cable 16 pin Control Pa...

Page 42: ...75L Alt Name Big Four Description This cable has one iPass SFF 8087 mini SAS connector 36 pins at one end and 4 SAS connectors on one end This cable connects from the Host motherboard or other controller to the backplane SAS hard drive port Extending Power Cables Although Supermicro chassis are designed with to be efficient and cost effective some compatible motherboards have power connectors loca...

Page 43: ...erent connector use the following list to find a compatible cable Front Panel to Motherboard Cable Ribbon Cable Number of Pins Front Panel Number of Pins Motherboard Cable Part 16 pin 16 pin CBL 0049 16 pin 20 pin CBL 0048 20 pin 20 pin CBL 0047 16 pin various CBL 0068 20 pin various CBL 0067 Split cables Use these cable if your motherboard requires several different con nections from the front pa...

Page 44: ...d M4 x 4 mm 0 157 RAIL Round head M4 x 4 mm 0 157 Flat head M5 x 12 mm 0 472 Washer for M5 DVD ROM CD ROM and FLOPPY DRIVE Flat head 6 32 x 5 mm 0 197 Pan head 6 32 x 5 mm 0 197 Round head M3 x 5 mm 0 197 Pan head 6 32 x 5 mm 0 197 M B Flat head 6 32 x 5 mm 0 197 HARD DRIVE Thumb screw 6 32 x 5 mm 0 197 M B standoff 6 32 to 6 32 M B STANDOFFS M B CPU standoff M5 to 6 32 Round head M2 6 x 5 mm 0 19...

Page 45: ...2 R900B Redundant 900W MFR Part PWS 902 1R AC Voltage 100 240V 50 60Hz 13 4 Amp 5V 30 Amp 5V standby 4 Amp 12V 75 Amp 12V 0 6 Amp 3 3V 24 Amp SC936A R1200B SC936E1 R1200B Redundant 1200W MFR Part PWS 1K21P 1R AC Input 100 140V 50 60Hz 8 11 5 Amp 180 240V 50 60Hz 5 5 8 Amp DC Output 12V 1000W 83 Amp 100 140V 1200W 100 Amp 180 240V 5Vsb 4A DC Output with PDB 5V 50 Amp 3 3V 30 Amp 12V 0 6 Amp ...

Page 46: ...SC936 Chassis Manual B 2 Notes ...

Page 47: ...prevent static discharge Touch a grounded metal object before removing a component from the antistatic bag Handle the backplane by its edges only do not touch its components peripheral chips memory modules or gold contacts When handling chips or modules avoid touching their pins Put the backplane and peripherals back into their antistatic bags when not in use C 2 General Safety Guidelines Always d...

Page 48: ... layouts shown in this user s guide are based upon the latest revision available at the time of publishing The backplane you have received may or may not look exactly the same as the graphics shown in this manual C 4 Introduction to the SAS 936A Backplane The SAS 9836A backplane has been designed to utilize the most up to date technol ogy available providing your system with reliable high quality ...

Page 49: ...to work properly connect using a 10 pin LED cable This is only used when the activity LED is not supported by the hard drive 4 and 5 I2 C Connectors The I2 C connectors designated JP37 JP95 JP52 and JP96 are used to monitor HDD activity and status See the table on the right for pin definitions SAS Activity LED Header Pin Definitions Pin Definition Pin Definition 1 ACT IN 0 6 ACT IN 4 2 ACT IN 1 7 ...

Page 50: ...nated JSM1 JSM4 Each port is also compatible with SATA drives 7 8 and 9 Fan Connectors The 3 pin or 4 pin connectors designated JP54 JP56 and JP58 provide power to the fans See the table on the right for pin defini tions Sideband Definitions Pin Definition Pin Definition A11 SGPIO SDIN I2 C Backplane Addressing SB5 B11 Controller ID SB6 A12 SGPIO SDOUT I2 C Reset SB4 B10 GND SB2 A9 GND SB3 B9 SGPI...

Page 51: ...quare solder pad on the printed circuit board Note On two pin jumpers Closed means the jumper is on and Open means the jumper is off the pins Connector Pins Jumper Setting 3 2 1 3 2 1 Jumper Settings Jumper Jumper Settings Note JP35 1 2 Reset 2 3 Default MG9072 Chip Reset 1 JP50 1 2 Reset 2 3 Default MG9072 Chip Reset 2 MH7 PWR0 PWR1 PWR2 PWR3 FAN1 FAN3 FAN2 SEC_I2C R581 SAS936A 3 1 BAR CODE 5V 12...

Page 52: ...an use up to four fans To utilize each fan you must configure both jumpers as instructed below Fan Jumper Settings Jumper Jumper Settings Note JP61 1 2 With Fan Default 2 3 No Fan FAN 1 JP97 1 2 With Fan Default 2 3 No Fan FAN 1 JP62 1 2 With Fan Default 2 3 No Fan FAN 2 JP98 1 2 With Fan Default 2 3 No Fan FAN 2 JP63 1 2 With Fan Default 2 3 No Fan FAN 3 JP99 1 2 With Fan Default 2 3 No Fan FAN 3...

Page 53: ...utilize I2 C or SGPIO SGPIO is the default mode and can be used without making changes to your jumper The following information details which jumper must be configured to use SGPIO mode or restore your backplane to I2 C mode SGPIO Default and I2 C Settings Jumper SGPIO Default Setting I2 C Setting JP84 1 2 2 3 ...

Page 54: ...fication D45 ON Failure in Fan 1 D47 ON Failure in Fan 2 D49 ON Failure in Fan 3 D3 ON Alarm 1 Overheat drive failure fan failure in channels 0 7 D36 ON Alarm 2 Overheat drive failure in channels 8 15 D53 OFF 5V Backplane power failure Light is on during normal operation D54 OFF 12V Backplane power failure Light is on during normal operation Front LED Indicators D45 D49 D47 D36 D3 D54 D53 Figure C...

Page 55: ...AS SATA 0 SAS SATA HDD 0 SAS SATA 12 SAS SATA HDD 12 SAS SATA 1 SAS SATA HDD 1 SAS SATA 13 SAS SATA HDD 13 SAS SATA 2 SAS SATA HDD 2 SAS SATA 14 SAS SATA HDD 14 SAS SATA 3 SAS SATA HDD 3 SAS SATA 15 SAS SATA HDD 15 SAS SATA 4 SAS SATA HDD 4 SAS SATA 16 SAS SATA HDD 16 SAS SATA 5 SAS SATA HDD 5 SAS SATA 17 SAS SATA HDD 17 SAS SATA 6 SAS SATA HDD 6 SAS SATA 18 SAS SATA HDD 18 SAS SATA 7 SAS SATA HDD...

Page 56: ... C A Rear LED Indicators Rear LED Hard Drive Activity Failure LED SAS 0 D12 D5 SAS 1 D13 D6 SAS 2 D14 D7 SAS 3 D15 D8 SAS 4 D18 D19 SAS 5 D21 D20 SAS 6 D22 D23 SAS 7 D24 D29 SAS 8 D25 D30 SAS 9 D26 D31 SAS 10 D27 D32 SAS 11 D28 D33 SAS 12 D40 D37 SAS 13 D41 D38 SAS 14 D42 D39 SAS 15 D87 D88 ...

Page 57: ...nt static discharge Touch a grounded metal object before removing a component from the antistatic bag Handle the backplane by its edges only do not touch its components peripheral chips memory modules or gold contacts When handling chips or modules avoid touching their pins Put the backplane and peripherals back into their antistatic bags when not in use D 2 General Safety Guidelines Always discon...

Page 58: ...s shown in this manual D 4 Introduction to the SAS 936EL Backplane The SAS 9836EL backplane has been designed to utilize the most up to date tech nology available providing your system with reliable high quality performance This manual reflects SAS 936EL Revision 1 00 the most current release available at the time of publication Always refer to the Supermicro Web site at www supermicro com for the...

Page 59: ... A C A C A C 1 D 5 Front Connectors and Jumpers 1 1 1 9 8 7 6 1 6 1 6 5 1 5 4 3 1 3 2 1 2 10 12 11 Front Connectors 1 Primary and secondary I2 C con nectors optional 2 Primary and secondary flash Chips 3 Primary and secondary expander chips 4 Power connectors PWR3 PWR2 PWR1 PWR0 5 EPP connectors J16 and J15 6 Fan connectors Fan1 Fan2 and Fan3 7 SAS connectors PRI_J1 8 SAS connectors PRI_J0 9 SAS c...

Page 60: ...atusthroughLED Seethe table on the right for pin definitions There are four total connectors two primary and two secondary These connectors are optional and should only be used by qualified technicians I2 C Connector Pin Definitions Pin Definition 1 Data 2 Ground 3 Clock 4 No Connection 3 Primary and Secondary Expander Chips These primary and secondary expander chips allow the backplane to support...

Page 61: ...4 provide power to the system fans See the table on the right for pin definitions Fan Connectors Pin Definition 1 Ground 2 12V 3 Tachometer 7 11 SAS Ports Note that the primary and secondary sets of SAS ports are in different order From right to left the ports are Primary A3 A1 and A2 and Secondary B3 B1 and B2 ...

Page 62: ...GND GND A C A C A C A C 1 Socket Settings Socket Socket Setting Note REMOTE_FAN_FAIL_ SOCKET Connected Front panel fan fail indicator Optional PRI _J 1 PRI _J 0 BUZZER1 BUZZER_ENB1 J 15 FAN3 FAN2 F3 FANFAI L1 OVERHEATFAI L1 12V_LED 5V_LED REM OTE_FAN_FAI L_SCOKET R581 R658 R659 R1 R2 PRI _M ODE4 1 2 A C A C A C A C 1 Buzzer Enb1 PRI_Mode4 REMOTE_FAN_FAIL_ SOCKET M H7 SEC_J 2 SEC_J 1 SEC_J 0 J 16 P...

Page 63: ...Jumper Setting 3 2 1 3 2 1 General Jumper Settings Jumper Jumper Settings Note PRI_MODE4 1 2 Factory setting Do not change PRI_MODE5 2 3 Factory setting Do not change PRI_BLINK Open Factory setting Do not change SEC_MODE4 1 2 Factory setting Do not change SEC_MODE5 2 3 Factory setting Do not change SEC_BLINK Open Factory setting Do not change BUZZER_ENB Open Disable Closed Enable Buzzer enable FAN...

Page 64: ...I _EXP SEC_EXP SAS936EL2 REV 1 00 W W N W W N BARCODE 1 2 1 2 5V 12V GND GND 5V 12V GND GND 5V 12V GND GND 5V 12V GND GND A C A C A C A C 1 Backplane LEDs LED State Specification OVERHEATFAIL1 ON Overheat or drive failure FANFAIL1 ON Failure in system fans 5V OFF Backplane power failure Light is on during normal operation 12V OFF Backplane power failure Light is on during normal operation Front LE...

Page 65: ... 9 FAIL 10 ACT 10 FAIL 13 ACT 13 FAIL 11 ACT 11 FAIL 2 ACT 2 FAIL 5 ACT 5 FAIL 6 ACT 6 FAIL 7 ACT 7 FAIL 1 ACT 1 FAIL 3 ACT 3 FAIL 4 ACT 4 FAIL 8 ACT 8 J 14 J 2 J 3 J 4 J 7 J 8 J 9 J 13 J 12 J 11 J 10 J 1 J 0 J 5 J 6 FAI L1 C75 C77 ACT1 FAI L2 ACT2 FAI L3 ACT3 FAI L4 ACT4 FAI L7 ACT7 FAI L6 ACT6 FAI L5 ACT5 FAI L8 ACT8 FAI L9 ACT9 A C A C A C A C A C A A C A C A C A C A C A C A C A C A A C A C A C...

Page 66: ... 0 SAS 1 ACT 1 FAIL 1 SAS 2 ACT 2 FAIL 2 SAS 3 ACT 3 FAIL 3 SAS 4 ACT 4 FAIL 4 SAS 5 ACT 5 FAIL 5 SAS 6 ACT 6 FAIL 6 SAS 7 ACT 7 FAIL 7 SAS 8 ACT 8 FAIL 8 SAS 9 ACT 9 FAIL 9 SAS 10 ACT 10 FAIL 10 SAS 11 ACT 11 FAIL 11 SAS 12 ACT 12 FAIL 12 SAS 13 ACT 13 FAIL 13 SAS 14 ACT 14 FAIL 14 SAS 15 ACT 15 FAIL 15 ...

Page 67: ...VERHEATFAI L1 12V_LED 5V_LED REM OTE_FAN_FAI L_SCOKET R581 R658 R659 R1 R2 PRI _M ODE4 SEC_M ODE4 SEC_FLASH PRI _FLASH PRI _EXP SEC_EXP SAS936EL2 REV 1 00 W W N W W N BARCODE 1 2 1 2 5V 12V GND GND 5V 12V GND GND 5V 12V GND GND 5V 12V GND GND A C A C A C A C 1 MH7 PRI_J2 PRI_J1 PRI_J0 BUZZER1 BUZZER_ENB1 J15 J16 PWR0 PWR1 PWR2 PWR3 FAN1 FAN3 FAN2 F3 BC46 SEC_IPMI SEC_I2C FANFAIL1 OVERHEATFAIL1 12V...

Page 68: ...em will automatically fail over to Port B SAS HBA SAS HBA Dual Host Bus Adapter In a dual host bus configuration the backplane connects to two Host Bus Adapters HBA Dual Host Bus Adapter Failover If the expander or data path in Port A fails the system will automatically fail over to Port B This maintains a full connection to all drives SEC_J2 SEC_J1 SEC_J0 PRI_J2 PRI_J1 B3 B2 B1 A3 A2 A1 PRI_J2 PR...

Page 69: ... configuration the first chassis includes a motherboard and at least one Host Bus Adapter HBA Other servers in this enclosed system include a power card This section describes the supported power card for the SAS 936 backlplane system For more information see the PCC JBPWR2 power card manual This manual a can be found at the http www supermicro com or as an appendix in the SAS 936 chassis manual A...

Page 70: ... Host Bus Adapter HBA Host Bus Adapter Single Internal Host Bus Adapter Dual Internal Host Bus Adapter Connecting an Internal Host Bus Adapter to the Backplane The following section lists the most common cables used to connect the HBA to the backplane SEC_J2 SEC_J1 SEC_J0 PRI_J2 PRI_J1 B3 B2 B1 A3 A2 A1 PRI_J2 PRI_J1 A3 A2 A1 ...

Page 71: ...s at the other This cable connects from the HBA to the SAS 936EL backplane Cable Name iPass to 4 Lane Part CBL 0117 Length 46 cm 18 inches Supported Internal HBA to Backplane Cables Use the following listed cables to create connections between the internal HBA and backplane The cables required depend on the HBA connector Figure D 6 iPass to 4 lane Cable CBL 0117 ...

Page 72: ...36 pins at each end It connects from the HBA to the SAS 936EL backplane Cable Name iPass mini SAS TO iPass mini SAS Part CBL 0108L 02 Length 39 cm 15 inches Part CBL 0109L 02 Length 22 cm 9 inches Part CBL 0110L 02 Length 18 cm 7 inches Figure D 7 iPass Mini SAS to iPass Mini SAS CBL 0110L 2 ...

Page 73: ...s This allows a JBOD Just a Bunch Of Drives configuration from an existing system HBA Host Bus Adapter Power Card Single External Host Bus Adapter HBA Host Bus Adapter Power Card HBA Host Bus Adapter Dual External Host Bus Adapter CBL 0200L External HBA Cable CBL 0200L External HBA Cables SEC_J2 SEC_J1 SEC_J0 PRI_J2 PRI_J1 B3 B2 B1 A3 A2 A1 PRI_J2 PRI_J1 A3 A2 A1 SEC_J2 SEC_J1 SEC_J0 PRI_J2 PRI_J1...

Page 74: ...f your external HBA has an Infiniband connector Description This cable has an Infiniband connector SFF 8470 on one end and an SFF 8088 1X 26 pins at the other end Cable Name SAS InfiniBand to Mini SAS X4 1M cable PBF Part CBL 0200L Length 1 meter Figure D 8 SAS InfiniBand to Mini SAS CBL 0200L ...

Page 75: ...ost Bus Adapter Port B Expander 2 Port A Expander 1 Power Card Port B Expander 2 Port A Expander 1 Single HBA Conguration Connecting Multiple Backplanes in a Single Channel Environment This section describes the cables used when cascading from a single HBA These connections use CBL 0167L internal cables and CBL 0166L external cables SEC_J2 SEC_J1 SEC_J0 PRI_J2 PRI_J1 B3 B2 B1 A3 A2 A1 PRI_J2 PRI_J...

Page 76: ...x1 Ports Single or Dual Placement External cable Description Internal cable Connects the backplane to the Host Bus Adapter HBA or external port Used in single port environments Cable Name SAS EL2 EL1 Backplane Cable Internal w 2 port Cascading Cable 68 cm Part CBL 0167L SFF 8087 to SFF 8088 x1 Ports Single Placement Internal cable Single HBA Configuration Cables Figure D 9 SAS Internal Backplane C...

Page 77: ... B3 B2 B1 A3 A2 A1 PRI_J2 PRI_J1 A3 A2 A1 Cable 0166L External Cable HBA Host Bus Adapter Port A Expander 1 HBA Host Bus Adapter Port B Expander 2 Cable 0168L with Single Port Assembly Internal Cable Connecting Multiple Backplanes in a Dual Channel Environment This section describes the cables used when cascading from a single HBA These connections use CBL 0168L internal cables and CBL 0166L exter...

Page 78: ...cement Internal cable Description External cascading cable Connects ports between servers Use one cable for single port connections and two cables for dual port connections Cable Name SAS EL2 EL1 Cascading Cable External 68cm Part CBL 0166L Ports Single or Dual Placement External cable Dual HBA Conguration Cables Dual Port Cable Assembly Figure D 12 SAS Cascading Cable External CBL 0166L Figure D ...

Page 79: ...d HBA For more infor mation see the SC936 chassis manual 3 4 Supported Cascading Configurations Other Considerations Cascading supports up to 122 hard drives Use the same cables for all single port configurations Cable 0167L Internal cable Cable 0166L External Cable Single Port Cable Assembly HBA Host Bus Adapter Port B Expander 2 Power Card Power Card SEC_J2 SEC_J1 SEC_J0 PRI_J2 PRI_J1 B3 B2 B1 A...

Page 80: ...PRI_J1 A3 A2 A1 Port A Expander 1 SEC_J2 SEC_J1 SEC_J0 PRI_J2 PRI_J1 B3 B2 B1 A3 A2 A1 PRI_J2 PRI_J1 A3 A2 A1 Port A Expander 1 SEC_J2 SEC_J1 SEC_J0 PRI_J2 PRI_J1 B3 B2 B1 A3 A2 A1 PRI_J2 PRI_J1 A3 A2 A1 Port A Expander 1 SEC_J2 SEC_J1 SEC_J0 PRI_J2 PRI_J1 B3 B2 B1 A3 A2 A1 PRI_J2 PRI_J1 A3 A2 A1 Port A Expander 1 Power Card SEC_J2 SEC_J1 SEC_J0 PRI_J2 PRI_J1 B3 B2 B1 A3 A2 A1 PRI_J2 PRI_J1 A3 A2 ...

Page 81: ...pter Port B Expander 2 Cable 0168L internal cable Dual Port Cable Assembly SEC_J2 SEC_J1 SEC_J0 PRI_J2 PRI_J1 B3 B2 B1 A3 A2 A1 PRI_J2 PRI_J1 A3 A2 A1 Power Card Port B Expander 2 Port A Expander 1 SEC_J2 SEC_J1 SEC_J0 PRI_J2 PRI_J1 B3 B2 B1 A3 A2 A1 PRI_J2 PRI_J1 A3 A2 A1 Power Card Port B Expander 2 Port A Expander 1 SEC_J2 SEC_J1 SEC_J0 PRI_J2 PRI_J1 B3 B2 B1 A3 A2 A1 PRI_J2 PRI_J1 A3 A2 A1 ...

Page 82: ...2 PRI_J1 A3 A2 A1 Port B Ex 2 Port A Ex 1 Power Card SEC_J2 SEC_J1 SEC_J0 PRI_J2 PRI_J1 B3 B2 B1 A3 A2 A1 PRI_J2 PRI_J1 A3 A2 A1 Port B Ex 2 SEC_J2 SEC_J1 SEC_J0 PRI_J2 PRI_J1 B3 B2 B1 A3 A2 A1 PRI_J2 PRI_J1 A3 A2 A1 Port B Ex 2 Port A Ex 1 Port A Ex 1 Power Card Power Card SEC_J2 SEC_J1 SEC_J0 PRI_J2 PRI_J1 B3 B2 B1 A3 A2 A1 PRI_J2 PRI_J1 A3 A2 A1 Port B Ex 2 SEC_J2 SEC_J1 SEC_J0 PRI_J2 PRI_J1 B3...

Page 83: ...ons CBL 0166L External cable External Cables In the previous diagrams external ca bles are represented with two different lines These cables are both CBL 0166L external cables Different lines help the user determine cable routing Dual Cable Routing ...

Page 84: ... reasonably expected to result in significant injury or loss of life or catastrophic property damage Accordingly Supermicro disclaims any and all liability and should buyer use or sell such products for use in such ultra hazardous applications it does so entirely at its own risk Furthermore buyer agrees to fully indemnify defend and hold Supermicro harmless for and against any and all claims deman...

Reviews: