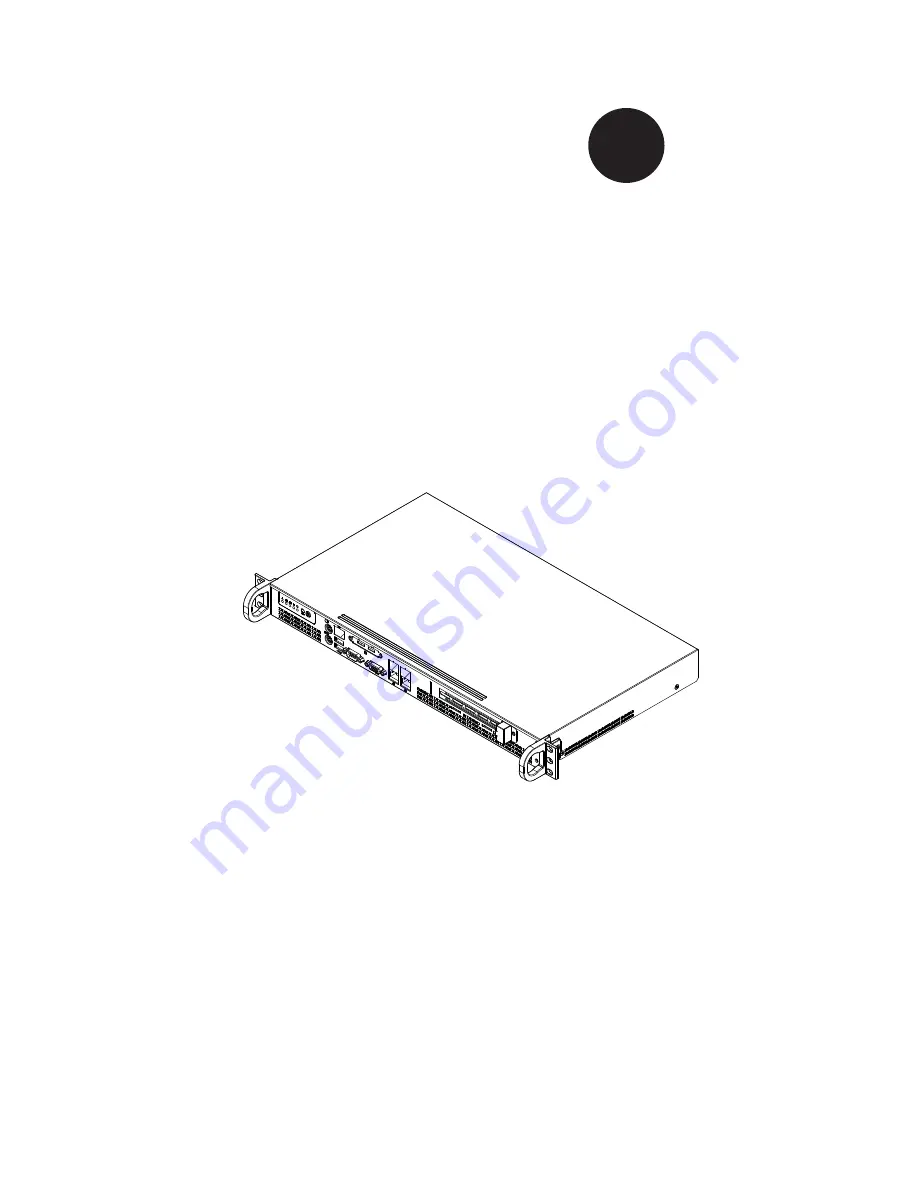
background image

SC503 Chassis Series

SC503-200B


S

UPER

®

USER’S MANUAL

1.0b

Summary of Contents for SC503-200B

Page 1: ...SC503 Chassis Series SC503 200B SUPER USER S MANUAL 1 0b ...

Page 2: ...RED OR USED WITH THE PRODUCT INCLUDING THE COSTS OF REPAIRING REPLACING INTEGRATING INSTALLING OR RECOVERING SUCH HARDWARE SOFTWARE OR DATA Any disputes arising between manufacturer and customer shall be governed by the laws of Santa Clara County in the State of California USA The State of California County of Santa Clara shall be the exclusive venue for the resolution of any such disputes Super M...

Page 3: ...xperienced technicians only Supermicro s SC503 chassis features a unique and highly optimized design for low wattage processor platforms The chassis is equipped with a 200W high efficiency power supply for superb power savings High performance fans provide ample optimized cooling This document lists compatible parts available when this document was published Always refer to the our Web site for up...

Page 4: ... and other components Chapter 4 System Interface Refer to this chapter for details on the system interface which includes the functions and information provided by the control panel on the chassis as well as other LEDs located throughout the system Chapter 5 Chassis Setup and Maintenance Follow the procedures given in this chapter when installing removing or reconfiguring your chassis Chapter 6 Ra...

Page 5: ...ty 2 3 Chapter 3 Chassis Components 3 1 Overview 3 1 3 2 Components 3 1 Chassis 3 1 Mounting to a Rack optional 3 1 Power Supply 3 1 3 3 Where to get Replacement Components 3 2 Chapter 4 System Interface 4 1 Overview 4 1 4 2 Control Panel Buttons 4 2 4 3 Control Panel LEDs 4 2 Chapter 5 Chassis Setup and Maintenance 5 1 Overview 5 1 5 2 Removing the Chassis Cover 5 2 5 3 Installing the Hard Drives...

Page 6: ...ns 6 2 General Server Precautions 6 2 Rack Mounting Considerations 6 3 Ambient Operating Temperature 6 3 Reduced Airflow 6 3 Mechanical Loading 6 3 Circuit Overloading 6 3 6 4 Rack Mounting Instructions 6 4 Installing the Chassis into a Rack 6 4 Installing the Chassis into a Telco Rack 6 5 Appendix A Cables Screws and Other Accessories Appendix B SC503 Power Supply Specifications ...

Page 7: ...part numbers for your particular chassis model http www supermicro com Chapter 1 Introduction 1 1 SC503 200B Chassis Model CPU HDD I O Slots Power Supply SC503 200 B Intel Celeron 400 series 35W See below 1 Fixed 3 5 hard drive or up to 2 fixed 2 5 hard drives 1x FH optional 200W IMPORTANT It is critical to choose the correct heatsink for your motherboard that will fit in the SC503 chassis Recomme...

Page 8: ... To en sure the highest level of professional service and technical support we strongly recommend purchasing exclusively from our Supermicro Authorized Distributors System Integrators Resellers A list of Supermicro Authorized Distributors System Integrators Reseller can be found at http www supermicro com Click the Where to Buy link ...

Page 9: ...ddress Super Micro Computer B V Het Sterrenbeeld 28 5215 ML s Hertogenbosch The Netherlands Tel 31 0 73 6400390 Fax 31 0 73 6416525 Email sales supermicro nl General Information support supermicro nl Technical Support rma supermicro nl Customer Support Asia Pacific Address Super Micro Computer Inc 4F No 232 1 Liancheng Rd Chung Ho 235 Taipei County Taiwan R O C Tel 886 2 8226 3990 Fax 886 2 8226 3...

Page 10: ...must be mailed when service is complete For faster service RMA authorizations may be requested online http www supermicro com support rma Whenever possible repack the chassis in the original Supermicro carton using the original packaging material If these are no longer available be sure to pack the chassis securely using packaging material to surround the chassis so that it does not shift within t...

Page 11: ... in any way If the chassis itself shows damage file a damage claim with carrier who delivered your system Decide on a suitable location for the rack unit that will hold that chassis It should be situated in a clean dust free area that is well venilated Avoid areas where heat electrical noise and eletromagnetic fields are generated You will also need it placed near at least one grounded power outle...

Page 12: ...em When working around exposed electrical circuits another person who is fa miliar with the power off controls should be nearby to switch off the power if necessary Use only one hand when working with powered on electrical equipment This is to avoid making a complete circuit which will cause electrical shock Use extreme caution when using metal tools which can easily damage any electrical componen...

Page 13: ... neckties and unbuttoned shirt sleeves which can come into contact with electrical circuits or be pulled into a cooling fan Remove any jewelry or metal objects from your body which are excellent metal conductors that can create short circuits and harm you if they come into contact with printed circuit boards or areas where power is present After accessing the inside of the system close the system ...

Page 14: ...nto contact with your clothing which may retain a charge even if you are wearing a wrist strap Handle a board by its edges only do not touch its components peripheral chips memory modules or contacts When handling chips or modules avoid touching their pins Put the serverboard and peripherals back into their antistatic bags when not in use For grounding purposes make sure your computer chassis prov...

Page 15: ...e options One fixed 3 5 hard drive Up to 2 fixed 2 5 hard drives One FH HL add on card For the latest shipping lists visit our Web site at http www supermicro com Mounting to a Rack optional The SC503 can be placed in a rack for secure storage and use To set up your rack follow the instructions included in this manual Power Supply Each SC503 chassis model includes a high efficiency 80 low noise po...

Page 16: ... To en sure the highest level of professional service and technical support we strongly recommend purchasing exclusively from our Supermicro Authorized Distributors System Integrators Resellers A list of Supermicro Authorized Distributors System Integrators Resellers can be found at http www supermicro com Click the Where to Buy link ...

Page 17: ... These LEDs keep you constantly informed of the overall status of the system and monitor the activity and health of specific components SC503 models feature two buttons on the chassis control panel an on off button and a reset but ton This chapter explains the meanings of all LED indicators and the appropriate responses you may need to take Figure 4 1 Chassis LEDs ...

Page 18: ...anel located on the front of the SC503 chassis has five LEDs These LEDs provide you with critical information related to different parts of the system This section explains what each LED indicates when illuminated and any corrective action you may need to take Power The main power switch is used to apply or remove power from the power supply to the server system Turning off system power with this ...

Page 19: ...ower supply units This LED should normally be illuminated when the system is operating HDD Indicates IDE channel activity SAS SATA drive and or DVD ROM drive activity when flashing NIC1 Indicates network activity on GLAN1 when flashing NIC2 Indicates network activity on GLAN2 when flashing ...

Page 20: ...SC503 Chassis Manual 4 4 Notes ...

Page 21: ...hassis The only tool you will need to install components and perform maintenance is a Phillips screwdriver Print this page to use as a reference while setting up your chassis Review the warnings and precautions listed in the manual be fore setting up or servicing this chassis These include infor mation in Chapter 2 System Safety and the warning precau tions listed in the setup instructions ...

Page 22: ...e of the chassis and one screw on the back Once the screws have been removed lift the cover upward to remove it from 2 the chassis Warning Except for short periods of time do NOT operate the server without the cover in place The chassis cover must be in place to allow proper airflow and prevent overheating Figure 5 1 Removing the Chassis Cover 1 2 1 ...

Page 23: ...he chassis 1 2 The 2 5 hard drives 1 must be installed in their bracket 2 before they are screwed into the chassis Bracket part number is MCP 220 00044 0N Warning Enterprise level hard disk drives are recommended for use in Supermicro chassis and servers For information on recommended HDDs visit the Supermicro Web site at http www supermicro com products nfo files storage SAS 1 Com pList 110909 pd...

Page 24: ...vent short circuits by securing space between the motherboard and the chassis surface The SC503 chassis includes permanent and removable standoffs in locations used by Micro ATX 9 6 x9 6 motherboards These standoffs accept the rounded Phillips head screws included in the SC503 accessories packaging Chassis Standoffs ...

Page 25: ...he mounting holes of the 2 motherboard Lay the motherboard on the chassis aligning the board with the standoffs 3 Secure the motherboard to the chassis using the rounded Phillips head 4 screws Do not exceed eight pounds of torque when tightening down the motherboard Secure the CPU s heatsinks and other components to the motherboard as 5 described in the motherboard documentation Connect the cables...

Page 26: ...sis from the power source 1 Remove the screws holding the add on card clip and the dummy bracket 2 which covers the openings in the back of the chassis Remove the add on card clip and the dummy plate from the chassis 3 Outside of the chassis insert the add on card into the riser card 4 Insert the assembled add on card and riser card into the expansion slot inside 5 the chassis carefully aligning t...

Page 27: ...ounting thru holes in the mother 2 board Using the screws of the heatsink attach the heatsink to the motherboard 3 Figure 5 6 Installing the Heatsink Note Intel Celeron 400 35W platform motherboards may require an optimized design SNK P0032A4 active heatsink Refer to Appendix A of this manual for basic heatsink information Refer to your motherboard documentation for detailed heatsink information a...

Page 28: ...the 1 chassis Use only recommended server parts 2 Make sure no wires or foreign objects obstruct air flow through the chassis 3 Pull all excess cabling out of the airflow path or use shorter cables The control panel LEDs inform you of system status See Chapter 3 System 4 Interface for details on the LEDs and the control panel buttons ...

Page 29: ...ermicro see contact information in the Preface Replacing the Power Supply Unplug all power leading to the chassis 1 Disconnect all wiring from the power supply 2 Remove the four screws which hold the power supply in the chassis The two 3 rear mounting screws are located on the back of the power supply The two bottom mounting screws are accessed on the underside of the chassis and extend upwards th...

Page 30: ...m the chassis 4 Align the mounting thru holes on the power supply with the mounting holes 5 in the chassis and reattach the power supply to the chassis using the four screws which were previously set aside Connect the chassis wiring to the power supply 6 ...

Page 31: ... a clean dust free area that is well ventilated Avoid areas where heat electrical noise and electromagnetic fields are generated You will also need it placed near a grounded power outlet Be sure to read the Rack and Server Pre cautions in the next section 6 3 Preparing for Setup The box your chassis was shipped in should include four mounting screws which you will need if you intend to install the...

Page 32: ... a time Extending two or more simul taneously may cause the rack to become unstable General Server Precautions Review the electrical and general safety precautions that came with the com ponents you are adding to your chassis Determine the placement of each component in the rack Install the heaviest server components on the bottom of the rack first and then work up Use a regulating uninterruptible...

Page 33: ...anical Loading Equipment should be mounted into a rack so that a hazardous condition does not arise due to uneven mechanical loading Circuit Overloading Consideration should be given to the connection of the equipment to the power supply circuitry and the effect that any possible overloading of circuits might have on overcurrent protection and power supply wiring Appropriate consideration of equip...

Page 34: ...ld also refer to the installation instructions that came with the rack unit you are using Installing the Chassis into a Rack Confirm that chassis includes the four mounting screws required to mount the 1 chassis into a rack Align the thru holes of the chassis with the thru holes of the rack 2 Insert the mounting screws into the thru holes in the front of the chassis and 3 through the thru holes in...

Page 35: ...hout the use of rails Figure 6 2 Installing the Chassis into a Telco Rack Installing the Chassis into a Telco Rack Confirm that chassis includes the four mounting screws required to mount the 1 chassis into a rack Align the thru holes of the chassis with the thru holes of the rack 2 Insert the mounting screws into the thru holes in the front of the chassis and 3 through the thru holes in the rack ...

Page 36: ...SC503 Chassis Manual 6 6 Notes ...

Page 37: ...Cables Included with SC503 Chassis SC503 200B Part Type Length Description CBL 0235L Ribbon 30 16 pin to 16 pin ribbon cable for control panel Cable 6 Regional power cord A 3 Optional Accessories The following accessories are compatible with the SC503 Chassis Hard Drive Carrier Tray MCP 220 00044 0N 2 5 hard drive carrier One carrier can hold up to two 2 5 hard drives The SC503 200B can hold up to...

Page 38: ...s utilizing Intel Celeron 400 series platforms To ascertain which heatsink is appropriate for your motherboard refer to the Supermicro Web site at http www supermicro com Extending Power Cables Although Supermicro chassis are designed with to be efficient and cost effective some compatible motherboards have power connectors located in different areas To use these motherboards you may have to exten...

Page 39: ...ncludes all the screws needed to setup your chassis This section lists and describes the most common screws used Your chassis may not require all the parts listed Flat head M4 x 4 mm 0 157 RAIL Round head M4 x 4 mm 0 157 Flat head M5 x 12 mm 0 472 Washer for M5 DVD ROM CD ROM and FLOPPY DRIVE Flat head 6 32 x 5 mm 0 197 Pan head 6 32 x 5 mm 0 197 Round head M3 x 5 mm 0 197 Pan head 6 32 x 5 mm 0 1...

Page 40: ...SC503 Chassis Manual A 4 Notes ...

Page 41: ... Appendix B SC503 Power Supply Specifications This appendix lists power supply specifications for your chassis system 200W MFR Part PWS 201 1H Rated AC Voltage 100 240V 50 60Hz 4 2Amp 5V standby 2 Amp 12V 16 Amp 5V 8 Amp 3 3V 8 Amp 12V 0 5 Amp ...

Page 42: ... be reasonably expected to result in significant injury or loss of life or catastrophic property damage Accordingly Supermicro disclaims any and all liability and should buyer use or sell such products for use in such ultra hazardous applications it does so entirely at its own risk Furthermore buyer agrees to fully indemnify defend and hold Supermicro harmless for and against any and all claims de...

Reviews: