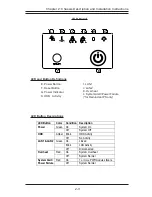
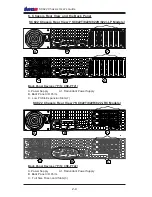
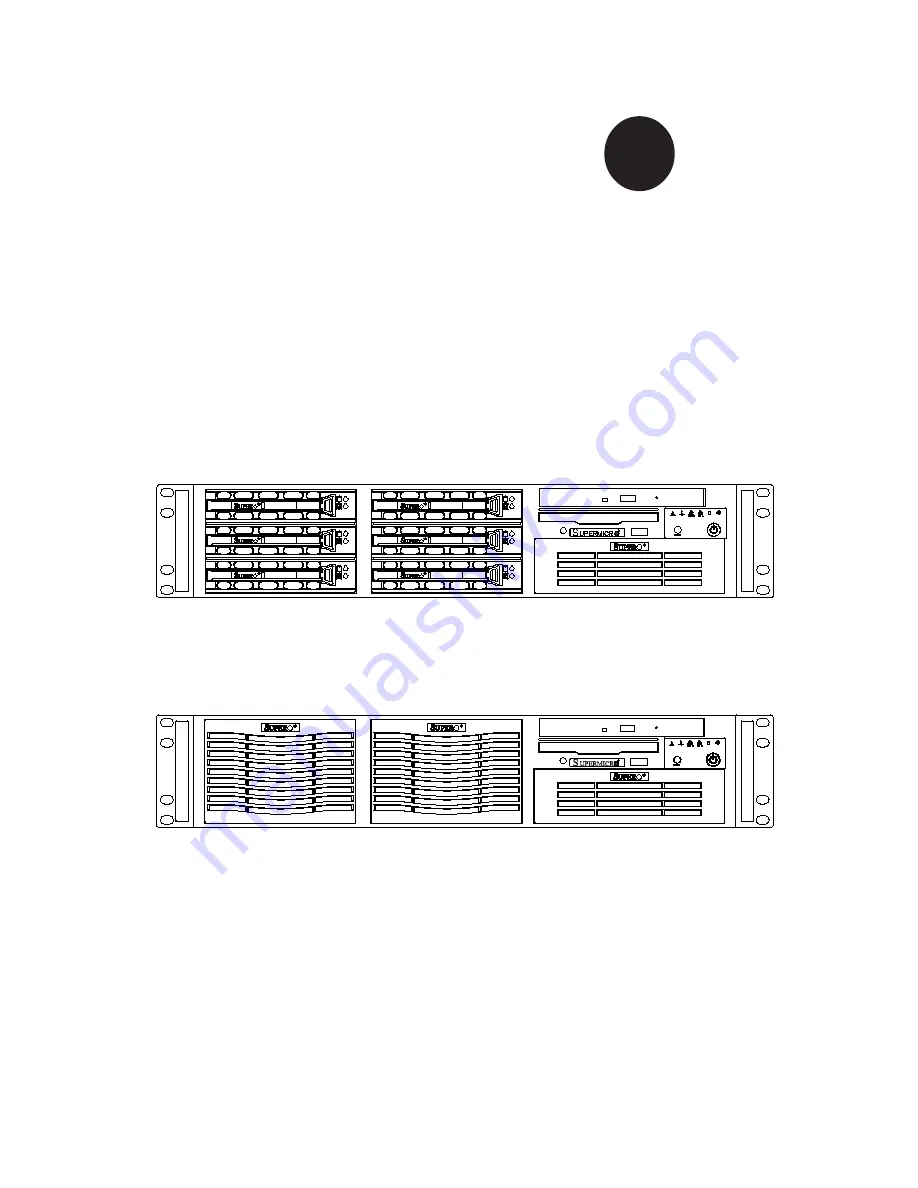
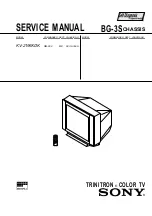
background image

1.0a

®


S

UPER

SC822 CHASSIS

USER'S  GUIDE

(SC822T/SC822S/SC822R)

(SC822i)

Summary of Contents for SC822i

Page 1: ...1 0a SUPER SC822 CHASSIS USER S GUIDE SC822T SC822S SC822R SC822i...

Page 2: ...THE USE OR INABILITY TO USE THIS PRODUCT OR DOCUMENTATION EVEN IF ADVISED OF THE POSSIBILITY OF SUCH DAMAGES IN PARTICULAR THE VENDOR SHALL NOT HAVE LIABILITY FOR ANY HARDWARE SOFTWARE OR DATA STORED...

Page 3: ...ion Procedures 2 1 2 1 Chassis Description 2 1 A Contents of the Accessory Kit 2 1 B Chassis Front View and the Front Control Panel 2 2 C Chassis Rear View and the Back Panel 2 4 2 2 Chassis Installat...

Page 4: ...sheet C13 type female connector Be sure to disconnect the power supply before accessing the SC822 or its components Plug the Power cord s into a socket that is properly grounded before turning on the...

Page 5: ...Laser CAUTION Do not open the enclosures of power supplies or CD ROM to avoid injury 1 2 General Safety Guidelines Warning Follow these rules to ensure general safety Keep the area around the SC822 cl...

Page 6: ...odules avoid touching their pins Put the motherboard and peripherals back into their antistatic bags when not in use For grounding purposes make sure your computer chassis provides excel lent conducti...

Page 7: ...ews and fasteners to remove the cover or components 2 Save all the screws and fasteners for later use If necessary label these screws or fasteners for easy identification 3 Follow the instruction give...

Page 8: ...and this Power Disconnect must be clearly marked 5 The rack assembly shall be properly grounded to avoid electric shock 6 The rack assembly must provide sufficient airflow to the chassis for proper c...

Page 9: ...s SATA Accessories For the SC822T only One 1 SATA backplane One 1 SATA Activity LED cable Six 6 SATA cables Six 6 SATA drive carriers IDE Accessories For the SC822i only Two 2 IDE drive carriers One 1...

Page 10: ...for 822R 400RC 822R 400LP 6 port SCSI Backplane CSE SCA 822 1 SCSI Cable CBL 033 U320 1 Floppy Drive FPD PNSC 02 01 1 CD ROM CDM TEAC 024 B 1 for Redundant Chassis Riser Card CSE RR2U 50 1 for Chassi...

Page 11: ...ons D 2 Jumper Setting Locations JP18 JP25 JP26 REV 1 01 REV 1 01 SUPER UPER SATA822 SATA822 R SATA4 SATA2 SATA0 SATA1 SATA3 SATA5 LED0 LED1 LED2 LED5 SATA0 SATA1 SATA2 LED3 LED4 SATA3 SATA4 SATA5 Jum...

Page 12: ...nly E 1 Jumper Settings and Pin Definitions E 2 Jumper Setting Locations H 2 5 2 4 2 H 2 1 7 35 2 7 KL M 5 2 7 Q 2 M U 7 JP18 4 pin PWR Connectors SCSI Connector LED0 LED1 LED2 SCA0 SCA1 SCA2 LED3 LED...

Page 13: ...ructions 0 6WDQGRIIV 6FUHZV IRU 0 6FUHZV IRU 6FUHZV IRU ULYHV 2 1 Chassis Description A Contents of the Accessory Kit The following items are included in the Accessory Kit Chapter 2 Chassis Descriptio...

Page 14: ...Trays 6 B Floppy Disk 1 Front Panel I O Device Definitions for the SC822T SC822S SC822R C 5 25 Drive Bay 1 A C SC822T SC822S SC822R Series SC822i Series Front Panel I O Device Definitions for the SC8...

Page 15: ...D and Button Definitions K Overheat J LAN2 I LAN1 H HDD Activity G Power Indicator F Reset Button E Power Button LED Button Descriptions E F G H I J K V L 2 L L 2 L 7 W 55 L 4 V L X W W X 4 L 5 2 L 2...

Page 16: ...k Panel Devices P N CSE PT21 A Power Supply A1 Redundant Power Supply B Back Panel I O Ports C Low Profile Expansion Slots 7 A SC822 Chassis Rear View SC822T 822R 822i RC Models B A1 C B C B Back Pane...

Page 17: ...Keyboard Mouse E USB Ports F COM Video Ports G LAN1 LAN2 H Parallel Port Power Module LED Descriptions For Redundant Power Supply only Note The actual I O Configuration of your system might be differe...

Page 18: ...he power supply connected to the SC822 2 Unplug all power cords from the system or the wall outlets 3 Disconnect all the cables and label the cables for easy identification 4 Use a grounded wrist stra...

Page 19: ...ling any components replacing chassis fans or accessing the motherboard you will first need to remove the top cover Procedures 1 Press the release tabs to release the cover from its locking position 2...

Page 20: ...ive into the chassis you need to first remove the SCA SATA drive tray from the chassis Procedures 1 Press the release tab located on the drive tray door to release the drive tray from its locking posi...

Page 21: ...DE drive tray from the chassis Procedures 1 Remove the screws from the top of the IDE drive as shown below 2 Once the top cover and the screws are removed press on the back side of the IDE drive tray...

Page 22: ...ocedures 1 Press the release tab located on the left side of the front chassis fan when facing the front side of the fan to release the chassis fan from its locking position as shown in the picture be...

Page 23: ...ush the release tab to the right to release the power supply from its locking position as shown below 3 Once the power supply module is released from its locking position remove it from the chassis Wa...

Page 24: ...corresponding mounting holes on the chassis 2 On the chassis install standoffs in the mounting holes that are corresponding to the mounting holes on the motherboard 3 Lay the motherboard on the stando...

Page 25: ...e rail assembly The inner rails are to be attached to the chassis and the outer rails are to be installed in the rack Outer rail to be installed in the rack Pull out the Inner rail to be attached on t...

Page 26: ...t the corresponding hooks on the chassis Once aligned attach the inner rail to the chassis by pressing the holes into the corresponding hooks 5 Once the rail is placed on the chassis pull the rail for...

Page 27: ...s are marked with Up Front Arrows front and Up Rear arrows rear 2 Secure the front short bracket marked with the Up Front arrows to the outer rail with two Type I screws 3 Attach the rear long bracket...

Page 28: ...The SC822 may not slide into the rack smoothly or easily when installed the first time However some adjustment to the slide assemblies might be needed for easy installation 8 You will need to release...

Reviews: