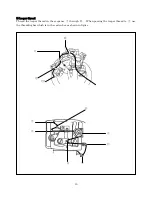
background image


OPERATION MANUAL 

For MODEL SE200-M SERIES 


SUZUKI MACHINERY CO., LTD. 

JAPAN 


● 

Thank you for your purchasing our machine. 

● 

Before operating the machine, carefully read this operation manual 

● 

This operation manual must be kept near the machine at any time. 

Summary of Contents for SE200-M SERIES

Page 1: ...MODEL SE200 M SERIES SUZUKI MACHINERY CO LTD JAPAN Thank you for your purchasing our machine Before operating the machine carefully read this operation manual This operation manual must be kept near the machine at any time ...

Page 2: ...e machine Never drop or wet the foot switch The machine should be only started and operated after having read the operation manual very carefully and only be according trained persons This machine should be only used for the purpose intend as industrial sewing machine All safety devices must be in the original position when the machine is ready for working or when in use Using the machine without ...

Page 3: ... when changing the environment from cold place to warm one Check the main voltage before the cord plug plugs in Main voltage is indicated on cord plug and machine number serial plate 2 Conditions for delivery stock opening setting and handling In case of delivery the machine never drop overthrow and damage to the carton box When re packing and delivering the machine fix the machine table and bed w...

Page 4: ...d thread trimmer etc Leaving the work place unattended Maintenance work 5 Foot switch optional hand switch Keep the foot switch optional hand switch dry anytime when in use Keep the foot switch optional hand switch clean anytime when in use Never use the foot switch optional hand switch if it got wet or the cord of it is damage Be careful to operate the foot switch optional hand switch when the se...

Page 5: ...chine is running 5 Adjust dial for stitch length Never touch or adjust it during the machine is running 6 Sewing and cutting area Never obtain to insert your hand in this area during the machine is running 7 In an emergency during the machine is running urgently push the emergency button to stop the machine functions see the page 22 for instruction of emergency button All covers for the machine mu...

Page 6: ... 17 6 Selecting for C B C A SEW ONLY and CUT ONLY 17 7 Setting for sewing speed 18 8 Setting for buttonhole and taper bar length 18 9 Size of knife and cutting block 19 10 Setting for the stitch length 19 11 Setting for the stitch density in part of eye 20 12 Setting for the position gauge 20 13 Foot switch 21 14 Safety interlock Safety lock 21 SEWING 22 23 1 How to start and finish 22 2 Emergency...

Page 7: ...tch width 2 2mm 3 2mm Upper cloth clamp height 10 12mm Type of buttonhole Eyelet and Straight buttonhole Sewing selection C B C A Sewing only Cut only Power AC100V 120V 5A or AC220V 230V 3A 1 phase 50 60Hz 200W See the serial number plate for actual voltage before operating Measurement W300 x L500 x H460 Weight N W 50kg 2 STANDARD ACCESSORIES a Instruction manual 1 b Parts list 1 c Tread guide sta...

Page 8: ...ve the feed table lock belt Install the thread guide stand into the machine table and main control box with screw under the sewing table Insert the main code into the connector of machine backside and foot switch code connector into the main control box as shown in figure RECOMMENDED MACHINE TABLE SIZE mm 40 1 000 Table thickness Machine base fixing screw hole 4 pcs φ7 Machine head Thread stand Ta...

Page 9: ...ine CAUTION Never connect the main plug and turn on the main switch before the machine sets Before connecting the connector please check the machine head is fixed completely on the machine table After checking connect the connector as following figures Connector Foot switch ...

Page 10: ...ad guide stand 7 Emergency button 8 LED lamp 9 Sewing speed control knob 10 Knife release knob 11 Sewing selector knob 12 Cloth clamp plate 13 Machine base 14 Feed table 15 Main switch with breaker 16 Foot switch for start 17 Foot switch for cloth clamp lock unlock 1 2 6 7 8 3 9 10 4 5 11 12 14 13 15 17 16 ...

Page 11: ...ace adjustment dial 19 Needle thread take up 20 Needle thread tension knob 21 Cutting block 22 Cloth clamp 23 Knife pressure adjustment screw 24 Buttonhole taper bar length adjustment indicator 19 20 18 21 22 23 24 ...

Page 12: ... position of waistband we recommend you to use wedge type of cloth clamp When changing from flat type to wedge type or reverse of it adjust the cloth clamp height 6 OILING CAUTION Switch off the main switch before oiling When lubricating the machine use high quality sewing machine oil Please check the oil tank whether oil comes to the red line max before operating the machine If oil is not enough ...

Page 13: ...ION Switch off the main switch before changing Needle system of your machine is SCHMETZ system 558 size 90 120 Never use over size 120 to the machine The machine is adjusted and equipped with size 90 or 110 at the factory Model SE200 MS is adjusted and equipped with size 90 for medium material sewing Model SE200 MJ is adjusted and equipped with size 110 for heavy jeans material sewing When changin...

Page 14: ...R REPLACE THE CLOTH CLAMP PLATE CAUTION Switch off the main switch When removing or replacing the left and right of cloth clamp plate the machine should be in the start position and the cloth clamp should be unlocked Removing Release the lock plate seize below the respective nail groove left or right with your thumb Raise the plate and pull it toward you Replacing Insert the forks of cloth clamp p...

Page 15: ...ead Looper thread Gimp thread Pass the thread and through a hole of the handle type thread guide and bring them under the machine bed 3 THREADING FOR THE GIMP LOOPER AND NEEDLE THREAD CAUTION Switch off the main switch before threading a Gimp thread Before threading remove both clamp plate and raise the feed table Thread the gimp thread in the sequence through When passing the gimp thread through ...

Page 16: ...15 b Looper thread Thread the looper thread in the sequence through When passing the looper thread to use the threading bar which is in the carton box as shown in figure ...

Page 17: ...read into a hole of the needle bar use the threading wire which is in the accessory box Insert the wire from lower hole of the needle bar as shown in figure After threading all thread replace both cloth clamp plate to the original position and clip the gimp and looper thread with the clip plate A B is the thread trimmer for cutting the gimp and looper threads after sewing Threading wire Part No S1...

Page 18: ...TH OR WITHOUT TAPER BAR CAUTION Switch off the main switch before selecting Raise the cloth feed table Move the lever A to your desired type until the lever is locked The left is for taper bar and the right is for non taper bar sewing CAUTION Never move the lever A during the machine is working It is a cause of trouble 6 SELECTING FOR C B C A SEWING ONLY AND CUT ONLY The sewing selector knob A is ...

Page 19: ... the screw A move the indicator B to the desired length and tighten the screw A When you want to have maximum 40mm loosen the screw and set the taper length to 9mm max and then set the indicator B to 40mm IMPORTANT When changing the buttonhole length size of the cutting block must be corresponded to the buttonhole length See page 19 for size of cutting block b Setting for taper bar length The tape...

Page 20: ...2 1mm Part No for the cutting block size of eyelet S1 2519A size 22mm S1 2519B size 24mm S1 2519C size 26mm S1 2519D size 28mm S1 2519E size 18mm S1 2519F size 20mm S1 2519G size 16mm S1 2519 size 35mm b For straight knife and cutting block Part No straight knife S1 2522 Part No for the cutting block size of straight S1 2523A size 22mm S1 2523B size 24mm S1 2523C size 26mm S1 2523D size 28mm S1 25...

Page 21: ...crew and move the adjusting lever to the direction or Direction Increase the number of stitch Direction Decrease the number of stitch 3 After adjusting tighten the screw and check the sewing with sample fabric before actual sewing Direction Only part A is adjustable Direction 12 SETTING FOR THE POSITION GAUGE CAUTION Switch off the main switch before setting Loosen the screw and adjust the positio...

Page 22: ...A is right One pedal start A is left Right foot switch Cloth clamp lock or unlock Left foot switch Cloth clamp lock and machine start Left foot switch Machine start You can operate the machine with left switch only but the right foot switch has the same function as two pedal start Connector A Optional hand switch is prepared this machine Part number of complete set SE 49K01A CUATION Be careful to ...

Page 23: ...OTE After pressing the start left foot switch the cloth clamp is not opened unlocked for safety reason even if you press the right foot switch during the machine is working e After the cloth clamp is completely locked press the start left foot switch The machine will be started and stopped after working such as cutting action and sewing etc and then cloth clamp opens unlocks automatically In this ...

Page 24: ...for 2 3 sec All LED are ON Press both foot switches emergency button and switch on at the same time All LED are ON OFF In case of knife is working Pull the knife driving release knob rotate its knob to counterclockwise or clockwise until the mark A align to the mark B and push the knob to the original position Set the knife selection knob to C O and test the cutting action NOTE When the machine is...

Page 25: ...the looper timing for the best sewing to prevent skip jump stitch 2 SETTING FOR STITCH WIDTH ZIG ZAG CAUTION Switch off the main switch before setting Remove the face plate Loosen the nut with spanner spanner is in the accessory box move the shaft up or down highest position is 3 2mm and lowest position is 2 2mm and tighten the nut at your desired position Before actual sewing please test the sewi...

Page 26: ...ng block arm comes to original position NOTE If you cannot achieve perfect cutting even the knife pressure is properly file dress up a surface of cutting block carefully See page 24 for dressing the cutting block b 1 Pull the knob to the left and keep it b 2 Rotate the knob clockwise until the mark B align to the mark C c When the mark B and C is align tighten the screw with hand for knife pressur...

Page 27: ...h Replacement position is that the machine should be the start position a Loosen the screw A remove the thread trimmer and replace a new one part No S1 3881 The position of it is as shown in figure Tighten the screw A after replacing Please check the position of thread trimmer and thread trimmer fixing arm whether it does not hit to other parts by moving the thread trimmer fixing arm to left with ...

Page 28: ...sors Is the main motor or inverter broken Is the CPU circuit board broken Is the main motor broken 3 Feed table doesn t move or stop Check the sensor for feed table sensor position or lead wire of it Check the driver for table motor motor lead wire or motor Is the timing belt for the feed table breakage Is the motor for feed table motor broken Is the CPU circuit board broken 4 Knife doesn t work o...

Page 29: ...s Schmetz system 558 90 120 Is there any scratches on the surface of loopers needle guard spreaders or throat plate Is there any scratches on the threading hole of each threading guide check part No S1 0514 S1 1953A S1 2931 or s1 2951 Is the adjustment of looper timing or needle bar height correctly Did you use high quality thread Is the adjustment of needle thread tension correctly 12 Knife broke...

Reviews: