Note: See your manual CD for a detailed owner’s manual and more
setup details concerning your new subwoofer.
1. Clear a location for your SVS powered cylinder or box subwoofer.
Ensure you have an AC power
outlet ready nearby and can route an RCA interconnect (signal cable) to the sub from your AVR or pre/pro.
2. Placement:
Put the subwoofer in a corner or along a wall near your seats. It is not important what
direction the subwoofer faces. Subs can be placed on their sides or behind furniture if required. Keep a
minimum of 4 inches clear space behind your sub to avoid pinched power cords or cables.
3. Unpack your sub.
Look for gray foam “port plugs” (adjustable ported subs only) and other items which
might be hidden in the shipping carton. Do not discard the box and its protective inserts until necessary.
Some SVS subs are quite heavy! Please use a helper to safely move yours.
4. Connect your subwoofer:
(See Owner’s Guide on the included CD if using the subwoofer for bass
management) Plug your power cord into an available wall outlet. Run a single “RCA to RCA” or XLR cable
from your audio/video receiver (AVR) or preamp/processor (pre/pro) subwoofer
output
jack to the
subwoofer’s Low Level or Balanced
input
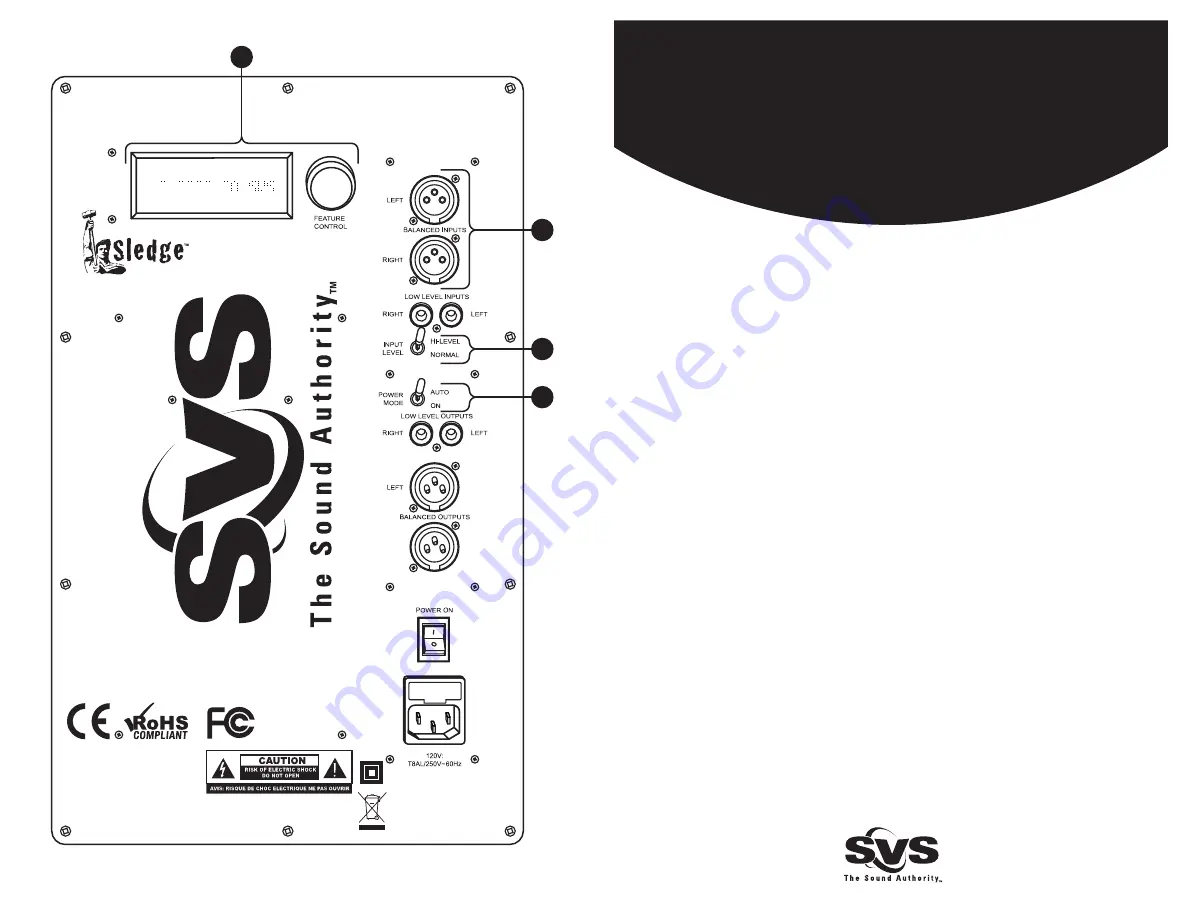
jack - “A” on the diagram - (SVS subs require only one input be
connected). Switch on the sub’s power when you are ready to proceed.
5. Initial subwoofer settings:
Your STA-800D/STA-1000D amplifier is equipped with a digital Integrated
Function Controller that allows access to the amplifier’s controls via a single knob and LCD screen - “B” on the
diagram. The default values from the factory (see Owner’s Guide on the enclosed CD for details) are correct
for systems with bass management performed in the AVR or pre/pro. If using the subwoofer for bass
management and/or optionally time alignment, see the Owner’s Guide for proper configuration. If using an
AVR or pre/pro with consumer level voltage levels, set the
“Input Level”
switch - “C” on the diagram - to
“Normal”, otherwise set it to “Hi Level”. Set the
“Auto/On”
switch - “D” on the diagram - to “On” if you
want the sub on all the time, otherwise set it to “Auto”.
6. Initial AVR or pre/pro settings:
If your AVR or pre/pro has an auto setup feature, run it now.
Afterwards, check your speakers are set to “Small” and the crossover is at 80Hz. For non-auto setup AVRs,
ensure your speakers and subwoofer are enabled for use. If adjustable, make sure your speakers are set to
“Small” and the crossover for all speakers is set to 80Hz or higher if needed.
7. Channel Level Matching:
If you have run auto setup on your AVR or pre/pro, you are done since this
step has already been performed. The key to good sound is having all your channels at the same level. Use
a sound pressure level (SPL) meter set to “slow” and “C-weighting”. Play your AVR’s calibration test tones
or the AVIA test DVD so tones are cycled to each speaker. This allows you to use each channel’s individual
level controls to achieve a measured 75 dB for each speaker. Set channels to 85 dB if using AVIA.
QUICK START GUIDE
“WARNING:
TO REDUCE THE RISK OF FIRE OR ELECTRIC
SHOCK, DO NOT EXPOSE THIS APPLIANCE TO RAIN OR MOISTURE.”
“AVERTISSEMENT:
POUR PRÉVENIR LES RISQUES D’INCENDIE
OU DE CHOC ÉLECTRIQUE, EVITER D’EXPOSER CET APPAREIL A LA
PLUIE OU A L’HUMIDITÉ.”
“CAUTION:
FOR CONTINUED PROTECTION
AGAINST RISK OF FIRE, REPLACE ONLY WITH
SAME TYPE FUSE AND RATING.”
“ATTENTION:
UTILISER UN FUSIBLE DE
RECHARGE DE MEME TYPE ET CALIBRE.”
S T A - 1 0 0 0 D
Subwoofers Equipped with
SVS STA-800D/STA-1000D
Sledge
™
Amplifier
© 2010 SVSound, LLC
•
6420 Belmont Avenue, Girard, OHIO 44420
•
USA 703.845.1472
•
Toll Free 877.626.5623
•
sales@svsound.com
© 2010 SVSound, LLC
•
6420 Belmont Avenue, Girard, OHIO 44420
•
USA 703.845.1472
•
Toll Free 877.626.5623
•
sales@svsound.com
B
A
D
C


