background image

Virage One-Piece Toilet

SM-1T118 / SM-1T118MB / SM-1T123

www.swissmadison.com  |  1-434-623-4766  |  info@swissmadison.com 

INSTALLATION 

INSTRUCTIONS

S

wiss 

M

adison

®

@SwissMadison

#WellMadeForever

Summary of Contents for Virage SM-1T118

Page 1: ...Virage One Piece Toilet SM 1T118 SM 1T118MB SM 1T123 www swissmadison com 1 434 623 4766 info swissmadison com INSTALLATION INSTRUCTIONS Swiss Madison SwissMadison WellMadeForever ...

Page 2: ...ughly before installing the toilet Be sure to use proper tools and always wear proper personal safety accessories for your protection All dimensions are nominal Be sure to measure your toilet prior to installation Thank you for purchasing a Swiss Madison One Piece Toilet We appreciate your business and know you will enjoy your toilet for many years to come If you have any questions or require assi...

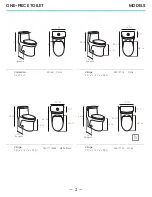
Page 3: ...28 8 SM 1T118 White 14 5 16 7 4 18 16 29 16 16 9 16 12 28 8 Rough in W L 12 H Rough in Virage 29 16 x 14 5 16 x 28 8 SM 1T118MB Matte Black 14 5 16 7 4 18 16 29 16 16 9 16 12 28 8 Rough in Virage 29 16 x 14 5 16 x 28 8 SM 1T123 White 14 5 16 7 4 18 16 29 16 16 9 16 12 28 8 Rough in ADA ...

Page 4: ...or waste opening to prevent escaping gas Remove closet bolts from flange and clean away old wax and putty from base area ONE PIECE TOILET INSTALLATION INSTRUCTIONS SUGGESTED TOOLS AND MATERIALS Safety Glasses Wrench Level Screwdriver Putty Knife Tape Measure Hacksaw Flexible Supply Tube One Piece Toilet Wax Ring Gasket Bolts Side Cover Caps PARTS LIST 1 Read the complete instruction manual before ...

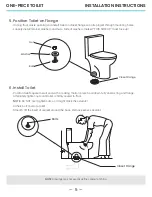
Page 5: ...ange Closet Bolts A 4 Install Wax Seal Invert toilet on floor use cushion to prevent damage and install wax ring evenly around waste flange with tapered end of ring facing toilet Apply a thin bead of sealant around toilet base Wax Ring Sealant ONE PIECE TOILET INSTALLATION INSTRUCTIONS NOTE Drawings may not exactly define contour of china ...

Page 6: ...6 Install Toilet Position toilet square to wall and with a rocking motion press bowl down fully on wax ring and flange Alternately tighten nuts until toilet is firmly sealed to floor NOTE Do NOT over tighten nuts as it might crack the ceramic Adhere bolt covers to toilet Smooth off the bead of sealant around the base Remove excess sealant THIS SIDE UP Closet Flange Bolts ONE PIECE TOILET INSTALLAT...

Page 7: ...Disassemble the cover cap and the hinge 2 Construct Hinges Insert screw and nut into the hole on the hinge Attach blind hole screw fixing to the bottom on the screw 3 Attach Hinges Insert hinges with blind hole screw fixings attached into holes on toilet bowl Lightly tighten hinges with a screwdriver too allow for later adjustment Pull or ...

Page 8: ...t to the secure hinges Adjust seat to align to the bowl 6 Usage To remove push middle button until you hear a click then pull straight up To re install align hinge posts with reference marks on seat then push down until your hear a click Click Click 4 Adjust and Cover Hinges Be sure the hinge is all the way forward for proper seat fitting Place the covers onto the hinges Incorrect Correct ...

Page 9: ...ed from its packaged state The product has been subjected to improper maintenance abuse misuse excessive use of chemicals accidents or other damages etc Swiss Madison makes no implication that its products comply with any local building or plumbing codes It is the consumer s responsibility and obligation to determine local code compliance prior to and during installation This warranty extends only...

Reviews: