Making Initial Settings
Make Basic Settings
11
In the [Basic Operation Settings] tab window, select the [Device
Settings] menu.
21
Enter the following information in the [Device Settings] window, and
click the [Send Settings] button.
Device Name Assign a unique name for each device.
LAN Pass-
word
Enter the password here for connecting to a device via a network.
This information is necessary for Monitoring Current Readings via
Web Browser (see
Trying some Basic Operations
).
31
Select the [Clock Settings] tab.
41
Choose either "Set to Computer Clock" or "Set to Specified Time";
confirm the entries, and click the [Send Settings] button.
Making Network Settings
11
In the [Basic Operation Settings] tab window, select the [Network
Settings] menu.
21
Make settings for DHCP.
Select “ON” to use DHCP. If you wish to use a static IP address, set
[DHCP] to “OFF” and enter the IP address and other necessary
information for each device.
For details, please see [
About DHCP] printed on the back side of this paper.
31
If you are using a TR-701AW / 702AW device, make sure to enter the
following settings in conjunction with the wireless LAN access point
being used.
• Wireless LAN settings tools such as AOSS (AirStation One-touch Secure System) and WPS
(Wi-Fi Protected Setup) are not supported.
• The MAC address of the device can be found under the [Settings Table] menu.
41
Click the [Send Settings] button.
Making Recording Settings
11
In the [Recording Settings] tab window, select the [Recording Settings]
menu.
21
Make Recording Condition Settings.
Recording Interval Select a Recording Interval.
Recording Start
Method
Immediate Start: Recording will start when the [Start Recording]
button is clicked.
Programmed Start: Recording will start at the specified time.
Unit of
Temperature
Select the desired unit of temperature.
Below are some examples of recording interval and maximum recording
time1
1 sec.
30 sec.
5 min.
15 min.
60 min.
2 hr 13 min
2 days 18 hr
27 days 18 hr
83 days 8 hr
333 days 8 hr
EX: Recording Interval of 30 seconds x data readings of 8,000 = 240,000 seconds
(about 2 days and 18 hours)
* Upon reaching the logging capacity, the oldest data will be overwritten and recording will
continue.
31
Click [Start Recording].
Note that the recorded data stored in the device will be lost if you change the recording
conditions or start a new recording session.
Installing the Device
11
Place the device to the desired measurement location.
21
Connect a TR-701NW / 702NW device to the network device with a
LAN cable.
31
Connect the supplied AC adaptor to the device.
If you are using a TR-701AW / 702AW device, the LINK Display LED will be on upon
successful connection to a wireless LAN access point.
Connecting the Device to a PC
11
Open the TR-700W for Windows from
the Start Screen or Start Menu.
21
Open the TR-700W Settings Utility.
31
Connect the device with the supplied USB cable to your computer.
The USB driver installation will start automatically.
* Do not connect a device to your computer until the software has been installed.
* It is not necessary to connect the LAN cable or AC adaptor at this point.
USB Connection
If you are using Windows XP, the [Found New Hardware Wizard] window will appear. For
details, see [
How to Install the USB Driver] printed on the back side of this paper.
41
After the USB driver installation is completed, the factory default
settings will be displayed automatically in the settings window.
If the above settings information does not appear
automatically:
The USB driver installation may have failed. Please see
[Help for Unit Recognition Failure] in the Operation Guide,
and check the USB driver.
Thermo Recorder
TR-700W Series Getting Started Guide
TR-701NW and TR-702NW are for use with a wired LAN1 TR-701AW and TR-702AW are for use with a wireless LAN (802111b/g)1
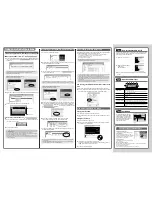
What can the TR-700W Series devices do?
The TR-700W Series Data Loggers are equipped with a LAN interface. Temperature and humidity management in remote locations including the downloading of
recorded data, the monitoring of current readings and the sending of warning mails: all of which can be done easily over a network. Network connection is available
either via wired LAN or wireless LAN.
Installing the Software
11
Start Windows and login using a User Account with Administrator
(Computer Administration) rights.
21
Place the CD-ROM into your CD or DVD drive.
31
The [Install Program] window will appear.
If the [Auto Play] window appears:
Click on [Run start.exe].
If the [Install Program] window does not appear automatically:
Double click on the [start.exe] icon in the CD/DVD drive.
* If you are using Windows 8, carry out the rest of the installation process on the "desktop" which
can be accessed via a tile on the Start screen.
41
Select "Install TR-700W for Windows" and click the [Execute] button to
start the installation.
Make sure to install all applications.
51
Follow the directions as they appear to complete the installation.
If a window appears such as the one below during installation, choose [Install] or [Continue
Anyway].
61
After installation, TR-700W for Windows will appear in the Windows
Start Screen or Start Menu.
71
Repeat procedures
4
to
6
to install all the applications.
Setting up the Device
11
Connect a sensor to the device.
TR-701NW / 701AW
TR-702NW / 702NW-H / 702AW / 702AW-H,
21
Insert the battery for data backup. Remove the battery case and insert
the battery making sure that + and - are in the correct direction.
The battery makes it possible to continue measuring and recording when AC power is not
available due to a power outage. (Note that when using the battery only, network
communication is not possible.)
* If no battery has been installed and the AC adaptor cannot be used, all recorded data will be lost.
* Battery performance deteriorates by natural discharge and corrosion. Even when using both a
battery and the AC adaptor, we suggest changing the battery somewhere between one and two
years of use.
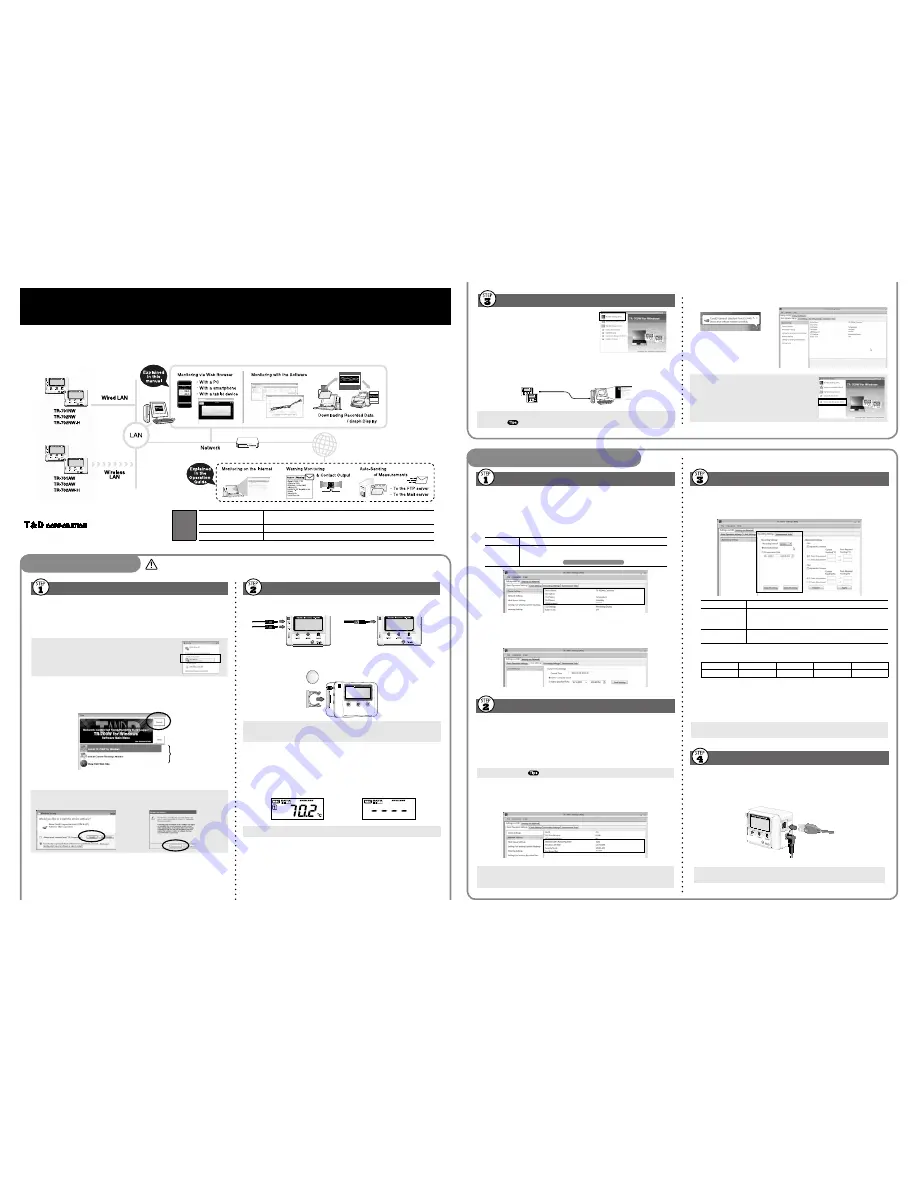
31
The measurement will be displayed on the LCD screen.
Under Normal Conditions:
During Sensor Error (no sensor connected / improper
connection / sensor damaged):
For information about button operation on the device, please refer to the Operation Guide.
Getting Ready
Before Using the Device
Do not connect a device to your computer until the software has been installed1
© Copyright T&D Corporation. All rights reserved. 2013.01. 16504900005 2nd Edition
http://www.tandd.com/
Terms
to be
Used
"device" or
"TR-700W Series devices"
TR-701NW, TR-701AW, TR-702NW, TR-702NW-H, TR-702AW, TR-702AW-H
Collective term for the above set of devices
Current Readings
Measurements collected for monitoring current data
Recorded Data
Measurements stored in the device at the selected recording interval