background image


Pump models: 

25-1 

25-2 

40-1 

40-2 

50-1 

50-2 

80-1 

100-1 

Sanitary Positive 


Displacement Pump


Tapflo LPX series


IOM manual


2023 | 1


Read this instruction manual carefully,  
before you install and operate the pump 

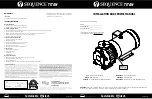
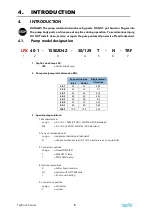
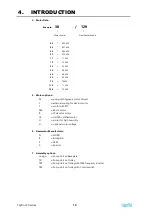
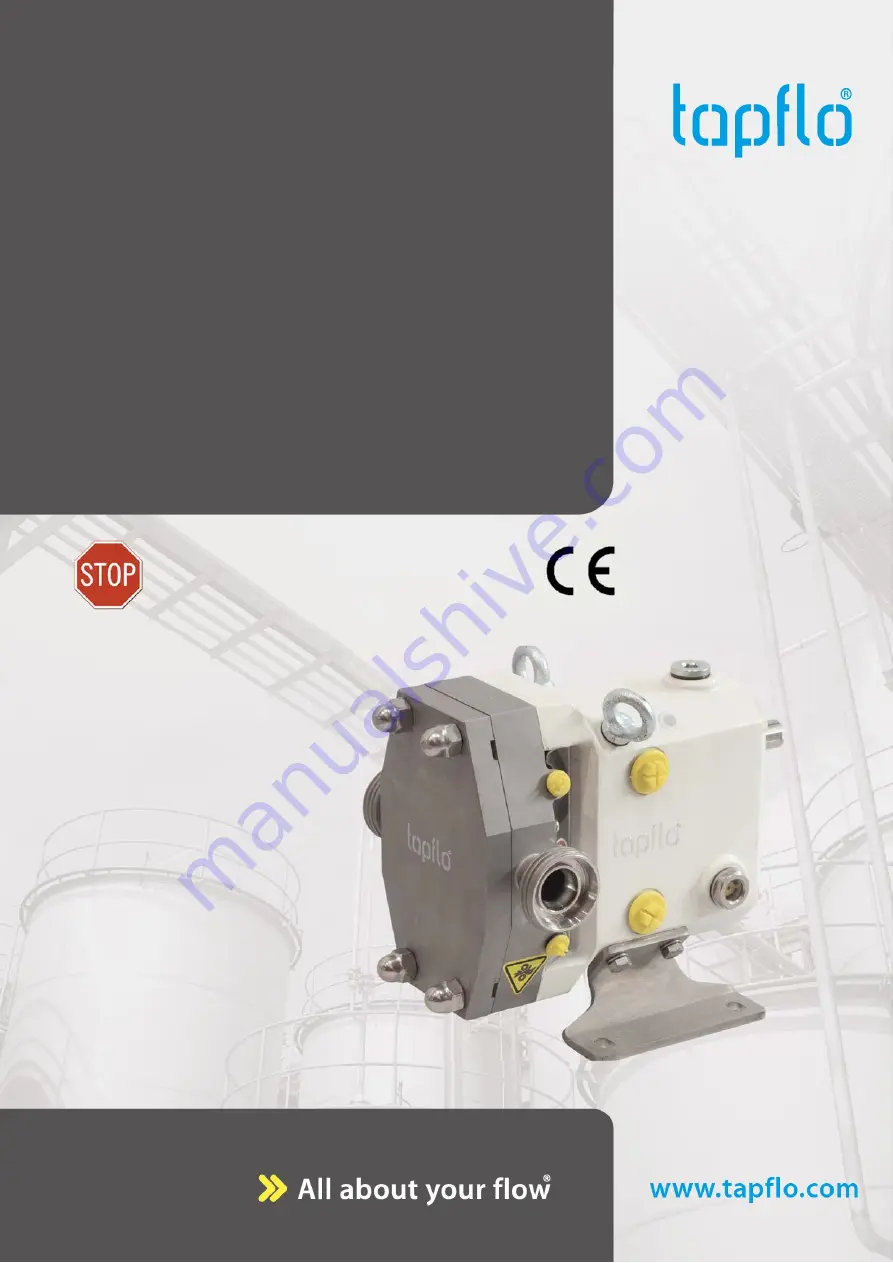
Summary of Contents for LPX Series

Page 1: ...ump models 25 1 25 2 40 1 40 2 50 1 50 2 80 1 100 1 Sanitary Positive Displacement Pump Tapflo LPX series IOM manual 2023 1 Read this instruction manual carefully before you install and operate the pump ...

Page 2: ...nting dimensions 13 4 7 2 Technical data 13 4 7 3 Sound level 14 4 7 4 Maximum particle size 14 5 INSTALLATION 15 5 1 Install pump and drive unit 15 5 2 Install connections and piping 16 5 2 1 Piping support 16 5 2 2 Expansion joints 16 5 2 3 Inlet piping 16 5 3 Install check valves 17 5 3 1 Inlet side on lift applications 17 5 3 2 Discharge side 17 5 4 Install isolation valves 18 5 5 Install reli...

Page 3: ...ons 26 7 3 1 Inspection of shaft 27 7 3 2 Inspection of hub end 27 7 3 3 Inspection of shaft shoulder 27 7 3 4 Inspection of gears and bearings 27 7 3 5 Recommended maintenance schedule 28 7 4 Maintenance inspection chart 29 7 5 Cleaning 29 7 6 Pump disassembly hydraulic components 30 7 6 1 Pump cover removal 30 7 6 2 Rotor removal 31 7 6 3 Rotor blocking 31 7 6 4 Pump body removal 33 7 6 5 Mechan...

Page 4: ...tion 52 8 TROUBLESHOOTING 54 9 PARTS LISTS 57 9 1 Model 25 1 to 50 1 Pump Parts A exploded view 57 9 2 Model 25 1 to 50 1 Pump Parts A BOM Items 58 9 3 Model 25 1 to 50 1 Pump Parts B exploded view 59 9 4 Model 25 1 to 50 1 Pump Parts B BOM Items 60 9 5 Model 50 2 to 100 1 Pump Parts A exploded view 61 9 6 Model 50 2 to 100 1 Pump Parts A BOM Items 62 9 7 Model 50 2 to 100 1 Pump Parts B exploded ...

Page 5: ...trical Safety Related Work Practices including procedural requirements for Lockout tagout Personnel qualifications and training requirements When it is not feasible to de energize and lockout tagout electrical circuits and equipment before working on or near exposed circuit parts Locking and Interlocking Devices These devices should be checked for proper working condition and capability of perform...

Page 6: ...marked with a stop sign Immediate hazards which WILL result in severe personal injury or death WARNING marked with a warning triangle Hazards or unsafe practices which COULD result in severe personal injury or death CAUTION marked with a warning triangle Hazards or unsafe practices which COULD result in minor personal injury or product or property damage ...

Page 7: ...sts for replacement part numbers 2 1 Application Instructions Apply to a clean dry surface Remove the backing from the label place it in proper position protect it with a cover sheet and burnish it A soft rubber roller also may be used to press the label into place Apply all labels to be readable from the front of the pump Fig 1 Label locations Label Definition Entanglement hazard Replace plug wit...

Page 8: ...e used such as sodium hypochlorite bleach do not exceed concentrations of 150 ppm available chlorine do not exceed contact time of 20 minutes and do not exceed temperatures of 104 F 40 C Corrosion discoloration deposits or pitting may occur under product deposits or under gaskets Keep surfaces clean including those under gaskets or in grooves or tight corners Clean immediately after use Do not all...

Page 9: ...ction size Displacement Inlet Outlet litres rev 25 1 25 25 0 04 25 2 25 25 0 1 40 1 40 40 0 14 40 2 40 40 0 23 50 1 50 50 0 3 50 2 50 50 0 67 80 1 80 80 0 94 100 1 100 100 2 29 3 Special pump solutions 1 Mechanical seal no sign SiC SiC FKM VITON AISI316L FDA standard SSE SiC SiC EPDM AISI316L FDA standard 2 Type of mechanical seal no sign single mechanical seal standard D double mechanical seal Si...

Page 10: ...ions M pump with hygienic motor shroud C external cooling for electric motor T motor with PTC F60 60 Hz motor IP IP class for motor UL UL CSA certified motor H motor for high humidity V optional motor voltage 6 Gearmotor Manufacturer N NORD B Bonfiglioli S SEW X Special 7 Assembly options no sign Pump Unit on Baseplate TR Pump Unit on Trolley TRF Pump Unit on Trolley with IP66 frequency inverter T...

Page 11: ... oil drain plug with the supplied oil fill breather See chapter 7 2 Lubrication for oil type and quantity All ports are covered at the factory to keep out foreign objects during transit If covers are missing or damaged remove the pump cover for a thorough inspection of the fluid head Be sure that the pumping head is clean and free of foreign material before rotating the shaft 4 4 Pump characterist...

Page 12: ...Figure 2 and Figure 3 When side mounted left hand as viewed from the pump cover Figure 3 rotation may be reversed for up or down vertical flows See also Figure 24 and Figure 25 The mounting position may be easily reconfigured by changing the location of the mounting feet The breather plug must be moved to the uppermost port and the level indicator should be in the lowest side port in the gear cove...

Page 13: ...160 0 396 4 205 9 99 5 120 0 13 112 9 10x8 321 0 57 6 292 9 75 5 38 124 0 156 0 159 4 80 1 239 1 310 6 160 0 423 9 205 9 99 5 120 0 13 112 9 10x8 332 6 57 6 292 9 87 1 38 134 0 166 0 159 4 100 1 301 1 384 6 250 0 553 6 263 7 130 5 210 0 13 138 7 16x10 437 0 85 6 368 2 81 5 55 159 0 189 0 201 2 4 7 2 Technical data Model Displacement liter rev Nominal Connection Size Differential Pressure Rating ba...

Page 14: ... Connection Inside Diameter mm Max Theoretical Particle Size mm Recommended Max Particle Size mm 25 1 20 7 6 3 25 2 26 15 6 5 40 1 40 15 6 5 40 2 40 25 6 9 50 1 50 25 6 9 50 2 50 38 5 13 80 1 81 38 5 13 100 1 100 45 6 15 25 1 25 2 40 1 max RPM 40 2 50 1 max RPM 50 2 80 1 max RPM 100 1 max RPM ...

Page 15: ... lines The pump warranty is not valid for damages caused by a hydraulic overload from operation or start up with a closed valve in the system 5 1 Install pump and drive unit WARNING Full guards must be installed to isolate operators and maintenance personnel from rotating components Fig 4 Portable Base Fig 5 Adjustable Leg Base Fig 6 Leveling and or Vibration Isolation Pads Fig 7 Permanent Install...

Page 16: ... independently support each pipe reducing the weight effect of piping and fluid on the pump 5 2 2 Expansion joints Fig 9 Flexible Connections and Supports Thermal expansion of piping can cause tremendous forces Use thermal expansion joints to minimize these forces on the pump Flexible joints can be used to limit transmission of mechanical vibration Ensure that the free ends of any flexible connect...

Page 17: ...alves to keep the inlet line full particularly with low viscosity fluids Figure 12 A Inlet Check Valve B Foot Check Valve 5 3 2 Discharge side Fig 13 Discharge Check Valve For systems with liquid under a vacuum we recommend installing a check valve on the discharge side of the pump The check valve prevents backflow air or fluid to aid in the initial start up by minimizing the required differential...

Page 18: ...mend installing an external relief valve designed to bypass fluid from the pump outlet to the inlet side of the system Figure 15 item A 5 6 Install side strainers and traps Fig 16 Inline Strainers and Traps Inlet side strainers and traps Figure 16 items A and B can be used to prevent foreign matter from damaging the pump Make the selection carefully to prevent cavitation caused by the restriction ...

Page 19: ...sh connections Fig 18 Flush Piping Setup Pumps with double seals require flushing The flush media typically water must be connected and flowing whenever pump is operated WARNING Operating the pump without flush will damage the seal and pump parts due to excess heat from dry running Pump bodies have four G 1 8 BSPT flush connections located near the bottom and top of the body Figure 18 item A 1 Flu...

Page 20: ...d range and horsepower The required inlet pressure also must be satisfied If the pump does not supply enough CIP solution velocity a separate CIP supply pump with an installed bypass may be used To determine the appropriate bypass arrangement contact Application Engineering Ensure that a differential pressure is created across the pump Differential pressure will push CIP solutions through close cl...

Page 21: ...ment Fig 20 Check Parallel Alignment 1 Check both the horizontal and vertical alignment of the pump and drive using a straight edge 2 Using a feeler gauge at location A in Figure 20 determine the direction and amount of movement needed Figure 20 item B 3 If necessary shim at location C and or move drive as needed 5 13 Check belt and chain alignment Fig 21 Alignment Belt and Chain Drives Use a stra...

Page 22: ...otation Check the rotation direction of the drive to determine the rotation direction of pump Figure 22 through Figure 25 After verifying the correct drive rotation connect the coupling and assemble the pump and coupling guards NOTE The pump covers in the following figures have been removed to view the rotor rotation Never operate the pump with the covers removed ...

Page 23: ...talled and on 1 Ensure that the pump is correctly installed as described in chapter 5 Installation Review chapter 5 5 Install Relief Valves and install relief valves as needed 2 Check the coupling alignment See chapter 5 10 Check Coupling Alignment 3 Ensure that the pump and piping are clean and free of foreign material such as welding slag gaskets etc 4 Ensure that all piping connections are tigh...

Page 24: ...utdown procedure 1 Shut off the power to the pump drive 2 Shut off the supply and discharge lines 6 4 Emergency shutdown procedure Emergency shutdown procedures should be documented by plant personnel after assessing system wide requirements ...

Page 25: ...l supply and lock out all power 7 2 Lubrication Fig 26 Lubrication points Tab 1 Callout table for figure 26 30 Oil Fill Breather 31 Oil Level Check Plug Sight Glass 32 Oil Drain Plug 33 Grease Fittings 34 Grease Cleanout Plug 7 2 1 Drive lubrication Refer to the manufacturer s manual shipped with the drive for proper drive lubrication and frequency 7 2 2 Gear oil CAUTION Each pump is shipped from ...

Page 26: ...ug Figure 26 item D Bearing Lubricant Grease NLGI Grade No 2 EP Lithium based lubricant Tab 3 Grease quantity Model Gear oil volume Front bearing Rear bearing 25 1 25 2 40 1 40 2 50 1 5 ml 4 ml 50 2 80 1 10 ml 9 ml 100 1 17 ml 14 ml 7 3 Maintenance inspections DANGER The pump contains internal moving parts DO NOT put hands or fingers into the pump body ports or drive area at any time during operat...

Page 27: ...ent cutting the shaft O ring on installation 7 3 4 Inspection of gears and bearings NOTE The rotor hub and shaft shoulder wear are caused by operating with a loose rotor lug screw s for extended periods Fig 28 Backslash check Gear backlash With the fluid head and seals removed feel for gear backlash by rotating either shaft by hand The other shaft must engage immediately Perform this check three t...

Page 28: ...d When the bearing is determined to be failing replace the bearing and review the lubrication schedule 7 3 5 Recommended maintenance schedule Item Grease Quantity per Bearing Replace Gear Oil Every 1000 hours See chapter 8 2 2 Gear Oil Grease Bearings Every 250 hours See chapter 7 2 3 Bearing Lubrication Replace O Rings Every time O rings are removed NOTE For seals and rotors component life varies...

Page 29: ...ion Lack of lubrication Excessive hydraulic loads Product or water contamination Check lubrication level and frequency Reduce hydraulic loads Ensure no excess grease build up Replace bearings if necessary Damaged front grease seals Seal may be old and worn No grease on lips to lubricate Replace seals Properly lubricate with grease when installing Inspect shaft surface under seals Damaged rear oil ...

Page 30: ...ANGER To avoid serious injury shut off and drain product from the pump prior to disconnecting the piping Fig 30 Pump Cover and Rotor Removal Tab 4 Callout table for figure 30 2 Cover 3 Rotor 4 Rotor Nut 5 Rotor screw cap 35 Acorn nut 51 Cover O ring 55 Rotor screw cover O ring 7 6 1 Pump cover removal 1 Remove the cover acorn nuts Figure 30 item 35 2 Remove the cover item 2 Cavities are provided o...

Page 31: ... be removed by hand use a twisting motion to break them free If unsuccessful tap the body forward using a mallet to loosen the rotors NOTE The rotor mounted on the drive shaft is marked with an X in the lug screw counterbore see Figure 31 The marked rotor must always be installed on the drive shaft to maintain proper rotor clearance and prevent pump damage 7 6 3 Rotor blocking Use a rod made of a ...

Page 32: ...7 MAINTENANCE Tapflo LPX series 32 Fig 32 Rod Position for Blocking Tab 5 Rod diameters 25 1 15 mm 25 2 40 1 20 mm 40 2 50 1 30 mm 50 2 80 1 45 mm 100 1 60 mm ...

Page 33: ...he body off of the studs item 34 to prevent damaging the mechanical seal components 3 Place the body on a protected surface with the seals facing up 4 Remove and inspect the rotor hub O rings item 53 7 6 5 Mechanical seal removal Fig 34 Remove seal seats 1 Remove the seal seats Figure 34 item 8 from the shafts Take care to prevent damage to the seats or shafts 2 Remove and inspect the O rings item...

Page 34: ...spring item 49 Remove the O ring item 54 from the outer seal and inspect it Replace as necessary 7 7 Gearbox disassembly DANGER The pump contains internal moving parts DO NOT put hands or fingers into the pump body ports or drive area at any time during operation To avoid serious injury DO NOT install clean service or repair the pump unless all power is off and locked out DANGER To avoid serious i...

Page 35: ...burrs or sharp edges from the input shaft 3 Remove the cap screws Figure 36 item 36 and washers item 37 and remove the cover item 12 4 Remove the input shaft seal item 29 from the gear cover and discard it 5 Inspect the level indicator plug item 31 and replace it if it appears cloudy or stained 6 Remove the gasket Figure 36 item 50 and discard it Carefully scrape any gasket residue from the mating...

Page 36: ...ssembly Figure 38 item 26 to release the gear from the shaft 2 Remove the gear and locking assembly from the shaft 3 Repeat steps 1 2 for the other shaft 4 Remove the bearing case screws Figure 40 item 41 5 Install 2 screws in the tapped holes Figure 40 item A in the bearing case item 14 Tighten the screws to pull the bearing case from the gear case Figure 41 6 Repeat steps 4 5 for the other shaft...

Page 37: ...shaft free of the rear bearing item 17 bearing case item 14 seal sleeve O ring item 68 and seal sleeve item 18 3 Remove the retaining ring item 19 from the bearing case and press the rear bearing cup and rear bearing seal item 27 out of the bearing case 4 Press the front bearing cone off of the shaft 5 Repeat the steps above for the other shaft 7 8 Pump assembly NOTE Use care at all times to preve...

Page 38: ...als Install new front bearing seals Figure 44 item 28 into the gear case item 11 with the primary lip facing toward the inside of the gear case The seals should be flush with the face of gear case 7 8 2 Bearing assembly Fig 45 Press Bearing Cone onto Shaft Fig 46 Press Rear Bearing Cup ...

Page 39: ... by the bearing case item 14 4 Press the rear bearing cone item 17b onto the shaft and into the cone 5 Press the rear seal item 27 into the bearing case item 14 with the primary lip facing away from the bearing and install the retaining ring item 19 Orient the seal as shown and make sure it does not interfere with the bearing 6 Install the O ring item 68 and seal sleeve item 18 onto the shaft as s...

Page 40: ...2 Install the shaft assemblies into the gear case and secure them with cap screws Figure 49 item 41 Apply a light film of bearing grease to the bores and bearing cups to ease installation Use care to prevent damage to the lip seals Figure 48 item 29 during assembly 3 Install one lug screw Figure 50 item 4 into one of the tapped holes in each of the shafts and check the rolling torque of each shaft...

Page 41: ... lock nut Figure 51 item 20 to achieve a torque value as shown in Table 6 Tab 6 Bearing rolling torque Pump Torque 25 1 25 2 40 1 40 2 50 1 1 6 1 8 Nm 50 2 80 1 3 2 3 4 Nm 100 1 4 5 4 7 Nm Fig 51 Tighten Setscrews 5 Tighten the locking setscrew s Figure 51 item A in the bearing lock nuts item 20 ...

Page 42: ...e rear groove in the shaft 2 Apply a compatible lubricant to the O rings and install the seal seats Figure 52 item 8 Align the flats in the seal seats with the flats on the shafts and seat them firmly against the shaft shoulder 3 Install the inner seal O ring Figure 53 item 52 into the inner seal groove and install the wave spring item 48 onto the body of the inner seals item 9 ...

Page 43: ...ely flat and smooth Use great care when handling these components to prevent damage and reduced seal performance 2 Although it is impossible to prevent touching the seal faces during assembly use clean hands and try to minimize contact with the lapped faces 3 Keep the work area clean to prevent contamination of the seal faces 4 O ring lubrication is important to ease assembly of the components pre...

Page 44: ...rotors are designed to match the screw holes in the shafts in only one orientation To aid assembly reference marks are provided on each rotor and the end of the shaft Rotor clearances and synchronization require that each rotor must always be installed on a specific shaft to maintain these clearances and prevent pump damage The drive shaft rotor therefore is marked with an X in the lug screw count...

Page 45: ...shafts making note of the alignment reference mark on the shafts for rotor positioning See item A in Figure 56 Detail F and G Stamp an X approximately 3mm high in the face of the counterbore opposite the alignment reference mark See Figure 56 Detail F also see Figure 31 for a larger view 4 Install one lug screw Figure 56 item 4 into the hole nearest the reference mark in each rotor 5 Install the r...

Page 46: ... the appropriate model from the clearance measurement The resulting value is the total shim thickness that must be installed behind the flange of the bearing case Tab 9 Back face and front face clearance Pump model Clearance target Acceptable range Back face Front face 25 1 25 2 40 1 0 100 0 125 0 100 0 260 0 155 40 2 0 125 0 150 0 125 0 265 0 160 50 1 0 125 0 150 0 125 0 315 0 210 50 2 80 1 0 150...

Page 47: ... Remove the bearing case screws Figure 58 item 41 install the shims selected in Step 3 and re install the screws To provide clearance for the shims move the shaft toward the rear by tapping gently on the rotor with a soft faced mallet or by installing two screws in the jacking holes item P in the bearing case flange item 14 5 Check the resulting back face and front face clearance items M and N in ...

Page 48: ... onto the lay shaft For models 25 1 to 50 1 this refers to the locking elements Figure 61 item 25 clamp ring item 23 and screws item 24 For models 50 2 to 100 1 this refers to the locking assembly Figure 61 item 26 inset 3 The locking elements Figure 61 item 25 detailed in Figure 60 consist of a slit inner ring and a slit outer ring For proper performance the elements must be assembled in the foll...

Page 49: ...ny screw more than 1 4 turn at a time to ensure that the clamp load is applied evenly Suggested patterns are provided in Figure 62 listed by model number 6 Following the same sequence as in Step 4 tighten the screws to the value shown in Table 10 under the heading Final 7 Re check each screw one by one to ensure that the specified torque value has been reached The process is complete when no screw...

Page 50: ...the screws to the value shown in Table 10 for Step 1 Do not turn any screw more than a 1 4 turn at a time to ensure that the clamp load is applied evenly 13 Following the same sequence as in step 4 tighten the screws to the value shown in Table 10 under the heading Final 14 Re check each screw one by one to ensure that the specified torque value has been reached The process is complete when no scr...

Page 51: ...synchronized measure the radial clearance of each lobe Figure 64 item A and verify that the clearance falls within the range shown in Table 12 2 Check clearance at all six points in the body as shown See Figure 64 item B 7 8 12 Gear cover installation Fig 65 Gear Cover Installation Tab 13 Oil volume Pump model Oil volume ml Max Min 25 1 25 2 40 1 40 2 50 1 100 170 50 2 80 1 325 490 100 1 625 1125 ...

Page 52: ...them evenly 5 Install the oil plugs item 32 and level indicator plug item 31 into the appropriate locations for the pump mounting position 6 Fill with oil and install the breather plug item 30 Table 13 provides oil capacity by pump size and mounting position The oil level should reach the center of the level indicator 7 Grease the bearings See Table 14 for the approximate volume of grease required...

Page 53: ...ng or dragging 5 Check that all labels are in place and legible See chapter 2 0 Replacement Labels Tab 15 Nut and screw torque reference Pump model Rotor lug screw Cover nut Bearing nut lock screw Gear locking assembly Hex Torque Hex Torque Hex Torque Hex Torque 25 1 25 2 40 1 40 2 50 1 9 mm 24 Nm 19 mm 71 Nm 2 5 mm 4 Nm 8 mm 6 Nm 50 2 80 1 13 mm 70 Nm 24 mm 172 Nm 3 mm 8 Nm 5 mm 10 Nm 100 1 18 mm...

Page 54: ...surizing with air Pump speed too slow Increase pump speed Liquid drains or siphons from system during off periods Use foot valve or check valves Filling inlet lines with material before startup may solve startup priming problems due to no material in system Air lock caused by fluids which gas off or vaporize or allow gas to come out of solution during off periods Install and use a manual or automa...

Page 55: ... system and controls Relief valve not adjusted or jammed Clear or adjust valve Insufficient flow High slip Hot HC or extra clearance rotors on cold fluid and or low viscosity fluid Replace with standard clearance rotors Worn pump Increase pump speed within limits Replace rotors have pump remanufactured High pressure Reduce pressure by adjusting system settings or hardware Noisy operation caused by...

Page 56: ...ive size Higher than expected pressures Reduce pump speed Increase line sizes Fluid is colder with a higher viscosity than expected Heat fluid insulate lines or heat trace lines Increase line sizes Fluid sets in line and pump during shutdown Insulate lines or heat trace lines Install a soft start drive Install a recirculating bypass system Flush system with a non setting fluid Fluid builds up on p...

Page 57: ...9 PARTS LISTS Tapflo LPX series 57 9 PARTS LISTS 9 1 Model 25 1 to 50 1 Pump Parts A exploded view ...

Page 58: ...5 40 Plug 1 8 BSP poly flush ports 4 HAP127484 HAP127484 HAP127484 HAP127484 HAP127484 48 Wave spring inner seal 2 HAP127222 HAP127222 HAP127222 HAP127222 HAP127222 49 Wave spring outer seal 2 HAP127225 HAP127225 HAP127225 HAP127225 HAP127225 51 O ring cover FKM 1 HAP127432 HAP127434 HAP127434 HAP127436 HAP127436 1 O ring cover EPDM 1 HAP127433 HAP127435 HAP127435 HAP127437 HAP127437 1 52 O ring i...

Page 59: ...9 PARTS LISTS Tapflo LPX series 59 9 3 Model 25 1 to 50 1 Pump Parts B exploded view ...

Page 60: ...HAP127306 HAP127306 28 Seal front bearing 2 HAP127303 HAP127303 HAP127303 HAP127303 HAP127303 29 Seal input shaft 1 HAP127309 HAP127309 HAP127309 HAP127309 HAP127309 30 Breather plug 1 HAP127314 HAP127314 HAP127314 HAP127314 HAP127314 31 Level indicator plug 1 HAP127315 HAP127315 HAP127315 HAP127315 HAP127315 32 Oil plug 2 HAP127313 HAP127313 HAP127313 HAP127313 HAP127313 33 Grease fitting G 18 BS...

Page 61: ...9 PARTS LISTS Tapflo LPX series 61 9 5 Model 50 2 to 100 1 Pump Parts A exploded view ...

Page 62: ... 4 HAP127286 HAP127286 HAP127287 40 Plug 1 8 BSP poly flush ports 4 HAP127484 HAP127484 HAP127484 48 Wave spring inner seal 2 HAP127223 HAP127223 HAP127224 49 Wave spring outer seal 2 HAP127226 HAP127226 HAP127227 51 O ring cover FKM 1 HAP127438 HAP127438 HAP127440 1 O ring cover EPDM 1 HAP127439 HAP127439 HAP127441 1 52 O ring inner seal FKM 2 HAP127460 HAP127460 HAP127458 1 O ring inner seal EPD...

Page 63: ...9 PARTS LISTS Tapflo LPX series 63 9 7 Model 50 2 to 100 1 Pump Parts B exploded view ...

Page 64: ...5 28 Seal front bearing 2 HAP127304 HAP127304 HAP127305 29 Seal input shaft 1 HAP127310 HAP127310 HAP127307 30 Breather plug 1 HAP127314 HAP127314 HAP127314 31 Level indicator plug 1 HAP127315 HAP127315 HAP127315 32 Oil plug 2 HAP127313 HAP127313 HAP127313 33 Grease fitting G 18 BSPT 4 HAP127312 HAP127312 HAP127312 34 Cover stud 4 HAP127187 HAP127188 HAP127189 36 HHCS gear cover 4 HAP127476 HAP127...

Page 65: ...P1466 HAP3842 Tab 16 Recommended maintenance schedule Item Maintenance interval Replace Gear Oil Every 1000 hours See chapter 8 2 2 Gear Oil Grease Bearings Every 250 hours See chapter 7 2 3 Bearing Lubrication Replace O Rings Every time O rings are removed NOTE 1 An O ring kit and a product seal kit shall be used in conjunction with a relevant double seal kit to assemble a complete double mechani...

Page 66: ... Serial No see name plate or stamped on pump housing Description of the fault The installation Liquid Temperature C Viscosity cPs Spec grav kg m3 pH value Content of particles of max size mm Flow l min Duty h day No of starts per day Discharge head bar Suction head lift m Air pressure bar Quality of the air filter micron lubrication Other Place for sketch of installation ...

Page 67: ...ocuments specifically made available to Tapflo before entering into this agreement c high quality materials are used in the construction of the pumps and that machining and assembly are carried out to the highest standards Except as expressly stated above Tapflo makes no warranties express or implied concerning the products including all warranties of fitness for a particular purpose 3 This warran...

Page 68: ...accordance with standard CE normative and are tested where applicable by Tapflo Approval and tests by other control authority are for the customer s account The products shall not be considered defective in materials design or workmanship if they need to be adapted changed or adjusted to conform to national or local technical or safety standards in force in any country other than that for which th...

Page 69: ...Tapflo LPX series 69 ...

Reviews: