background image

Visit our Website at www.targus.com
Features and specifications subject to change without notice. 
© 2007 Targus Group International, Inc. and Targus, Inc.

AMW10US / 410-0085-001B

USER GUIDE 

rechargeable 
wireless 
desktop mouse 

30

Summary of Contents for AMW10US

Page 1: ... Website at www targus com Features and specifications subject to change without notice 2007 Targus Group International Inc and Targus Inc AMW10US 410 0085 001B USER GUIDE rechargeable wireless desktop mouse 30 ...

Page 2: ...WIRELESS MOUSE Congratulations on your purchase of the Targus 5 button Rechargeable Wireless Mouse This mouse offers a charge cable to ensure continuous use without power interruption and an extension seat that allows connectivity for the receiver and the charge cable The 4th 5th buttons are pre programmed to provide Internet Back ward and Internet Forward under Windows 2000 XP 1 ...

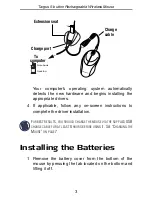
Page 3: ...interference from other wireless devices This extension seat allows you to place the receiver closer to your mouse while in use 1 Connect the extension seat to an available USB port on your Desktop PC or Notebook 2 Plug the receiver into the USB port labeled receiver located at the top of the seat 3 Connect the USB end of the charge cable to the port labeled charge on the extension seat Windows Vi...

Page 4: ...uctions to complete the driver installation FOR BEST RESULTS YOU SHOULD CHARGE THE MOUSE VIA THE SUPPLIED USB CHARGE CABLE FOR AT LEAST 8 HOURS BEFORE USING IT SEE CHARGING THE MOUSE ON PAGE 7 Installing the Batteries 1 Remove the battery cover from the bottom of the mouse by pressing the tab located on the bottom and lifting it off Charge port computer Extension seat To Charge cable Notebook Desk...

Page 5: ...of each battery match the polarity indicators inside the battery housing WARNINGS USE ONLY HEAVY DUTY NIMH BATTERIES NEVER USE ALKALINE IF YOU INTEND TO USE THE RECHARGING FEATURE AVOID MIXING NEW AND USED BATTERIES IN A DEVICE 3 Slide the battery cover back into position until it clicks firmly into place The optical sensor located on the bottom of the mouse glows red 4 ...

Page 6: ... of the charge cable to the mouse as shown 5 Alternatively you can connect the supplied charge cable s USB connector directly into an available USB port on your computer NOTE TO CONTINUOUSLY CHARGE THE MOUSE VIA THE USB CHARGE CABLE YOUR COMPUTER MUST BE ON AND AWAKE FOR BEST RESULTS TURN OFF YOUR COMPUTER S POWER MANAGEMENT FEATURE WHILE CHARGING THE MOUSE Charge port computer Extension seat To C...

Page 7: ...ernate a Click Start b Click Control Panel c Click Performance and Maintenance Skip in Classic View d Click Power Options e Make sure System Standby and System Hibernates under Plugged in are set to Never 3 If you use your notebook computer s LCD monitor please do not close the lid Please ignore this step if you use an external monitor with your notebook lid closed 4 If your mouse does not respond...

Page 8: ...ase the connect button located on the bottom of the mouse The receiver s status light flashes while it scans the identification codes When synchronized the status light stops flashing This process must be completed within a few seconds or the steps will need to be repeated After successfully synchronizing you are ready to use the mouse NOTE YOU MUST SYNCHRONIZE EVERY TIME YOU CHANGE THE BATTERIES ...

Page 9: ...oid using the mouse on a metal surface Metals such as iron aluminum or copper shield the radio fre quency transmission and may slow down the mouse s response time or cause the mouse to fail temporarily The mouse will enter a suspend mode at the same time your computer does Click any mouse button to wake it If your computer has a metal case that contains alumi num or magnesium use the mouse to the ...

Page 10: ...cles may be related to repeti tive motion an improperly set up work area incorrect body posture and poor work habits To reduce the risk of injury follow these precautions Stand stretch and move around several times every hour Switch hands while performing tasks Use shortcut keys to avoid repetitive or awkward mouse movements Relax your shoulders and keep your elbows at your sides Adjust the keyboa...

Page 11: ... the USB port on your computer or to the extension seat and that the extension seat s cable is connected to your PC Make sure you have established a communication link between the mouse and its receiver See Synchroniza tion on page 8 When I use the mouse other wireless devices work more slowly or fail temporarily what should I do The mouse may cause interference with any cordless radio based devic...

Page 12: ...eat if necessary Increase the distance between the mouse s receiver and the base units of other wireless devices Turn off any wireless devices and their base units that are near the mouse s receiver If you are using the mouse on a metal surface move it and the receiver to a non metal surface Metals such as iron aluminum or copper shield the radio frequency transmission and may slow down the mouse ...

Page 13: ... and workmanship for one year If your Targus accessory is found to be defective within that time we will promptly repair or replace it This warranty does not cover accidental damage wear and tear or consequential or incidental loss Under no conditions is Targus liable for loss of or damage to a devices nor loss of or damage to programs records or data nor any consequential or incidental damages ev...

Page 14: ...antenna Increase the separation between the equipment and receiver Connect the equipment into an outlet on a circuit different from that to which the receiver is connected Consult the dealer or an experienced radio TV technician for help FCC Statement Tested to Comply Changes or modifications not authorized by the party responsible for compliance could void the user s authority to operate this pro...

Reviews: