background image

DEUTSCH

ENGLISH

CR-H258i

Z

7202-090400101

CD Receiver

OWNER'S MANUAL

BEDIENUNGSANLEITUNG

Summary of Contents for CR-H258i

Page 1: ...DEUTSCH ENGLISH CR H258i Z 7202 090400101 CD Receiver OWNER S MANUAL BEDIENUNGSANLEITUNG ...

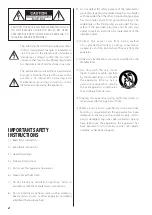
Page 2: ...fied by the manufacturer 12 Use only with the cart stand tripod bracket or table specified by the manufacturer or sold with the apparatus When a cart is used use caution when moving the cart apparatus combination to avoid injury from tip over 13 Unplug this apparatus during lightning storms or when unused for long periods of time 14 Refer all servicing to qualified service personnel Servicing is r...

Page 3: ...PLIANCE TO RAIN OR MOISTURE CAUTION DO NOT REMOVE THE EXTERNAL CASES OR CABINETS TO EXPOSE THE ELECTRONICS NO USER SERVICEABLE PARTS ARE WITHIN IF YOU ARE EXPERIENCING PROBLEMS WITH THIS PRODUCT CONTACT TEAC FOR A SERVICE REFERRAL DO NOT USE THE PRODUCT UNTIL IT HAS BEEN REPAIRED USE OF CONTROLS OR ADJUSTMENTS OR PERFORMANCE OF PROCEDURES OTHER THAN THOSE SPECIFIED HEREIN MAY RESULT IN HAZARDOUS R...

Page 4: ...lied to the unit should match the voltage as printed on the rear panel If you are in any doubt regarding this matter consult an electrician Choose the installation location of your unit carefully Avoid placing it in direct sunlight or close to a source of heat Also avoid locations subject to vibrations and excessive dust heat cold or moisture Do not place the unit on an amplifier receiver Do not o...

Page 5: ... this occurs leave the unit for one or two hours with the power turned on The unit will stabilize at the temperature of its surroundings Memory Backup If the power supply is cut off for 14 days or longer settings kept in memory timer settings will be erased Restoring system settings If you want to manually initialize the settings restore the unit to the factory settings as follows 1 Press the STAN...

Page 6: ...turned to their cases after use to avoid dust and scratches that could cause the laser pickup to skip Do not expose discs to direct sunlight or high humidity and temperature for extended periods Long exposure to high temperatures will warp the disc Do not play any disc that is warped deformed or damaged Playing such discs may cause irreparable harm to the playing mechanisms CD R and CD RW discs ar...

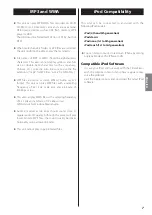
Page 7: ...r FAT 32 but not NTFS When more than 255 folders or 999 files are recorded the unit might not be able to play them correctly File names of MP3 or WMA should be alphanumeric characters This unit cannot display symbols and full size or double byte characters such as Japanese Chinese etc correctly Also be sure to use the file extension mp3 for MP3 files wma for WMA files MP3 files are mono or stereo ...

Page 8: ...ead the instructions of each component you intend to use with this unit Be sure to insert each plug securely To prevent humming and interference avoid bundling the signal interconnection cables together with the AC power cord or speaker cables Connection 1 CD recorder Cassette deck etc TV or Monitor Dock Separately purchased CD recorder MD deck etc DVD player etc ...

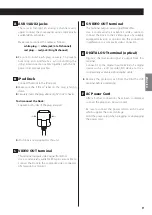
Page 9: ...rrect voltage Hold the power plug when plugging or unplugging the power cord A AUX1 AUX2 jacks These jacks transmit an analog 2 channel audio signal Connect the components using commercially available RCA pin cables Make sure to connect the cables as follows white plug q white jack L left channel red plug q red jack R right channel Be sure to insert each plug securely To prevent humming and interf...

Page 10: ...s of the outer insulation Removing too much insulation may lead to a short circuit if the bared wires should come in contact with each other Twist the strands of the stripped wires tightly together 2 Turn the terminal cap counter clockwise to loosen it The speaker terminal caps cannot be fully removed from the base 3 Insert the wire into the terminal and turn the terminal cap clockwise to securely...

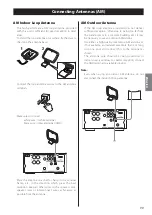
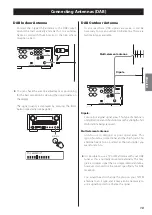
Page 11: ...ower cords speaker wires or interconnect wires as far away as possible from the antenna AM Outdoor Antenna If the AM loop antenna provided does not deliver sufficient reception often due to being too far from the transmitter or in a concrete building etc it may be necessary to use an outdoor AM antenna Use either a high quality commercial AM antenna or if not available an insulated wire more than ...

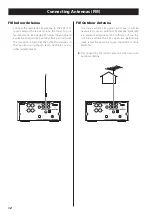
Page 12: ...ception is best and then affix the antenna in that position using thumb tacks push pins or any other suitable means FM Outdoor Antenna In an area where FM signals are weak it will be necessary to use an outdoor FM antenna Generally a 3 element antenna will be sufficient if you live in an area where the FM signals are particularly weak it may be necessary to use one with 5 or more elements Disconne...

Page 13: ...le For use in marginal signal areas This type of antenna is omnidirectional and should increase the strength of all DAB stations being received Multi element antenna Also for use in marginal or poor signal areas This type of antenna is directional and has high gain This antenna needs to be pointed at the transmitter you want to listen to It is possible to use a TV or FM antenna with your DAB tuner...

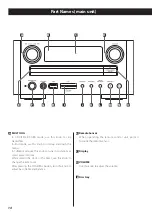
Page 14: ...NER mode use this knob to tune in to stations or select preset stations While setting the clock or the timer use this knob to change the item to set After pressing the TONE BAL button turn this knob to adjust bass treble and balance B Remote Sensor When operating the remote control unit point it towards the remote sensor C Display D VOLUME Use this knob to adjust the volume E Disc tray ...

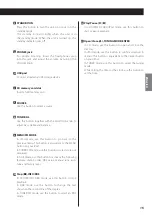
Page 15: ...equivalent to the MENU button on your iPod In TUNER FM mode use this button to select stereo or monaural In DAB mode use this button to activate the following features station order DRC value manual tune auto tune and factory reset M Stop H INFO RDS In CD USB SD CARD mode use this button to stop playback In DAB mode use this button to change the text shown on the second line of the display In TUNE...

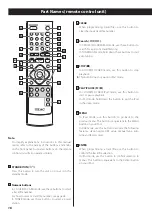
Page 16: ...CD USB SD CARD iPod mode use these buttons to search for a part of a track file song In TUNER DAB mode hold down these buttons to start auto tuning e STOP H In CD USB SD CARD mode use this button to stop playback This button does not work in iPod mode f PLAY PAUSE y J In CD USB SD CARD iPod mode use this button to start or pause playback In iPod mode hold down this button to put the iPod in the sl...

Page 17: ...o select stereo or monaural q PROGRAM In CD USB SD CARD mode use this button to enter the programme mode when playback is stopped In TUNER FM TUNER AM DAB mode use this button to enter the presetting mode r SHUFFLE In CD USB SD CARD iPod mode use this button to start shuffle playback s REPEAT 1 ALL In CD USB SD CARD iPod mode use this button to set the repeat playback t DISPLAY In CD USB SD CARD m...

Page 18: ... specified Do not mix new batteries with old ones or use different types of batteries together Do not heat or disassemble batteries and never throw them in the fire or water Do not carry or store batteries with other metallic objects The battery may short circuit leak or explode Never recharge a battery unless it is a verified rechargeable type The provided Remote Control Unit allows the unit to b...

Page 19: ...ress the SOURCE button repeatedly to select a source The source changes as follows To listen to an external source connected to the AUX IN jack select AUX 1 IN or AUX 2 IN You can use the AUX 1 AUX 2 TUNER CD USB SD and iPod buttons on the remote control unit to select a source directly 3 Play the source and gradually turn up the volume to the required level by turning the VOLUME knob Standby indi...

Page 20: ...nge The level can be adjusted from 10 to 10 Balance Adjusts the balance of the volume level between the left and right speakers The level can be adjusted from L 16 to R 16 How to adjust bass treble balance of speakers 1 Press the TONE BAL button repeatedly to select an item to adjust 2 Within 3 seconds turn the MULTI JOG knob to adjust the setting 3 Wait for 3 seconds after adjusting the item to f...

Page 21: ...tes later SLEEP OFF The sleep timer is off The display is dimmed when you set the sleep timer If you want to check the remaining time press the SLEEP button once The remaining time will be displayed for 3 seconds then return to the normal display Headphones For private listening first reduce the volume level to minimum Then insert the plug of your headphones into the PHONES jack and adjust the vol...

Page 22: ...headphones are plugged into the iPod sound comes out from both the speakers of the CR H258i and the headphones You can watch a video source stored on the iPod on the TV or monitor connected to the dock Set the TV Out setting on the iPod to On The Stop button H does not work in the iPod mode To pause playback During playback press the PLAY PAUSE button G J to pause playback Playback stops at the cu...

Page 23: ... If the iPod is set to either of the shuffle modes the icon appears on the display of the iPod To search for a part of a song During playback hold down the Search button m or and release it when the part you want to listen to is found To go back to the previous menu Press the MENU button to go back to the previous menu This button is equivalent to the MENU button on your iPod To select a menu item...

Page 24: ...it has closed Never place more than one disc on the tray Do not stick labels or tapes on the disc Do not use irregularly shaped discs Disc Playback current track number elapsed time of the current track current file number elapsed time of the current file 4 Press the Open Close button L to close the tray When an audio CD is loaded The total number of the tracks and total play time of the disc is d...

Page 25: ...ng first closed the disc tray the disc tray closes and playback starts USB Playback You can play MP3 WMA files by connecting various external USB storage devices such as USB flash memory This unit can play external USB storage devices with a capacity of up to 32 GB 1 Press the SOURCE button repeatedly to select USB No USB will be displayed if no USB device is connected 2 Connect an external USB st...

Page 26: ...d is inserted 2 Insert an SD memory card into the SD slot of this unit 3 Press the Play Pause button y J To suspend playback temporarily pause mode Press the Play Pause button G J during playback Playback stops at the current position To resume playback press the Play Pause button G J again To stop playback Press the Stop button H to stop playback General Playback disc USB SD ...

Page 27: ... PLAY PAUSE button G J when the part you want to listen to is found To skip to the next or a previous track During playback turn the MULTI JOG knob until the desired track file is found The selected track file will be played from the beginning In the stop mode turn the MULTI JOG knob until the desired track file is found Press the Play Pause button G J to start playback from the selected track fil...

Page 28: ... starts from track 2 To select track number 12 Press 0 1 and 2 or press 1 2 and the PLAY PAUSE button G J If you press 1 and 2 and wait for a few seconds playback starts from track 12 To select track number 123 MP3 WMA files only Press 1 2 and 3 Direct Playback disc USB SD During playback press the DISPLAY button repeatedly to change the information on the display Display changes as follows Audio ...

Page 29: ...sc has no folder this mode will be skipped Repeat all the tracks files RPT ALL All the tracks files will be played repeatedly During programmed playback programmed tracks files will be played repeatedly Normal playback Repeat Playback disc USB SD Only MP3 WMA files Shuffle Playback disc USB SD Press the SHUFFLE button during playback or in stop mode Random appears on the display and the tracks fil...

Page 30: ... last input track file number will be deleted Up to 30 tracks files can be programmed If you attempt to programme more than 30 tracks files P FULL appears on the display 5 When programming has been finished press the PLAY PAUSE button y J to start programmed playback After playback of all the programmed tracks files has finished or you stop the programmed playback you can return to the programmed ...

Page 31: ...the program press the ENTER button repeatedly until T_ _ _ appears on the display 2 Select a track file using the Number buttons then press the ENTER button You can also select a track file using the Skip buttons The previously programmed track file is replaced with the newly selected one Or the track file is added to the end of the program To clear the program In the stop mode press the PROGRAM b...

Page 32: ...s are added to the channel list the number of channels found is displayed After broadcast services have been found the channels are listed in alphanumeric order If no broadcast services are found please check that the antenna is correctly connected to the unit Listening to an External Source You can listen to the sound from an external component connected to the AUX 1 IN or AUX 2 IN jacks 1 Press ...

Page 33: ...s the ENTER button Listening to DAB Stations The channel is tuned in and channel information is displayed Channels are displayed in alphanumeric order in the channel list with numbers coming first Therefore stations such as 6 Music from the BBC will be listed early in the list If a channel is no longer broadcasting or the unit is moved out of the area of a broadcast channel the unit will no longer...

Page 34: ...il Station order is displayed on the second line of the display 3 Press the ENTER button 4 Turn the MULTI JOG knob until the desired option is displayed in the second line of the display The current option is shown on the first line of the display Active station This option will list active stations at the top of the channel list and channels that are in the list but have no service in your area w...

Page 35: ...ning levels while classical music broadcasts may have no DRC applied to allow the listener to hear the full dynamic range of the source volume 1 While listening to a DAB broadcast press the MENU button 2 Turn the MULTI JOG knob until DRC Value is displayed on the second line of the display 3 Press the ENTER button 4 Turn the MULTI JOG knob until the desired option is displayed in the second line o...

Page 36: ...ve the unit to a new area or you want to check to see if there are new channels available in your area you can scan to find new channels automatically 1 While listening to a DAB broadcast press the MENU button 2 Turn the MULTI JOG knob until Autotune is displayed on the second line of the display Manual tune 1 While listening to a DAB broadcast press the MENU button 2 Turn the MULTI JOG knob until...

Page 37: ...he MULTI JOG knob until Factory reset is displayed on the second line of the display 3 Press the ENTER button 4 Turn the MULTI JOG knob to display Yes on the second line of the display 5 Press the ENTER button All data of the Function Control is erased and it returns to the factory settings After resetting use Auto tune to find new channels see page 36 If you change the source or turn off the unit...

Page 38: ...nd time This displays the current date and time which is supplied by the radio station and should always be accurate The clock setting will be automatically adjusted according to the clock time data If you tune in a DAB station broadcasting incorrect clock time data the clock might be wrongly adjusted and that may eventually affect the timer operation No matter which DAB mode is selected the unit ...

Page 39: ...o reception select this mode Reception will now be forced to monaural reducing unwanted noise Listening to FM AM Stations 1 Press the SOURCE button repeatedly to select TUNER FM or TUNER AM 2 Press the TUNING MODE button to select the tuning mode Each time the TUNING MODE button is pressed the tuning mode changes as follows 3 Turn the MULTI JOG knob to tune in to a station you want to listen to Ma...

Page 40: ... automatically Preset Manually DAB FM AM 1 Tune in to a station you want to listen to see pages 33 and 39 2 Press the PROGRAM button FM or AM __ blinks on the display DAB 01 appears on the display 3 Within 20 seconds select a preset channel to store the station FM or AM For instance to select preset number 15 press 1 5 and the PROGRAM button To select numbers less than 10 press 0 and the number As...

Page 41: ...PROGRAM button within 4 seconds after selecting the channel the selection will be cancelled If you store a new station to a channel the station previously stored in the channel will be overwritten To store more stations repeat steps 1 to 3 How to select preset stations FM or AM Press the Numeric buttons or the Skip buttons DAB Press the Skip buttons You can also select preset stations using the bu...

Page 42: ...e frequency will be displayed RDS Program type PTY When you select RDS Program type RDS PROGRAM TYPE will blink for about 3 seconds and then the programme type will be displayed RDS Radio text RT When you select RDS Radio text RDS RADIO TEXT will blink for about 3 seconds and then the news of stations composed of up to 64 symbols will be displayed RDS RDS Clock time CT Displays the time informatio...

Page 43: ...s of PTY programmes The programme type blinks You can also use the Cursor buttons on the remote control unit to select a programme type 4 Press the ENTER button The programme type stops blinking 5 Turn the MULTI JOG knob The unit starts searching You can also start searching by pressing the Cursor button or on the remote control unit When the programme that you have selected is found searching sto...

Page 44: ...cal and popular songs and sale volume of discs etc ROCK M Practical modern music generally composed and played by young musicians EASY M Popular music usually lasting for less than 5 minutes LIGHT M Classical music instrumental music chorus and light music favored by non professionals CLASSICS Orchestra including great operas symphony chamber music and so on OTHER M Other music styles Rhythm Blues...

Page 45: ...seconds 1 Press and hold the TIME MODE button for more than 2 seconds CLOCK SETTING appears on the display When no action is taken for 20 seconds the time adjust mode will be cancelled Press the STOP button H to cancel the time setting 2 Press the button to select the hour The hour value blinks 3 Press the Scroll buttons to set the current hour Setting the Clock ...

Page 46: ...ue of the start time blinks 3 Press the Scroll buttons to set the minute of the start time and press the ENTER button The hour value of the stop time blinks Using the Timer 4 Press the Scroll buttons to set the hour of the stop time and press the ENTER button The minute value of the stop time blinks 5 Press the Scroll buttons to set the minute of the stop time and press the ENTER button The source...

Page 47: ...DAB TU FM or TU AM for the timer tune in to a station The unit tunes in to the station when timer starts working 3 Press the STANDBY ON button to turn the unit off standby The standby indicator blinks at 5 second intervals The unit will turn on and off at the specified times every day Do not forget to turn the unit off standby or the timer will not work To turn off the timer Press the TIMER button...

Page 48: ...e control unit and the main unit e If a strong light is near the unit turn it off CD Player Will not play e Load a disc with the label side up e If the disc is dirty clean the surface of the disc e A blank disc has been loaded Load a prerecorded disc e Depending on the disc etc it may not be possible to play back CD R RW discs Try again with another disc e You cannot play back unfinalized CD R RW ...

Page 49: ...overed unplug the power cord from the outlet and plug it in again iPod Player Cannot insert the iPod e Check the dock adapter e Remove dust or obstacles from the Dock connector of the CR H258i and the iPod then insert the iPod again Will not play e Remove the iPod from the dock wait a few seconds and insert it again e Software update may solve the problem Visit the Apple website and download the l...

Page 50: ...on Output Power 25 W ch 6 ohms 0 5 1 kHz Input Sensitivity 340 mV 47 kΩ Frequency Response 20 Hz to 60 000 Hz 1 3 dB TUNER Section FM Section Tuning Range 87 50 MHz to 108 00 MHz Signal to Noise Ratio 56 dB Mono 52 dB Stereo AM Section Tuning Range 522 kHz to 1 629 kHz Signal to Noise Ratio 35 dB DAB Section Tuning range Band 3 174 MHz 240 MHz Input 50 ohms nominal Max signal 3 dBm typ Sensitivity...

Page 51: ...revent any potential negative effects on human health and the environment which could otherwise arise from inappropriate waste handling For more information about collection and recycling of old products and batteries please contact your local municipality your waste disposal service or the point of sale where you purchased the items Information on Disposal in other Countries outside the European ...

Page 52: ... Sie sich an einen Elektriker falls Sie sich diesbezüglich nicht sicher sind Wählen Sie den Aufstellungsort für Ihr Gerät sorgfältig Stellen Sie es nicht in direktem Sonnenlicht oder in der Nähe einer Wärmequelle auf Vermeiden Sie auch Orte mit Vibrationen und viel Staub sehr hohen oder niedrigen Temperaturen oder Feuchtigkeit Stellen Sie dieses Gerät nicht auf einem Verstärker Receiver auf Öffnen...

Page 53: ...en setzen Sie das Gerät auf werkseitige Voreinstellungen zurück wie folgt 1 Drücken Sie die STANDBY ON Taste um das Gerät auszuschalten Bereitschaftsmodus 2 Halten Sie die Stopp Taste H länger als 2 Sekunden gedrückt FACTORY RESET FINISHED erscheint im Display 3 Ziehen Sie das Netzkabel von der Netzsteckdose ab 4 Stecken Sie das Netzkabel erneut in eine Netzsteckdose ein Alle Daten werden gelöscht...

Page 54: ...tzer zu vermeiden die Aussetzer des Laserabtasters verursachen könnten Setzen Sie Discs nicht über längere Zeit direktem Sonnenlicht oder hoher Luftfeuchtigkeit und hohen Temperaturen aus Wenn sie längere Zeit hohen Temperaturen ausgesetzt werden können Discs verwellen Spielen Sie keine Disc ab die verwellt verformt oder beschädigt ist Durch Abspielen solcher Disc kann der Abspielmechanismus irrep...

Page 55: ...r oderr 999 Dateien aufgezeichnet sind kann deren richtige Wiedergabe mit dem Gerät u U nicht möglich sein Die Namen von MP3 oder WMA Dateien müssen in alphanumerischen Zeichen sein Dieses Gerät kann nicht Symbole und Full Size oder Doppelbyte Zeichen wie japanische oder chinesische Schriftzeichen usw richtig anzeigen Außerdem muss immer die Dateierweiterung verwendet werden mp3 für MP3 Dateien wm...

Page 56: ...mponenten die Sie in Verbindung mit diesem Gerät verwenden möchten Achten Sie darauf jeden Stecker sicher einzustecken Vermeiden Sie um Brummen und Störungen vorzubeugen die Bündelung der Signalverbindungskabel zusammen mit dem Netzstromkabel oder den Lautsprecherkabeln Verbindung 1 CD Recorder Kassettendeck usw Fernsehgerät oder Monitor Dock Getrennt erhältlich CD Recorder MD Deck usw DVD Player ...

Page 57: ...ehmen des Netzkabels den Netzstecker A AUX1 AUX2 Buchsen Diese Buchsen geben ein analoges 2 Kanal Audiosignal aus Schließen Sie die Komponenten mit handelsüblichen RCA Cinchkabeln an Stellen Sie sicher dass die Kabel wie folgt angeschlossen sind Weißer Stecker q Weiße Buchse L linker Kanal Roter Stecker q Rote Buchse R rechter Kanal Achten Sie darauf jeden Stecker sicher einzustecken Vermeiden Sie...

Page 58: ...el Isolation entfernt wird besteht die Gefahr von Kurzschlüssen wenn die freigelegten Drähte in Berührung miteinander kommen Verdrillen Sie die Stränge der abisolierten Drähte fest miteinander 2 DrehenSiedieKlemmenkappegegendenUhrzeigersinn um sie lösen Die Lautsprecherklemmenkappen können nicht vollständig von der Basis entfernt werden 3 Stecken Sie den Draht in die Klemme und drehen Sie die Klem...

Page 59: ...sprecherkabel oder Verbindungskabel so weit wie möglich von der Antenne entfernt MW Außenantenne Wenn die mitgelieferte MW Rahmenantenne keinen ausreichenden Empfang bietet häufig wegen zu großer Entfernung zum Sender oder Anbringung in einem Stahlbetongebäude usw kann es erforderlich sein eine MW Außenantenne zu verwenden Verwenden Sie entweder eine hochwertige handelsübliche MW Antenne oder fall...

Page 60: ...er Empfang optimal ist und befestigen Sie die Anenne in dieser Position mit Reißzwecken Druckstiften oder ähnlichen Befestigungsteilen UKW Außenantenne In Gebieten mit schwachen UKW Signalen ist es erforderlich eine UKW Außenantenne zu verwenden Generell reicht eine 3 Element Antenne aus wenn Sie in einem Gebiet wohnen wo UKW Signale besonders schwach sind kann es erforderlich sein eine Antenne mi...

Page 61: ...ten mit schwachen Signalen Dieser Antennentyp ist omnidirektional und sollte die Stärke aller empfangenen DAB Sender steigern Multi Element Antenne Ebenfalls zur Verwendung in Gebieten mit schwachen Signalen Dieser Antennentyp hat eine Richtcharakteristik und einen hohen Antennengewinn Diese Antenne muss auf den gewünschten Sender gerichtet werden Es ist möglich eine TV Antenne oder eine UKW Anten...

Page 62: ...R Modus diesen Regler zum Abstimmen auf Sender oder zum Wählen von Festsendern Verwenden Sie bei der Einstellung von Uhr oder Timer diesen Regler zum Ändern des Einstellpunkts Nach dem Drücken der TONE BAL Taste drehen Sie diesen Regler zum Einstellen von Tiefen Höhen und Balance B Fernbedienungssensor Beim Betrieb mit Fernbedienung richten Sie diese auf den Fernbedienungssensor C Display D VOLUME...

Page 63: ...n Sie im TUNER FM Modus diese Taste zum Wählen von Stereo oder Mono Im DAB Modus verwenden Sie diese Taste um die folgenden Merkmale zu aktivieren Senderreihenfolge DRC Wert manuelle Abstimmung automatische Abstimmung und Rückstellung auf werkseitige Vorgaben M Stopp H INFO RDS Information RDS Verwenden Sie im CD USB SD CARD Modus diese Taste zum Stoppen der Wiedergabe Verwenden Sie im DAB Modus d...

Page 64: ...nem Part eines Tracks einer Datei eines Songs zu suchen Im TUNER DAB Modus halten Sie diese Tasten gedrückt um automatische Abstimmung zu starten e STOP H Stopp Verwenden Sie im CD USB SD CARD Modus diese Taste zum Stoppen der Wiedergabe Diese Taste arbeitet nicht im iPod Modus f PLAY PAUSE y J Wiedergabe Pause Verwenden Sie im CD USB SD CARD iPod Modus diese Taste zum Starten oder Pausieren der W...

Page 65: ...tereo oder Mono q PROGRAM Programm Verwenden Sie im CD USB SD CARD Modus diese Taste zum Einschalten des Programmmodus bei gestoppter Wiedergabe Verwenden Sie im TUNER FM TUNER AM DAB Modus diese Taste zum Einschalten des Vorwahlmodus r SHUFFLE Zufall Verwenden Sie im CD USB SD CARD iPod Modus diese Taste zum Starten der Zufallswiedergabe s REPEAT 1 ALL Wiedergabe 1 alle Verwenden Sie im CD USB SD...

Page 66: ... vorgeschriebenen Legen Sie nicht alte und neue Batterien oder Batterien verschiedener Sorten gemischt ein Erhitzen Sie Batterien nicht und werfen Sie sie niemals in ein Feuer oder Wasser Tragen oder lagern Sie Batterien nicht zusammen mit anderen Metallgegenständen Die Batterie kann kurzschließen leck werden oder explodieren Laden Sie eine Batterie niemals auf wenn es sich nicht um einen aufladba...

Page 67: ...Taste wiederholt um eine Quelle zu wählen Die Quelle schaltet wie folgt um Zum Hören einer externen Quelle die an die AUX IN Buchse angeschlossen ist wählen Sie AUX 1 IN oder AUX 2 IN Sie können die Tasten AUX 1 AUX 2 TUNER CD USB SD und iPod an der Fernbedienung zum direkten Wählen einer Quelle verwenden 3 Spielen Sie die Quelle ab und stellen Sie langsam den erforderlichen Lautstärkepegel durch ...

Page 68: ...n Balance Stellt die Balance des Lautstärkepegels zwischen linken und rechten Lautsprechern ein Der Pegel kann von L 16 bis R 16 eingestellt werden Einstellen von Tiefen Höhen und Balance von Lautsprechern 1 Drücken Sie die TONE BAL Taste wiederholt um einen Gegenstand zur Einstellung zu wählen 2 Drehen Sie den MULTI JOG Regler innerhalb von 3 Sekunden um die Einstellung anzupassen 3 Warten Sie 3 ...

Page 69: ...0 60 30 20 10 Minuten ausgeschaltet SLEEP OFF Der Einschlaf Timer ist ausgeschaltet Das Display wird abgeblendet wenn Sie den Einschlaf Timer einstellen Wenn Sie die Restzeit prüfen wollen drücken Sie die SLEEP Taste einmal Die Restzeit wird 3 Sekunden lang angezeigt und dann wird auf die normale Anzeige zurückgeschaltet Kopfhörer Für privates Hören stellen Sie zuerst die Lautstärke auf Minimum ei...

Page 70: ...n von beiden Lautsprechern des CR H258i und den Kopfhörern Sie können eine auf dem iPod gespeicherte Videoquelle auf dem an das Dock angeschlossene Fernsehgerät oder den Monitor abspielen Stellen Sie die Einstellung TV Out am iPod auf On Die Stopp Taste H arbeitet nicht im iPod Modus Pausieren der Wiedergabe Während der Wiedergabe drücken Sie die PLAY PAUSE Taste G J zum Pausieren der Wiedergabe D...

Page 71: ...e der Zufalls Betriebsarten eingestellt ist erscheint das Symbol im Display des iPod Suche nach einem Teil eines Titels Während der Wiedergabe halten Sie die Suchen Taste m oder gedrückt und lassen sie los wenn der zu Hören gewünschte Part gefunden wurde Zurückgehen zum vorherigen Menü Drücken Sie die MENU Taste zum Zurückgehen zum vorherigen Menü Diese Taste entspricht der MENU Taste an Ihrem iPo...

Page 72: ...en Sie nicht mehr als eine Disc in die Disc Schublade Kleben Sie keine Etiketten oder Klebebänder auf die Disc Verwenden Sie keine ungewöhnlich geformten Discs Disc Wiedergabe aktuelle Tracknummer verflossene Zeit des aktuellen Tracks Aktuelle Dateinummer verflossene Zeit der aktuellen Datei 4 Drücken Sie die Öffnen Schließen Taste L zum Schließen der Schublade Wenn eine Audio CD eingesetzt ist Di...

Page 73: ...sen zu haben wird die Disc Schublade geschlossen und die Wiedergabe beginnt USB Wiedergabe Sie können MP3 WMA Dateien abspielen indem Sie verschiedene USB Speichergeräte wie USB Flash Memory anschließen Dieses Gerät kann externe USB Speichergeräte mit einer Kapazität von bis zu 32 GB abspielen 1 Drücken Sie die SOURCE Taste wiederholt um USB zu wählen No USB wird angezeigt wenn kein USB Gerät ange...

Page 74: ... SD Speicherkarte in den SD Schlitz dieses Geräts ein 3 Drücken Sie die Wiedergabe Pause Taste y J Zum kurzzeitigen Aufheben der Wiedergabe Pause Modus Drücken Sie die Wiedergabe Pause Taste G J während der Wiedergabe Die Wiedergabe stoppt in der aktuellen Position Zum Fortsetzen der Wiedergabe drücken Sie die Wiedergabe Pause Taste G J erneut Stoppen der Wiedergabe Drücken Sie die Stopp Taste H z...

Page 75: ...ste G J wenn der zu Hören gewünschte Part gefunden wurde Zum Weiterspringen zum nächsten oder vorherigen Track Während der Wiedergabe drehen Sie den MULTI JOG Regler bis der die gewünschte Track Datei gefunden wird Der die gewünschte Track Datei wird von Anfang an abgespielt Drehen Sie im Stoppmodus den MULTI JOG Regler bis der die gewünschte Track Datei gefunden wird Drücken Sie die Wiedergabe Pa...

Page 76: ...PLAY PAUSE Taste G J Wenn Sie 1 und 2 drücken und einige Sekunden warten beginnt die Wiedergabe mit Track 12 Zum Wählen von Track Nr 123 nur MP3 WMA Dateien Drücken Sie 1 2 und 3 Direkt Wiedergabe Disc USB SD CD Play 09 00 T002 0 13 CD Play 09 00 T002 2 03 CD Play 09 00 T002 5 39 CD Play 09 00 T002 51 21 Während der Wiedergabe drücken Sie die DISPLAY Taste wiederholt um die Information im Display ...

Page 77: ...ser Modus übersprungen Alle Tracks Dateien wiederholen RPT ALL Alle Tracks Dateien werden wiederholt abgespielt Bei Programmwiedergabe werden die programmierten Tracks Dateien wiederholt abgespielt Normale Wiedergabe Wiederholwiedergabe Disc USB SD Nur MP3 WMA Dateien Zufallswiedergabe Disc USB SD Drücken Sie die SHUFFLE Taste während der Wiedergabe oder im Stoppmodus Random erscheint im Display u...

Page 78: ... Die zuletzt eingegebene Track Dateinummer wird gelöscht Bis zu 30 Tracks Dateien können programmiert werden Wenn Sie ein Programm mit mehr als 30 Tracks Dateien programmieren erscheint die Meldung P FULL auf dem Display 5 Wenn die Programmierung beendet ist drücken Sie die PLAY PAUSE Taste y J zum Starten der programmierten Wiedergabe Nach der Wiedergabe aller programmierten Tracks Dateien oder w...

Page 79: ... drücken Sie die ENTER Taste wiederholt bis T_ _ _ im Display erscheint 2 Wählen Sie einen Track eine Datei mit den Zifferntasten und betätigen Sie dann die ENTER Taste Sie können auch einen Track eine Datei mit den Überspringen Tasten auswählen Die der vorher programmierte Datei Track wird durch den die neu gewählte n ersetzt Oder der Track die Datei wird zum Ende des Programms hinzugefügt Zum Lö...

Page 80: ...res DAB Tuners Beim ersten Hören von DAB Radio sucht das Gerät nach DAB Kanälen und baut eine Kanalliste auf Drücken Sie die SOURCE Taste wiederholt um DAB zu wählen Das Gerät sucht Senderdienste im örtlichen Gebiet und fügt sie nacheinander zur Kanalliste hinzu Dieser Suchvorgang sollte etwa 10 Sekunden dauern Während Kanäle zu der Kanalliste hinzugefügt werden wird die Anzahl der gefundenen Kanä...

Page 81: ...ücken Sie die ENTER Taste Hören von DAB Sendern Der Kanal wird abgestimmt und die Kanalinformation angezeigt Kanäle werden in alphanumerischer Reihenfolge in der Kanalliste angezeigt mit den Zahlen zuerst kommend Darum werden Sender wie 6 Music von der BBC oben in der Liste aufgeführt Wenn auf einem Kanal nicht mehr gesendet wird oder das Gerät aus dem Empfangsbereich eines Kanals bewegt wurde kan...

Page 82: ...G Regler bis Station order in der zweiten Zeile des Displays angezeigt wird 3 Drücken Sie die ENTER Taste 4 Drehen Sie den MULTI JOG Regler bis die gewünschte Option in der zweiten Zeile des Displays angezeigt wird Die aktuelle Option wird in der ersten Zeile des Displays angezeigt Aktive Sender Active station Diese Option listet aktive Sender oben in der Kanalliste und Kanäle die in der Liste sin...

Page 83: ...dungen mit klassischer Musik möglicherweise keinen DRC haben so dass der Hörer den vollen Dynamikbereich des Originaltons genießen kann 1 Beim Hören einer DAB Sendung drücken Sie die MENU Taste 2 Drehen Sie den MULTI JOG Regler bis DRC Value in der zweiten Zeile des Displays angezeigt wird 3 Drücken Sie die ENTER Taste 4 Drehen Sie den MULTI JOG Regler bis die gewünschte Option in der zweiten Zeil...

Page 84: ...utotune Wenn Sie das Gerät in einen neuen Bereich bringen und prüfen wollen ob neue Kanäle in Ihrem Bereich vorhanden sind können Sie automatisch einen Suchlauf nach neuen Kanälen ausführen 1 Beim Hören einer DAB Sendung drücken Sie die MENU Taste 2 Drehen Sie den MULTI JOG Regler bis Autotune in der zweiten Zeile des Displays angezeigt wird Manuelle Abstimmung Manual tune 1 Beim Hören einer DAB S...

Page 85: ...ays angezeigt wird 3 Drücken Sie die Taste ENTER No Yes TEAC CR H258i 4 Drehen Sie den MULTI JOG Regler um Yes in der zweiten Zeile des Displays erscheinen zu lassen 5 Drücken Sie die Taste ENTER Alle Daten der Funktionssteuerung werden gelöscht und das Gerät wird auf die Werkseinstellungen zurückgesetzt Nach dem Rücksetzen verwenden Sie die automatische Abstimmung um neue Kanäle zu finden siehe S...

Page 86: ...elles Datum und die Zeit an wie von der Radiosendung geliefert Diese Information sollte immer korrekt sein Die Uhr Einstellung dieses Geräts wird automatisch entsprechend den Uhrzeit Daten eingestellt Falls Sie auf einen DAB Sender abstimmen der falsche Uhrzeit Daten sendet kann es sein dass die Uhr falsch eingestellt wird und dies kann schließlich den Timerbetrieb beeinträchtigen Egal welcher DAB...

Page 87: ... ist jetzt zwangsweise auf Mono gestellt wobei ungewünschtes Rauschen verringert wird Hören von UKW MW Sendern 1 Drücken Sie die SOURCE Taste wiederholt um TUNER FM oder TUNER AM zu wählen 2 Drücken Sie die TUNING MODE Taste zum Wählen des Senderabstimmmodus Bei jedem Drücken der TUNING MODE Taste wechselt der Abstimmmodus folgendermaßen 3 Drehen Sie den MULTI JOG Regler um einen Sender zum Hören ...

Page 88: ...rt Manueller Preset DAB UKW MW 1 Stimmen Sie auf einen zu Hören gewünschten Sender ab siehe Seite 81 und 87 2 Drücken Sie die PROGRAM Taste UKW oder MW __ blinkt im Display DAB 01 erscheint im Display 3 Wählen Sie innerhalb von 20 Sekunden einen Preset Kanal zum Speichern des Senders UKW oder MW Um zum Beispiel die Preset Nummer 15 zu wählen drücken Sie 1 5 und die PROGRAM Taste Zum Wählen von Zah...

Page 89: ...alb von 4 Sekunden nach dem Wählen des Kanals drücken wird die Auswahl aufgehoben Wenn Sie einen neuen Sender in einem Kanal speichern wird der vorher an dieser Stelle gespeicherte Kanal überschrieben Zum Speichern weiterer Sender wiederholen Sie die Schritte 1 bis 3 Wählen von Preset Sendern UKW oder MW Drücken Sie die Zifferntasten oder die Überspringen Tasten DAB Drücken Sie die Überspringen Ta...

Page 90: ...wird die Frequenz angezeigt RDS Programmtyp PTY Wenn Sie den RDS Programmtyp wählen blinkt RDS PROGRAM TYPE etwa 3 Sekunden lang und dann erscheint der Programmtyp RDS Radiotext RT Wenn Sie den RDS Radiotext wählen blinkt RDS RADIO TEXT etwa 3 Sekunden lang und dann erscheinen die Nachrichten von Sendern bestehend aus bis zu 64 Symbolen RDS RDS Uhrzeit CT Zeigt vom Sender ausgestrahlte Zeitinforma...

Page 91: ...Y Programmen wählen Der Programmtyp blinkt Sie können auch die Cursor Tasten an der Fernbedienung verwenden um einen Programmtyp zu wählen 4 Drücken Sie die ENTER Taste Der Programmtyp hört zu blinken auf 5 Drehen Sie den MULTI JOG Regler Das Gerät beginnt mit der Suche Durch Drücken der Cursor Taste oder an der Fernbedienung können Sie auch die Suche starten Wenn das gewählte Programm gefunden wi...

Page 92: ...puläre Songs Verkaufsvolumen von Discs usw ROCK M Praktische moderne Musik generell von jungen Musikern komponiert und gespielt EASY M Populäre Musikstücke die generell kürzer als 5 Minuten sind LIGHT M Klassische Musik Instrumentalmusik Chor und leichte Musik von Nichtprofis bevorzugt CLASSICS Orchestermusik einschließlich große Opern Symphonien Kammermusik usw OTHER M Andere Musikstile Rhythm Bl...

Page 93: ...ten Sie die TIME MODE Taste länger als 2 Sekunden gedrückt CLOCK SETTING erscheint im Display Wenn 20 Sekunden lang keine Bedienung vorgenommen wird wird der Einstellmodus aufgehoben Drücken Sie die STOP Taste H zum Abbrechen der Zeiteinstellung 2 Mit der Taste können Sie die Stunde wählen Der Stunde Wert blinkt 3 Drücken Sie die Scroll Tasten zum Einstellen der aktuellen Stunde Einstellen der Uhr...

Page 94: ...t der Startzeit blinkt 3 Drücken Sie die Scroll Tasten zum Einstellen der Minute der Startzeit und drücken Sie die ENTER Taste Der Stunde Wert der Stoppzeit blinkt Verwendung des Timers 4 Drücken Sie die Scroll Tasten zum Einstellen der Stunde der Stoppzeit und drücken Sie die ENTER Taste Der Minute Wert der Stoppzeit blinkt 5 Drücken Sie die Scroll Tasten zum Einstellen der Minute der Stoppzeit u...

Page 95: ... den Timer gewählt haben stimmen Sie einen Sender ab Das Gerät stimmt auf den Sender ab wenn der Timer zu arbeiten beginnt 3 Drücken Sie die STANDBY ON Taste um das Gerät auszuschalten Bereitschaft Die Standby Anzeige blinkt in 5 Sekunden Intervallen Das Gerät schaltet jeden Tag zu den festgelegten Zeiten ein und aus Vergessen Sie nicht das Gerät auszuschalten Bereitschaft oder der Timer arbeitet ...

Page 96: ...dem Hauptgerät e Wenn sich eine starke Lichtquelle in der Nähe des Geräts befindet schalten Sie diese aus CD Player Wiedergabe ist nicht möglich e Setzen Sie die Disc mit der bedruckten Seite nach oben weisend e Wenn die Disc verschmutzt ist reinigen Sie die Oberfläche der Disc e Eine leere Disc wurde eingesetzt Legen Sie eine bespielte Disc ein e Je nach der Disc und anderen Faktoren kann die Wie...

Page 97: ...ele sekundäre Dienste vorhanden aber ihre Anzahl wird zunehmen während mehr Sender DAB ausstrahlen Wenn ein sekundärer Dienst verfügbar ist erscheint die Sekundär Anzeige neben dem Sendernamen Das Display erlischt oder die Meldung service off air erscheint e Dies kann auftreten wenn die Sendeanstalt das Label eines Dienstes ändert oder das Label entfernt während Sie die Sendung hören Der CR H258i ...

Page 98: ...0 Hz 2 dB Signal Rauschabstand mehr als 90 dB Gleichlaufschwankungen Unter der Messgrenze USB SD Speicherkarten Teil Frequenzgang 20 Hz bis 20 000 Hz 2 dB Signal Rauschabstand mehr als 85 dB Technische Daten Allgemein Erforderlicher Betriebsstrom AC 230 V 50 Hz Leistungsaufnahme 74 W 0 8 W Bereitschaft Abmessungen 215 105 355 mm Gewicht 4 2 kg Standardzubehör Netzkabel 1 Fernbedienung RC 1226 1 Ba...

Page 99: ...negative Auswirkungen auf die menschliche Gesundheit und die Umwelt die andernfalls durch unsachgerechte Müllentsorgung auftreten könnten Für weitere Informationen zum Sammeln und Wiederaufbereiten alter Elektrogeräte und Batterien kontaktieren Sie bitte Ihre örtliche Stadtoder Gemeindeverwaltung Ihren Abfallentsorgungsdienst oder die Verkaufsstelle der Artikel Entsorgungsinformation für Länder au...

Page 100: ...d Montebello California 90640 U S A Phone 323 726 0303 TEAC CANADA LTD 5939 Wallace Street Mississauga Ontario L4Z 1Z8 Canada Phone 905 890 8008 TEAC MEXICO S A de C V Río Churubusco 364 Colonia Del Carmen Delegación Coyoacàn CP 04100 México DF México Phone 5255 5010 6000 TEAC UK LIMITED Suites 19 20 Building 6 Croxley Green Business Park Hatters Lane Watford Hertfordshire WD18 8TE U K Phone 0845 ...

Reviews: