background image

USER MANUAL

WARRANTY INFORMATION INSIDE. PLEASE READ

www.teac.com.au

IMPORTANT !


Trademark of  TEAC Corporation JAPAN

LEH55K7UDT
LEH65K7UDT

Ultra HD Smart LED TV

Summary of Contents for LEH55K7UDT

Page 1: ...USER MANUAL WARRANTY INFORMATION INSIDE PLEASE READ www teac com au IMPORTANT Trademark of TEAC Corporation JAPAN LEH55K7UDT LEH65K7UDT Ultra HD Smart LED TV ...

Page 2: ... and keep this information for your own records 2ZQHU V 1DPH 2ZQHU V Address Postcode Model Name No Serial No HDOHU V 1DPH HDOHU V Address Postcode Thank you for selecting a TEAC product If your TEAC product malfunctions please call us directly for warranty support between Monday to Friday at 8 30AM 5PM AEST at the TEAC Warranty Service Hotline 1300 553 315 For other enquiries please contact us at...

Page 3: ...made available at a fee upon request 6 A 12 month replacement warranty is applicable to all Accessories such as Remotes Power Adapters and Cables 7 TEAC will ensure to the best of its abilities that all required parts are made available for any required service repair 8 TEAC Australia Pty Ltd and its Authorised Service Centres will use their best endeavours to complete product repairs within a rea...

Page 4: ...troduction 2 Warning 3 Caution 4 Remote Control 10 Stand Assembly 6 Wall Mounting Installation Guidelines 7 Main Unit Description 8 Main Menu 11 Main Menu Operation 12 Media 33 Specifications 35 Trouble Shooting 36 ...

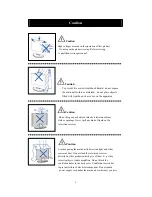
Page 5: ...e damage to the cabinet or premature component failure ĺ This TV can be connected to 100 240V 50 60HZ Ļ Do not install the TV in a location near heat sources such as radiator air ducts direct sunlight or in a place somewhere like close compartment and close area Do not cover the ventilation openings when using the TV ļ The indicator light goes out about 30 seconds after you disconnect the TV from ...

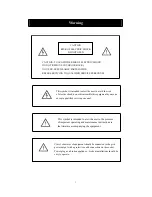
Page 6: ...ance instructions in the literature accompanying the equipment Class I structures of equipment should be connected to the grid power output with a protective earth connection on the socket Power plug as a broken applianceˈbroken installations should be easy to operate CAUTION TO AVOID THE RISK OF ELECTRIC SHOCK DO NOT REMOVE COVER OR BACK NO USER SERVICEABLE PARTS INSIDE REFER SERVICING TO QUALIFI...

Page 7: ...o not drop or push objects into the television cabinet slots or openings Never spill any kind of liquid on the television receiver Caution Avoid exposing the main unit to direct sunlight and other sources of heat Do not stand the television receiver directly on other products which give off heat E g video cassette players Audio amplifiers Do not block the ventilation holes in the back cover Ventil...

Page 8: ...an individual and damage to the television may result if it should fall Caution When the product is not used for an extended period of time it is advisable to disconnect the AC power cord from the AC outlet Caution The LED panel used in this product is made of glass Therefore it can break when the product is dropped or applied with impact Be careful not to be injured by broken glass pieces in case...

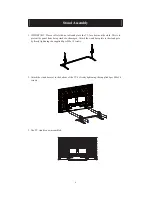
Page 9: ...event the panel from being cracked or damaged Attach the stand base plate to the stand pole by firmly tightening the supplied 4pcs M4x10 screws 2 Attach the stand base set to the bottom of the TV by firmly tightening the supplied 4pcs M4x14 screws 3 The TV stand is now assembled Stand Assembly 6 ...

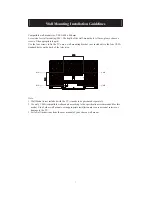
Page 10: ...unting M6 The depth of the wall mount hole is 19mm please choose a screw of the appropriate length Note 1 Wall Mount is not included with the TV it needs to be purchased separately 2 Use only VESA compatible wall mounts according to the specifications recommended for this model Use of other wall mounts or inappropriate installation may cause personal injuries or damage to the TV 3 Follow all instr...

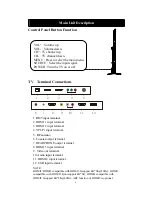
Page 11: ...7 HEADPHONE output terminal 6 Coaxial output terminal 2 HDMI 1 input terminal 1 RJ45 input terminal 3 HDMI 2 input terminal 8 HDMI 3 input terminal 11 HDMI 4 input terminal 12 USB input terminal 4 YPb Pr input terminal 5 RF antenna 9 Video out terminal 10 Audio input terminal NOTE HDMI1 HDMI2 compatible with HDMI1 4 support 4K 2K 30Hz HDMI3 compatible with HDMI1 4 not support 4K 2k HDMI4 compatibl...

Page 12: ...FW ZLWK 86 MDFN Ɣ 7R HQVXUH WKH 0RELOH ZRUNV ZHOO RX VKRXOG XVH RWKHU SRZHU VXSSO IRU WKH 0RELOH Ɣ W VXSSRUWV 0RELOH E FRQQHFting with USB jack must more than 2 GB The partitions of WKH 0RELOH FDQ W EH PRUH WKDQ SDUWLWLRQV 7KH PD SDUWLWLRQ LV 7 W VXSSRUWV 7 7 document The max FAT document is 4GB and the max FAT32 document is 2TB ...

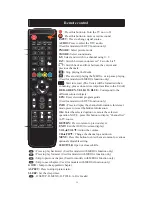
Page 13: ...t and previous channels Stop playing the Media Press to start playing the MEDIA or to pause playing Used for models with MEDIA function only Start to record The U disk will be formatted when in burning please do not store important files in the U disk RED GREEN YELLOW BLUE Correspond to the different colored subjects EPG Enter electronic program guide Used for models with DTV function only INFO Pr...

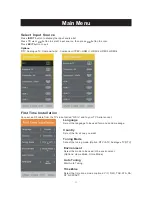
Page 14: ...and message Country Select the time zone you want Tuning Mode Select the tuning mode Option DTV ATV Analogue TV DTV OK OK Options Main Menu 11 Environment Select the mode to be used in the environment Options Home Mode Store Mode Auto Tuning Start Auto Tuning Time Zone Select the time zone mode coptions VIC QLD TAS WA SA NT NSW ACT Press button to display the input source list INPUT EXIT DTV Analo...

Page 15: ...ton to select the item you want to adjust in the main menu Picture Menu Press MENU button to display the main menu Press button to select PICTURE in the main menu Ż Ź MENU Main Menu Operation 12 Options PICTURE SOUND CHANNEL LOCK TIME NETWORK SETTING APPLICATION ...

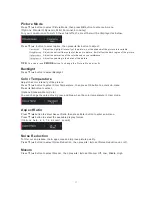
Page 16: ...ght Ż Ź Adjust the color intensity of the picture Press button to select Color Temperature Press button to select Backlight then press OK button to enter sub menu Press button to select Options Standard Warm Cold You can change the value of red green and blue when the color temperature in User mode Aspect Ratio Press Ʒ button to select Aspect Ratio then press Enter button to enter sub menu Press Ʒ...

Page 17: ...lay the main menu Press button to select SOUND in the main menu Ż Ź Auto Volume Level Adjust volume automatically when switching to another program Press button to select Auto Volume then press OK button to set Auto Volume on or off Surround Sound Press button to select Surround Sound then press to set Surround Sound on or off Ż Ź 14 Digital Output Press button to select digital output then press ...

Page 18: ...n to adjust 3 After finishing your adjustment Press button to save and return to the previous menu Auto Tuning Tuning the analogue channel automatically Press button to select Auto Tuning then press Enter button to enter sub menu Note The channel menu is available only for Air and Cable source Tuning Mode Country Auto Tuning Select the tuning mode Options ATV DTV ATV DTV Select the country Start a...

Page 19: ... menu Storage To 1 System BG Current CH 1 Search Fine Tune TV DTV Radio Data Store the searched channel to 1 you can adjust the channel number by The color system Select the current channel Search the channel Adjust the tune channel Ż Ź VHF CH 5 DTV Radio Data Set the Very High Frequency Channel The searched DTV channel The searched Radio Channel The searched Data Channel The searched TV programme...

Page 20: ...to highlight the channel you want to select Delete the channel from your favorite list Move the selected channel Skip the selected channel Set the selected channel as favorite Press up and down to select channel Select the selected channel Return to the main menu 17 Rename the channel Only available for ATV ...

Page 21: ...Auto Tuning Analogue Manual Tuning Digital Manual Tuning Channel Edit Signal Information Recorded List Schedule List OAD Details refer to the following content 1 Press button to select the option that you want to adjust in the CHANNEL menu 2 Press Enter button to adjust Press MENU button to display the main menu Press input to select the input source as DTV 18 ...

Page 22: ...tor Auto Tuning Select the tuning mode Options ATV DTV ATV DTV Select the country Select the operator Start auto tuning Tuning the analogue channel manually Press button to select Analogue Manual Tuning then press button to enter sub menu Storage To 1 System BG Current CH 1 Search Fine Tune Store the searched channel to 1 you can adjust the channel number by The color system Select the current cha...

Page 23: ...ital Manual Tuning then press button to enter sub menu Frequency 394 MHZ Symbol Auto Modulation Auto Search Strength Quality Data Radio DTV Channel Adjust the symbol automatically Adjust the modulation automatically Start searching Channel signal strength Channel signal quality The searched data The searched radio The searched DTV programme frequency Press button then you can adjust the modulation...

Page 24: ...ed channel Recorded List Press button to select Recorded List then press Enter button to enter sub menu Press Gto view the recorded list Delete the program in Record list 1 1 2 OAD Set over air download on or off Press ź Ÿ button to select OAD press the Enter button to set it on or off Sort the recorded programs by channel number Press Index button to change the LCN channel program order ...

Page 25: ...ton to select Set Password then press Enter button to enter sub menu to set new password Channel Lock Press button to select Channel Lock then press Enter button to enter sub menu Press to select channel to lock or unlock it 22 If you forget your password call Customer Service for assistance 1 Press button to select the option that you want to adjust in the Lock menu 2 Press Ente button to adjust ...

Page 26: ...n through Parental Guidance set up parents can block unsuitable shows automatically Press button to select Parental Guidance Press button to select block M MA AV R G PG and above block ALL NO block Key Lock Press button to select Key Lock then press Enter button or to set it On or Off Ż Ź 23 ...

Page 27: ...enter sub menu to set the time Off Time Press button to select Off Time then press Enter button to enter sub menu Press to set the off Time On Time Press button to select On Time then press Enter button to enter sub menu Press to set the on Time Sleep Timer Press button to select Sleep Timer the TV set will sleep automatically after the setting time Options off 10min 20min 30min 60min 90min 120min...

Page 28: ... menu 2 Press Enter button to adjust 3 After finishing your adjustment Press Enter button to save and return to the previous menu Network Configuration Ż Ź Select wifi or cable network Press button to select Network Configuration then press Enter button to confirm WIFI Configuration Press to select WIFI Configuration Press Enter button to confirm Press to select WIFI Auto Search 25 ...

Page 29: ...etwork Info Press Ʒ button to select Network Info Press Enter button to view the WIFI network information Network Test Press Ʒ button to select Network Test Press Enter button to test the WIFI network 26 ...

Page 30: ...g Cable Configuration Press Ʒ button to select IP Config Press Enter button to set the IP Configuration Press Ʒ button to select Cable Configuration Press Enter button to view set IP Netmask Gateway and DNS 27 ...

Page 31: ...etwork Test Press Ʒ button to select Network Info Press Enter button to view the WIFI network information Press Ʒ button to select Network Test Press Enter button to test the WIFI network Network Info 28 ...

Page 32: ... Press Ż Ź to select the Audio language2 Subtitle Language Press Ʒ button to select Subtitle Language Press Ż Ź to select the Subtitle language Subtitle Language2 Press Ʒ button to select Subtitle Language2 Press Ż Ź to select the Subtitle languag Hearing Impaired Press Ʒ button to select Hearing Impaired Press Ż Ź to select it on or off Blue Screen Press Ʒ button to select Blue Screen Press Ż Ź t...

Page 33: ...aper then press Enter button to set System information Set the System information Press button to select System information then press Enter button to set HDMI_CE S HDMI CEC control allows you to control multiple CEC enabled devices connected using HDMI with a single remote control et HDMI_CEC on or off Press button to select HDMI_CEC Press Enter button to confirm Audio Return Channel ARC returns ...

Page 34: ...window by pressing EPG button DATE and TIME information is displayed on the right of the window The left side shows all channels The right side shows the programs in the channel The selected program is also displayed on the top of the screen Timeshift Record and replay the digital program Press Timeshift to pause the program and press the same button to continue the program Note USB device is need...

Page 35: ...ress Ʒ button to select Applications Press Ʒ button to select the application you want to view then press enter to enter Application Press MENU button to display the main menu Press Ʒ button to select Application 32 ...

Page 36: ...in the main menu then press Enter button to enter When highOighting the optioQ ou seOeFt the fiOe informatioQ ZiOO Dppear on the right and moviH ZiOO Ee SUHYLHZHG Multimedia Press Menu button on the remote FRQtURO to enter the main menu SHOHFt 0XOtimedia E using Ż Ź buttons and press Enter button to enter PresV Ż Ź Eutton to seOeFt the optioQ oX Zant to adjust in the main Media menu Media 33 ...

Page 37: ...HQX WR TXLW 34 Music PresV Ż Ź EXWWRQ WR VeOeFW 0USI LQ WKH PDLQ PeQX WKeQ Sress Enter EXWWRQ WR HQWer Press EXWWRQ WR UeWXrQ WR WKH SreYLRXV PeQX DQG H LW PeQX WR TXLW File PresV Ż Ź EXWWRQ WR VeOeFW LOH LQ WKH PDLQ PeQX WKeQ Sress Enter EXWWRQ WR HQWer WKeQ KLgKOLgKWLQJ WKH RSWLRQ RX VeOeFW WKe fLOH LQfRrPDWLRQ ZLOO DSSeDU RQ WKe rLgKW ...

Page 38: ... 60 1080i 1920 x 1080i 28 13 33 75 50 59 94 60 1080p 1920 x 1080p 56 25 67 5 50 4Kx2K 3840 x 2160 59 94 60 270 120 COMPONENT YPbPr INPUT Mode Resolution Horizontal Frequency KHz Vertical Frequency HZ 480i 720 x480i 15 73 59 94 60 576i 720 x 576i 15 63 50 480p 720 x480p 31 47 59 94 60 576p 720 x 576p 31 26 50 720p 1280 x 720p 37 50 44 96 50 59 94 60 1080i 1920 x 1080i 28 13 33 75 50 59 94 60 1080p ...

Page 39: ...urce Poor picture sound OK ƔCheck the cable between TV and antenna external AV device ƔTry another channel the station may have broadcast difficulties ƔAdjust the brightness contrast in the Video menu Check that the unit is set to PAL Audio noise ƔMove any infrared equipment away from the TV Smart TV Portal is slow ƔCheck your internet connection Performance is dependent on your internet speed and...

Page 40: ...rranty period please call the TEAC Warranty Service Hotline 1300 553 315 Between Monday to Friday 8 30AM to 5PM AEST Please have your purchase receipt and the product s serial number ready For other enquiries and support please visit www teac com au ...

Reviews: