background image

NEDERLANDS

ESP

AÑOL

IT

ALIANO

DEUTSCH

FRANÇAIS

ENGLISH

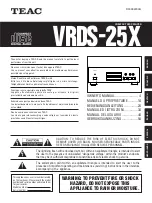
vrds-25x

`

D00332200A

D

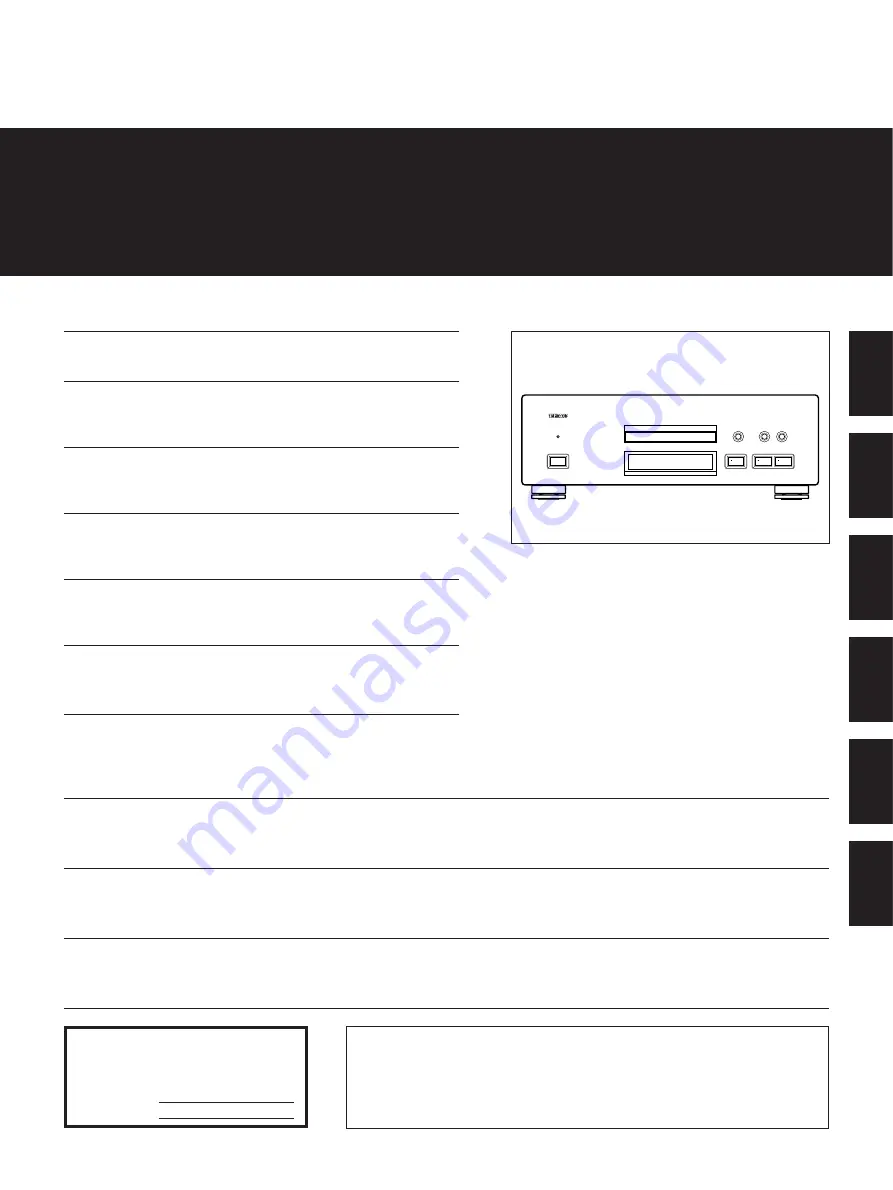
Thanks for buying a TEAC. Read this manual carefully to get the best
performance from this unit.

Nous vous remercions pour l’achat d’un appareil TEAC.
Lire ce manuel avec attention pour obtenir les meilleures performances
possibles de cet appareil.

Vielen Dank für den Kauf dieses TEAC-Geräts.
Bitte lesen Sie diese Anleitung sorgfältig durch, um die Leistungs-
fähigkeit dieses Geräts optimal nutzen zu können.

Grazie per aver acquistato un prodotto TEAC.
Leggere attentamente questo manuale per ottenere le migliori
prestazioni da questo apparecchio.

Enhorabuena por la adquisición de un TEAC.
Lea detenidamente este manual a fin de obtener el mejor rendimiento de
esta unidad.

Dank u voor de aanschaf van een TEAC.
Lees deze gebruiksaanwijzing aandachtig door teneinde de beste
prestaties van dit toestel te verkrijgen.

OWNER’S MANUAL ......................... 4
MANUEL DU PROPRIETAIRE ...........14
BEDIENUNGSANLEITUNG................24
MANUALE DI ISTRUZIONI ...............34
MANUAL DEL USUARIO ..................44
GEBRUIKSAANWIJZING ..................54

NEDERLANDS

ESP

A

Ñ

OL

IT

ALIANO

DEUTSCH

FRAN

Ç

AIS

ENGLISH

This appliance has a serial number located
on the rear panel. Please record the model
number and serial number and retain them
for your records.
Model number
Serial number

WARNING: TO PREVENT FIRE OR SHOCK

HAZARD, DO NOT EXPOSE THIS 
APPLIANCE TO RAIN OR MOISTURE.

The exclamation point within an equilateral triangle is intended to alert the user to the
presence of important operating and maintenance (servicing) instructions in the literature
accompanying  the  appliance.

The lightning flash with arrowhead symbol, within an equilateral triangle, is intended to alert 
the user to the presence of uninsulated “dangerous voltage” within the product’s enclosure 
that may be of sufficient magnitude to constitute a risk of electric shock to persons.

CAUTION: TO REDUCE THE RISK OF ELECTRIC SHOCK, DO NOT
REMOVE COVER (OR BACK). NO USER-SERVICEABLE PARTS INSIDE.
REFER SERVICING TO QUALIFIED SERVICE PERSONNEL.

Ü

ÿ
Ÿ

COMPACT DISC PLAYER

Summary of Contents for VRDS-25X

Page 1: ... MANUAL 4 MANUEL DU PROPRIETAIRE 14 BEDIENUNGSANLEITUNG 24 MANUALE DI ISTRUZIONI 34 MANUAL DEL USUARIO 44 GEBRUIKSAANWIJZING 54 NEDERLANDS ESPAÑOL ITALIANO DEUTSCH FRANÇAIS ENGLISH This appliance has a serial number located on the rear panel Please record the model number and serial number and retain them for your records Model number Serial number WARNING TO PREVENT FIRE OR SHOCK HAZARD DO NOT EX...

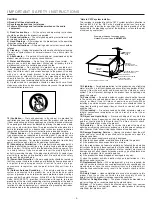
Page 2: ...g of the mast and supporting structure grounding of the lead in wire to an antenna discharge unit size of grounding conductors location of antenna discharge unit connection to grounding electrodes and requirements for the grounding electrode Note to CATV system installer This reminder is provided to call the CATV system installer s attention to Section 820 40 of the NEC which provides guidelines f...

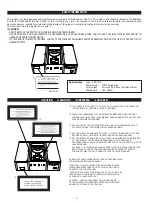
Page 3: ...IONEN ANBRAGT PÅ INDERSIDEN AF TOPDÆKSLET FOR AT ADVARE BRUGEREN OM AT YDERLIGERE FREMTRÆNGEN VIL VÆRE FORBUNDET MED FARE FOR AT UDSÆTTE SIG FOR LASERSTRÅLING ADVARSEL BETJENING AF ANDRE KONTROLLER OG REGULATORER ELLER BENYTTELES AF ANDRE FREMGANGSMÅDER END BESKREVET HERI ER FORBUNDET MED FARE FOR UDSÆTTELSE FOR LASERSTRÅLING VARING APPARATEN INNEHÅLLER LASER LOMPONENT MED STRÅLNING ÖVERSTIGANDE K...

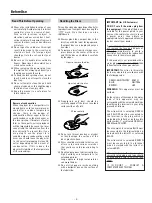
Page 4: ...condensation When the player or a compact disc is moved from a cold to a warm place or used after a sudden temperature change there is the danger of condensation Water vapor in the air could condense on the mechanism or the laser pickup If droplets of water form on these parts correct playback will be impossible because the laser cannot read the information from the disc correctly To prevent this ...

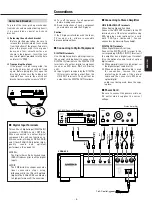
Page 5: ...l digital cable is not being used leave the caps in place Power Cord Be sure to connect the power cord to an AC outlet which supplies the correct voltage Stereo Amplifier VRDS 25X To AC outlet DAT MD Deck or CD Drive unit Digital optical cable Digital optical cable RCA pin cord Coaxial cord Coaxial cord XLR plug cord XLR plug cord To protect the laser pick up mechanism from shocks and movement dur...

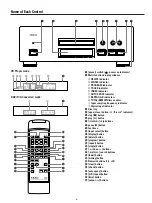
Page 6: ...indicator 3Disc tray 4 open close button I disc in indicator 5stop button 6play button 7 Ú Æ skip buttons 8pause ƒ button 9Foot base 0 input select button q display button w delete button e program button r repeat button t single button y index buttons u Ò search buttons i fader button o muting button pNumeric buttons 1 0 10 a clear button s check button d auto space button f A B repeat button g t...

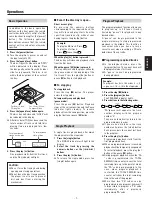
Page 7: ...isc A single track is played back after which the player enters the stop mode 1 Press the single button The SINGLE indicator will light in the display 2 Select the track by pressing the numeric buttons or the Ú Æ buttons 3 Press the play button O To release the single mode press the single button again Single Playback CAUTION ODo not force the tray by hand during opening and closing operations ODo...

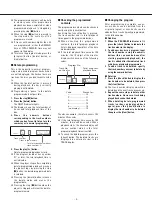
Page 8: ...ked easily using the check button Each time the check button is pressed the track number and its total playback time appear in the programmed order O When checking the programmed contents the total program playback time is displayed regardless of the time mode indication O If the total playback time exceeds 100 minutes the 10 s digit of the minutes display will show one of the following codes Code...

Page 9: ...ions extending over more than one track is not possible during programmed playback delete programmed playback or single playback O To cancel Repeat playback and resume normal playback press the A B button Programmed repeat playback Repeat function can be activated even in the programmed playback mode To repeat all the programmed tracks press the repeat button O When the single button is pressed ON...

Page 10: ...s allows direct access to any desired points on discs where INDEX codes have been encoded 1 Select the required track within which the desired Index code is encoded using the numeric buttons 2 Press the index buttons until the desired Index number appears in the INDEX display O The player skips to the selected INDEX point and playback starts from the point at which the designated Index code is enc...

Page 11: ...desired track at a specified time when this player is connected to the optional timer 1 Connect the unit and your stereo system to an audio timer 2 Turn on the timer and each component s power 3 Set the amplifier to the proper mode 4 Load a disc into the unit and close the door 5 Set the preset time for playback to start and for the power to turn off Each component s power is turned off 6 Power to...

Page 12: ...correctly 3 Close the cover until it clicks Battery Replacement If you notice that the distance between the remote control unit and the player for correct operation becomes shorter it indicates that the batteries are exhaust ed In this case replace the batteries with new ones Precautions concerning batteries Be sure to insert the batteries with correct positive and negative polarities Use batterie...

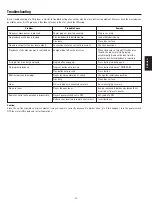
Page 13: ...n to display PROGRAM Play button not pressed Press button Mistracing sound jumping Player receiving vibration or shock Change the installation position Disc dirty Clean disc surface Hum Pin cord plug not connected securely Re connect plug securely Noise in tuner Player too near tuner Keep a reasonable distance between them or switch off player s power Remote control unit operation is impossible Pl...

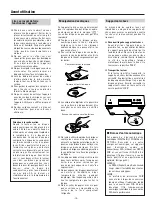
Page 14: ...urrait endommager le fini de l appareil Utiliser un chiffon propre et sec O Garder soigneusement ce manuel d instructions pour une référence ultérieure Avant utilisation Lire ceci avant de faire fonctionner l appareil Manipulation des disques Le mécanisme du capteur laser est immobilisé au moyen d un support anti chocs pour assurer sa protection contre les chocs et le mouvement pendant le transpor...

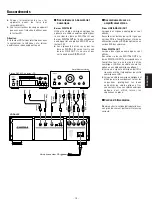
Page 15: ...der les bornes de sortie ligne aux entrées CD de l amplificateur stéréo en utilisant des cordons RCA en option ou un cordon XLR du commerce Prises DIGITAL OUT Lorsque des signaux numériques sont utilisés Raccorder la borne DIGITAL OUT à la borne DIGITAL INPUT correspondante si l amplificateur a une borne d entrée numérique Utiliser un câble coaxial en option ou un câble numérique optique Lorsqu un...

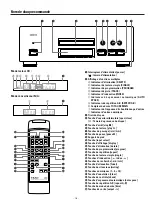
Page 16: ...ture open close I Témoin de présence de disque 5Touche d arrêt stop 6Touche de lecture play 7Touches de passage Ú Æ 8Touche de pause pause ƒ 9Support de pied 0Touche input select qTouche d affichage display wTouche d élimination delete eTouche de programmation program rTouche de répétition repeat tTouche de lecture simple single yTouches d indexation index uTouches de recherche Ò iTouche d atténua...

Page 17: ...che play La lecture du disque commence à partir de la première plage et l indicateur Play sera allumé Une seule plage est lue après quoi le lecteur passe en mode d arrêt 1 Appuyer sur la touche single L indicateur SINGLE s allume sur l affichage 2 Sélectionner la plage en appuyant sur les touches numériques ou les touches Ú Æ 3 Appuyer sur la touche de lecture O Pour sortir du mode simple appuyer ...

Page 18: ...programmation normale et elle est utilisée pour programmer des plages qui sont à ne pas lire L utiliser quand il y a des plages sur le disque que vous ne voulez pas écouter O Lorsque la touche delete est pressée pendant la lecture la plage en cours de lecture n est pas annulée O Programmer une pause en mode de programmation par annulation n est pas possible 1 Appuyer sur la touche stop 2 Appuyer s...

Page 19: ...as possible pendant la lecture programmée la lecture programmée par annulation ou la lecture simple O Pour annuler la lecture répétée et reprendre la lecture normale appuyer sur la touche A B Lecture répétée programmée La fonction de répétition peut être activée même dans le mode de lecture programmée Pour répéter toutes les plages programmées appuyer sur la touche repeat O Lorsque la touche singl...

Page 20: ...X ont été marqués 1 Sélectionner la plage voulue dans laquelle le code d indexation désiré est encodé en utilisant les touches numériques Espacement automatique Cette fonction est utile pour localiser le début des plages à enregistrer vers un disque MD ou une cassette Quand cette fonction est activée un intervalle de 4 secondes environ sera introduit automatiquement entre les plages pour qu elles ...

Page 21: ...lée et la durée restante de la plage en lecture O Appuyer sur la touche time en mode d arrêt pour afficher pendant plusieurs secondes la durée de lecture totale du disque et le nombre total de plages sur le disque Affichage de la durée écoulée Pas d indication durée écoulée Appuyer sur la touche time pour effacer l indication de mode de durée La durée écoulée de la plage en lecture est alors affic...

Page 22: ...entrée reçus par les bornes DIGITAL IN seront sortis aux bornes LINE OUT Ils ne seront pas sortis aux bornes DIGITAL OUT O Lorsque la fréquence d échantillonnage d entrée est laissée non verrouillée apparaît O Lorsque l alimentation est mise en marche le mode CD est engagé O Lorsque la touche play est pressée dans le mode convertisseur N A le mode CD est engagé Mode CD COAXIAL OPTICAL Mode convert...

Page 23: ... place le lecteur commencera auto matiquement la lecture Retirer le disque du lecteur sauf si la lecture par minuterie est requise Une seule piste peut être lue La touche single est engagée Presser la touche pour la désengager Pas de lecture programmée La touche program n est pas pressée Presser la touche pour afficher PROGRAM La touche play n est pas pressée Presser la touche Mauvais alignement s...

Page 24: ...e Gehäuseoberfläche beschädigt werden kann Ein sauberes trockenes Tuch ver wenden O Bewahren Sie diese Bedienungs anleitung auf um bei eventuell später auftauchenden Fragen darin nach schlagen zu können Vor Inbetriebnahme Bitte vor Inbetriebnahme lesen Handhabung von Compact Discs Auf Kondensationsniederschlag achten Wenn das Gerät oder CDs von kalter in eine warme Umgebung gebracht werden bzw ein...

Page 25: ...INE OUT Für Analogsignale Stellen Sie die Verbindung zwischen den LINE OUT Buchsen und dem entsprechen den Eingang Ihres Verstärkers mit Cinchstecker Kabeln oder mit im Fachhandel erhältlichen XLR Stecker Kabeln her Digital Ausgänge DIGITAL OUT Für Digitalsignale Die DIGITAL OUT Buchsen mit dem Digital Eingang wenn vorhanden des Verstärkers verbinden hierzu ein Koaxial oder Lichtleiterkabel beide ...

Page 26: ...zeige 5Stoptaste stop 6Wiedergabetaste play 7 Ú Æ Titel Sprungstasten 8Pausetaste ƒ pause 9Fußunterteil 0Eingangswahltaste input select qAnzeigetaste display wLöschprogrammiertaste delete eProgrammiertaste program rWiederholungstaste repeat tEinzeltiteltaste single yIndextasten index u Ò Suchlauftasten iFadertaste fader oStummschalttaste muting pNumerische Tasten 1 0 10 aLöschtaste clear sPrüftast...

Page 27: ...l Nr 21 Zweimal und dann einmal drücken Einzeltitelwiedergabe Die Wiedergabe erfolgt für nur einen Titel worauf der CD Player auf Stop schaltet 1 Die Taste single drücken Im Display feld leuchtet die SINGLE Anzeige 2 Den Titel mit den numerischen Tasten oder den Tasten Ú Æ anwählen 3 Die Taste play drücken O Zur Abschaltung der Einzeltitelfunktion nochmals die Taste single drücken VORSICHTSMASSNAH...

Page 28: ...i jedem Betätigen der Taste check werden Titelnummer und Titelspielzeit in der programmierten Reihenfolge ange zeigt O Bei der Programminhalts Überprüfung wird unabhängig von der Zeit Betriebsartanzeige die Programm Gesamtspielzeit angezeigt O Bei einer Gesamtspielzeit von 100 Minuten und darüber erscheinen an der Zehnerstelle der Minutenanzeige die folgenden Symbole Code bedeutet 10 P 11 A 12 b 1...

Page 29: ...aste Ò oder Æ angewählt werden anstelle der normalen Wiedergabe O Die Abschnittswiederholung für einen Abschnitt der mehr als einen Titel umfaßt arbeitet nicht für die programmierte und löschprogrammierte Wiedergabe die Einzelwiedergabe und die Zufallswiedergabe O Zur Deaktivierung der Wiederhol funktion und anschließender normaler Wiedergabe die Taste A B drücken Wiederholfunktion für program mie...

Page 30: ... kann jede Index Position einer entsprechend bespielten CD angewählt werden 1 Die dem Titel mit lndexcode entsprechenden numerischen Tasten betätigen 2 Die Index Tasten index betätigen bis die gewünschte Indexnummer im INDEX Display gezeigt wird O Die vorbestimmte Indexposition wird angewählt und die Wiedergabe startet hier O Wenn die eingegebene Indexnummer höher als die vorhandene Zahl der lndex...

Page 31: ...edergabe Die Timer Wiedergabe kann zum vorbestimmten Zeitpunkt für den gewünschten Titel ausgelöst werden Der CD Player muß an einen Timer nicht mitgeliefert angeschlossen werden 1 Dieses Gerät und das Stereo System an eine Schaltuhr anschließen 2 Die Schaltuhr und alle angeschlos senen Geräte einschalten 3 Am Verstärker die erforderlichen Ein stellungen vornehmen 4 Eine CD einlegen und den CD Hal...

Page 32: ...OUT Buchsen nicht an den DIGITAL OUT Buchsen abgegeben O Kann die Sampling Eingangsfrequenz nicht synchronisiert werden erscheint Anzeige O Nach der Einschaltung befindet sich das Gerät im CD Player Modus O Wird im D A Wandler Modus die Taste play gedrückt wechselt das Gerät auf den CD Player Modus CD Player Modus COAXIAL OPTICAL D A Wandler Modus Diese Bedienelemente auf der Fernbedieneinheit arb...

Page 33: ...en Bei Einschaltung des Geräts startet Eine CD ist noch eingelegt Nach Geräteeinschaltung bei eingelegter CD sofort die Wiedergabe startet der CD Spieler die Wiedergabe automatisch CDs daher entnehmen wenn keine schaltuhrgesteuerte CD Wiedergabe erfolgen soll Nur die Wiedergabe eines einzelnen Die Taste single wurde betätigt Die Taste nochmals betätigen Titels ist möglich Keine Programm Wiedergabe...

Page 34: ...nto Prima dell uso Leggere questo manuale prima di procedere all uso Come tenere i CD Attenzione alla condensazione Quando l apparecchio o i dischi compatti viene trasferito da un luogo freddo in uno caldo o viene usato dopo una brusca varizione di temperatura c è il pericolo di condensazione Il vapore acqueo in sospensione nell aria può condensarsi sul meccanismo o sul pickup laser Se delle gocce...

Page 35: ...li CD o altro dell amplificatore stereo per mezzo di cavi opzionali dotati di spine del tipo RCA o con un cavo facilmente reperibile sul mercato dotato di connettori Cannon del tipo XLR bilanciati Terminali di uscita digitali DIGITAL OUT In caso di uso di segnali digitali Se l amplificatore dispone di un terminale di ingresso digitale collegare il terminale DIGITAL OUT di questo apparecchio al cor...

Page 36: ...c in 5Tasto di arresto stop 6Tasto di riproduzione play 7Tasti Ú Æ salto 8Tasto di pausa pause ƒ 9Base del piede 0Tasto di selezione di ingresso input select qTasto display wTasto cancellazione delete eTasto programmazione program rTasto ripetizione repeat tTasto rip singola single yTasti indice index uTasti Ò ricerca iTasto dissolvenza fader oTasto di silenziamento muting pTasti numerici 1 0 10 a...

Page 37: ...er compact disc singoli da 8 cm Per compact disc da 12 cm Riproduzione singola significa riproduzione di un solo brano al termine del quale l apparecchio passa alla modalità di arresto 1 Premere il tasto di riproduzione singola single Sul quadrante compare l indicazione SINGLE 2 Selezionare il brano desiderato digitandolo per mezzo dei tasti numerici o agendo opportunamente sui tasti Ú Æ 3 Premere...

Page 38: ...grammati I contenuti programmati possono essere verificati con facilità utilizzando il tasto check Ad ogni successiva pressione del tasto check sul quadrante compare nell ordine di programmazione il numero di un brano ed il relativo tempo totale di riproduzione Nel corso della verifica del contenuto del programma il tempo totale di riproduzione del programma viene visualizzato indipendentemente da...

Page 39: ...ossibile nel corso della riproduzione programmata della riproduzione con programmazione dei brani da escludere e della riproduzione di un singolo brano Per cancellare la riproduzione ripetuta e riprendere la riproduzione normale premere di nuovo il tasto A B Ripetizione della riproduzione programmata La funzione di ripetizione può essere attivata anche in modalità di riproduzione programmata Per r...

Page 40: ...iò permette l accesso diretto ad un qualsiasi punto dei compact disc che contengano dei codici di indice INDEX 1 Per selezionare il brano che contiene l indice desiderato usare i tasti numerici 2 Agire sui tasti index sino a quando il numero di indice desiderato compare nel riquadro INDEX Il lettore salta al punto del numero di indice selezionato e la riproduzione inizia dalla posizione in cui l i...

Page 41: ... trascorso dall inizio ed il tempo rimanente del brano in corso di lettura premere il tasto time durante la riproduzione Per visualizzare per alcuni secondi la durata totale di riproduzione del disco ed il numero totale di brani presenti sul disco stesso premere il tasto time in modalità di arresto Visualizzazione del tempo trascorso nessuna indicazione tempo trascorso Per cancellare l indicazione...

Page 42: ...aser Laser a semiconduttori tipo GaAIAs Lunghezza d onda 780 nm GENERALITÀ Alimentazione corrente alternata a 120 V 60 Hz Modello per USA e Canada corrente alternata 230 V 50 Hz Modello per l Europa e la Gran Bretagna Consumo 18 W Dimensioni L x A x P 442 x 153 x 344 mm inclusa base del piede Peso 16 5 kg Accessori in dotazione Telecomando RC 657 per versione con frontale oro o RC 658 per versione...

Page 43: ...ali zzazione dell indicazione PROGRAM Il tasto di riproduzione non è stato premuto Premere il tasto Errori di allineamento il suono salta L apparecchio è soggetto a vibrazioni o a Cambiare le posizione in cui è stato scosse installato l apparecchio CD sporco Pulire la superficie del CD Si verificano fruscii La spina del cavo di collegamento non è Fissare bene la spina del cavo di colle ben fissata...

Page 44: ...iguiente antes de poner en funcionamiento el aparato Manipulación de discos Cuidado con la condensación Cuando se cambia el reproductor o un compact disc de un lugar frío a otro cálido o cuando se utiliza luego de un cambio brusco de temperatura existe el peligro de condensación El vapor de agua en el aire puede condensarse en el mecanismo o en el fonocaptor laser Si se forman gotas de agua en est...

Page 45: ...terminales CD etc del amplificador estereofónico utilizando cables de clavija monopolar RCA opcionales o un cable con conectores Cannon de tipo XLR que se encuentran fácilmente en el comercio Terminales DIGITAL OUT Cuando se utilizan señales digitales Conecte el terminal DIGITAL OUT al terminal DIGITAL INPUT correspondiente si el amplificador tiene un terminal de entrada digital Emplee el cordón c...

Page 46: ...de parada stop 6Tecla de reproducción play 7Teclas de salto Ú Æ skip 8Tecla de pausa ƒ pause 9Base del pie 0Tecla input select qTecla de presentación visual display wTecla de anulación delete eTecla de programación program rTecla de repetición repeat tTecla de repetición de nua sola canción single yTeclas de código índice index uTeclas de búsqueda Ò search iTecla del atenuador fader oTecla de sile...

Page 47: ...dicador reproducción Ejemplo Para reproducir a partir de la 5 canción Presione Para reproducir a partir de la 21 canción Presione dos veces y luego Se reproduce una sóla pista después de lo cual el reproductor entra en el modo de parada 1 Presione la tecla single El indicador SINGLE se encenderá en el visor 2 Seleccione la pista presionando las teclas numéricos o las teclas Ú Æ 3 Presione la tecla...

Page 48: ... Cada vez que presiona la tecla check aparecen el número de pista y el tiempo total de reproducción en el orden programado O Al verificar el contenido del programa se visualiza el tiempo total de la reproducción programada independientemente de la indicación del modo de tiempo O Si el tiempo total de reproducción supera los 100 minutos aparecerá uno de los siguientes códigos en el dígito correspon...

Page 49: ... Presione las teclas numéricas o la tecla de reproducción para iniciar la reproducción 2 Designe el punto en el cual debe iniciarse la reproducción punto A presionando la tecla A B Se enciende el indicador REPEAT y destella el indicador A B señalando que se ha ingresado el punto A 3 Presione otra vez la tecla A B A B y REPEAT se encienden continuadamente en el punto final B La porción A B será rep...

Page 50: ..._ 50 _ Búsqueda musical utilizando las teclas Ú Æ MUSIC SKIP El comienzo de cualquier pista puede localizarse fácilmente utilizando las teclas Ú y Æ durante la reproducción o en el modo de pausa Esta operación es claramente indicada por el indicador TRACK Para saltar a la próxima pista Si presiona la tecla Æ durante la reproducción el captor fonográfico saltará al comienzo de la próxima pista Cada...

Page 51: ...ndo reproducida O Presione la tecla time en el modo de parada para llamar la indicación del tiempo total de reproducción del disco y el número total de pistas en el disco durante varios segundos Indicación del tiempo transcurrido Sin indicación tiempo transcurrido Presione la tecla time para borrar la indicación de modo de tiempo El tiempo transcurrido de la pista que está siendo reproducida apare...

Page 52: ...igo de modulación de canal EFM Velocidad de bits por canal 4 3218 Mb seg FONOCAPTOR Tipo Impulsor de objetivo fonocaptor óptico láser de 3 haces Objetivo Impulsor paralelo bidimensional Tipo de láser Láser de semiconductor tipo GaAIAs Longitud de onda 780 nm GENERALIDADES Alimentación 120 V de CA 60 Hz Modelo para EE UU Canadá 230 V de CA 50 Hz Modelo para Europa Ru Consumo 18 watts Dimensiones An...

Page 53: ...oducción se inicia al encender el Hay un disco en el reproductor Si hay un disco en el aparato al encenderlo aparato éste comenzará a reproducirse automáticamente Retire el disco del reproductor a menos que vaya a realizar una reproducción programada Sólo puede reproducirse una sola La tecla single está activada Presiónela para desactivarla canción No se reproduce lo programado No se ha presionado...

Page 54: ...om deze later te kunnen naslaan Alvorens in gebruik te nemen Lees dit alvorens het toestel in gebruik te nemen Hanteren van discs Pas op met condensatie Wanneer de disc speler of een compact disc van een koude naar een warme plaats verplaatst wordt of gebruikt wordt na een plotselinge verandering in de temperatuur bestaat er kans op condensatie Waterdamp in de lucht kan nl gaan condenseren op het ...

Page 55: ...NE OUT Analoge signaalverbinding Verbind de LINE OUT uitgangen met de CD ingangen van een stereo versterker met behulp van een RCA tulpstekkersnoer los verkrijgbaar of een snoer met XLR type gebalanceerde Cannon stekkers los verkrijgbaar Digitale uitgangsaansluitingen DIGITAL OUT Digitale signaalverbinding Verbind de DIGITAL OUT aansluiting van de CD speler met de daarvoor bedoelde DIGITAL INPUT a...

Page 56: ...cht toets open close I disc geplaatst indicator 5Stoptoets stop 6Weergavetoets play 7 Ú Æ verspring toetsen 8Pauzetoets ƒ pause 9Trillingsdempende voet 0Ingangskeuzetoets input select qAanduidingskeuzetoets display wWistoets delete eProgrammeertoets program rHerhaaltoets repeat tToets voor weergave van één muziekstuk single yIndextoetsen index u Ò zoek toetsen iFadertoets fader oDempingstoets muti...

Page 57: ...de display getoond O Nadat de inhoudsopgave TOC van de disc is gelezen wordt enkele seconden lang het totale aantal muziekstukken en de totale speelduur van de disc aangegeven Zelfs als de discschuif open is Directe weergave van een bepaald fragment Door op een cijfertoets van een bepaald fragmentnummer te drukken wordt de discschuif automatisch gesloten en de weergave vanaf dit fragment gestart U...

Page 58: ...t aangegeven nummer wordt gewist en het volgende fragmentnummer verschijnt 2 Herhaal deze stappen voor het wissen van andere fragmentnummers Het is echter niet mogelijk het nummer van het spelende fragment te wissen 3 Voor het wissen een weglaat geprogrammeerd nummer zodat het fragment juist weer wel wordt weergegeven drukt u op de check controletoets totdat u het nummer ziet van het fragment en d...

Page 59: ...druk dan op de single enkel nummer toets van de afstandsbediening De SINGLE en REPEAT indicators lichten op 2 Druk op de play weergavetoets Het spelende muziekstuk zal dan herhaald worden 3 U kunt het te herhalen muziekstuk veranderen met de Ú Æ toetsen of de cijfertoetsen 4 Druk op de weergavetoets O Dan wordt het gekozen muziekstuk herhaald weergegeven O De herhaalde weergave van één muziekstuk ...

Page 60: ...jdens de stopfunctie met de Ú Æ toets is gekozen kunt u met de indexzoektoetsen index een bepaald indexnummer opzoeken Weergave start vervolgens vanaf het gekozen indexpunt Muziekzoeken met de Ú Æ toetsen verspringen Tijdens weergave of in de pauzestand kunt u gemakkelijk het begin van een muziekstuk opzoeken met de Ú en Æ toetsen Het verspringen van muziekstukken wordt duidelijk in het TRACK vens...

Page 61: ...n op een los verkrijgbare audio schakelklok kunt u het afspelen van een gewenst muziekstuk laten beginnen op een vooraf gekozen tijdstip 1 Sluit dit apparaat en uw stereo installatie aan op een audio schakelklok 2 Zet de audio schakelklok aan en ook de daarop aangesloten apparatuur 3 Stel uw versterker in op weergave 4 Leg een disc in het apparaat en sluit de disc lade 5 Stel de inschakeltijd en d...

Page 62: ... geeft dit aan dat de batterijen uitgeput zijn Vervang de batterijen in dit geval door nieuwe Voorzorgsmaatregelen aangaande batterijen O Zorg ervoor dat de batterijen ingelegd zijn met de juiste polariteit en O Gebruik altijd batterijen van hetzelfde type Probeer nooit verschillende typen batterijen door elkaar te gebruiken O Zowel oplaadbare als normale batterijen kunnen worden gebruikt Zie de v...

Page 63: ... disk uit de discspeler tenzij timer geregelde weergave gewenst is Slechts een enkel nummer kan worden De single toets is ingeschakeld Toets indrukken om de herhalingsfunctie gespeeld uit te schakelen Geen geprogrammeerde weergave De program toets is niet ingedrukt Toets indrukken zodat PROGRAM aangegeven wordt De play toets is niet ingedrukt Druk op de play toets Overspringen van het geluid De di...

Page 64: ...echnician for additional suggestions CAUTION Changes or modifications to this equipment not expressly approved by TEAC CORPORATION for compliance could void the user s authority to operate this equipment For U S A TEAC CORPORATION 3 7 3 Nakacho Musashino shi Tokyo 180 8550 Japan Phone 0422 52 5082 TEAC AMERICA INC 7733 Telegraph Road Montebello California 90640 Phone 213 726 0303 TEAC CANADA LTD 5...

Reviews: