background image

HT1-Issue 1 (August 2009


DE 7288/2005 


HEADLIGHT 

BEAM TESTER 


Installation 

Operation 

Maintenance 


Tecalemit Garage Equipment Co. Ltd. Eagle Road Langage Park Plymouth PL7 5JY UNITED 
KINGDOM 


Tel +44 (0) 1752 219100 Service Tel +44 (0) 1752 219111 Sales Fax +44 (0) 1752 219128 Sales and 
Service 


1

Summary of Contents for DE 7288/2005

Page 1: ...ADLIGHT BEAM TESTER Installation Operation Maintenance Tecalemit Garage Equipment Co Ltd Eagle Road Langage Park Plymouth PL7 5JY UNITED KINGDOM Tel 44 0 1752 219100 Service Tel 44 0 1752 219111 Sales Fax 44 0 1752 219128 Sales and Service 1 ...

Page 2: ... otherwise without the prior written permission of Tecalemit Garage Equipment Co Ltd Contents HEALTH AND SAFETY 3 WARNINGS CAUTIONS AND NOTES 3 DESCRIPTION 4 INSTALLATION 5 Site 5 Installing Rails 5 General Installation 7 Alignment Mirror 7 Column Locking Pedal 7 Column Guide Adjusters 8 CALIBRATION SAFETY PRECAUTIONS See Separate manual METHOD OF INSPECTION 9 EUROPEAN TYPE HEADLAMP CHARACTERISTIC...

Page 3: ...ngineering automobile engineering etc It is important that all persons installing operating maintaining or calibrating this headlamp tester and optional accessories must be familiar with the layout of the equipment safety precautions using appropriate training methods and supervision as may be required prior to installing using maintaining or calibrating this headlamp tester WARNINGS CAUTIONS AND ...

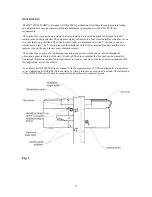
Page 4: ...reduces the likelihood of the trolley assembly rocking and therefore increases the stability and the accuracy of measurement The optical box consists of a condensing lens and aiming screen which can be viewed through the observation panel in the top of the unit A light cell fitted to ensure that the hot spot can be accurately determined Provision is made for the instrument to traverse each side of...

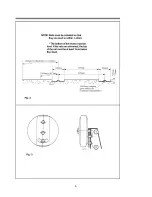
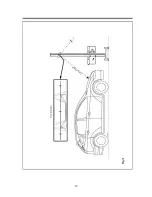
Page 5: ...er tightening down In the final position the rails must be level within 2 mm Where the vehicle tested or any other traffic will pass over the rails each rail must be recessed into the floor and fully supported along its entire length by grouting as necessary see Fig 2 It is helpful if lines are painted on the floor at 90 degrees to the Tester s rails to enable the accurate positioning of vehicles ...

Page 6: ...6 ...

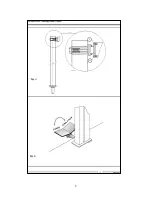
Page 7: ...se into the column support bearing Check column locks correctly when the pedal is operated Retain column in position with the circular retaining plate and two cap head screws Alignment Mirror Fit the mirror assembly in position and tighten the two M4 x 20 screws 1 as shown in Fig 4 Ensure that it rotates smoothly and that the leading edge of the optical box aligns correctly with the line on the mi...

Page 8: ...8 ...

Page 9: ...ure that the headlight lens is clean 3 Measure the height to the centre of the headlight lens from the floor and adjust the height of the optical box to the same height If the rails are recessed then this must be added to ensure the optical box is at the correct height There is a tolerance of 10mm NOTE 1 The above information is based on the criteria published in the MOT Inspection Manual which is...

Page 10: ...10 ...

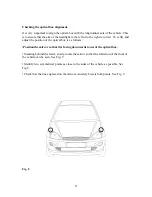
Page 11: ...t the position of the optical box is as follows Position the mirror so that it is facing downwards towards the optical box Standing behind the tester slowly rotate the mirror so that the reflection of the front of the vehicle can be seen See Fig 9 Identify two symmetrical points as close to the sides of the vehicle as possible See Fig 8 Check that the line engraved on the mirror accurately bisects...

Page 12: ...12 ...

Page 13: ...gine idling If this is required ensure that the handbrake has been applied and the transmission is in neutral or park before starting the engine To check headlight aim proceed as follows Determine the appropriate headlamp beam image and its aim See Figs 12 13 and 14 NOTE Pre C 1950 headlamp beam images may not conform to either diagrams 12 13 or 14 In such cases check that dip beam headlamps are a...

Page 14: ...e set as follows 1 3 if the headlamp centre is not more than 850 mm from the ground 2 0 if the headlamp centre is more than 850 mm from the ground Reason for Rejection 1 The beam image kick up is to the offside 2 For headlamps with centres not more than 850 mm from the ground the beam image horizontal cut off is not between the horizontal 0 5 and 2 lines i e the red tolerance band 3 For headlamps ...

Page 15: ... or to the left of the vertical 2 line 3 For headlamps whose centre is not more than 850 mm from the ground the hot spot centre is below the horizontal 2 line 4 For headlamps whose centre is more than 850 mm from the ground the hot spot centre is below the horizontal 2 75 line NOTE 1 The above information is based on the criteria published in the MOT Inspection Manual which is an HMSO publication ...

Page 16: ...line 2 The upper edge of the hot spot is below the horizontal 2 75 line 3 The right hand edge of the hot spot is to the right of the vertical 0 line or to the left of the vertical 2 line NOTE 1 The above information is based on the criteria published in the MOT Inspection Manual which is an HMSO publication and is available from most bookshops Always refer to the current edition for any amendments...

Page 17: ...17 ...

Page 18: ...CE LUXMETER If the Luxmeter is damaged or defective the Optical Box should be returned for a Service repair or replacement DISPOSAL The DE7288 RS232 must be disposed of in accordance with Local Authority regulations STEEL Optical box Column trolley and rails LENS Glass COPPER Wiring and Luxmeter coils PLASTIC Observation panel and miscellaneous small components PAPER Packaging and instruction manu...

Page 19: ... headlight height 1500mm Tolerance on aiming height 10mm Lens diameter 200mm Focal length Optical box size 250mm x 250mm x 610 Same or less than mW Accuracy Same or less than 1mm per metre Distance between rails 395mm Rail recess dimension 100mm x 27mm min 29mm max Min clearance behind optical box 500mm VOSA Requirements 19 ...

Reviews: