INCLUDED IN YOUR PACKAGE
Cordless Handset
AC Adapter
Base Unit
User Guide
NiMH Battery
10-foot, 4-wire RJ-11 Line Cord
Rubber Battery Screw Cover
15-foot, 8-wire RJ-45 Cable
Phillips Screw
Clear Plastic Overlay
PREPARING TO USE THE CL2200 SERIES
1. Prepare to install the battery into the cordless handset by
firmly pressing down on the top of the battery cover and
sliding it off. If cover is secured with a screw, remove the
screw first.
2. Locate the lightly embossed numbers “1” and “2” on the
battery’s plastic connector.
3. Insert the battery connector into the handset’s connector
with the embossed numbers facing up.
Note: The handset may “beep” when the battery is connected. This is not
an indication that the telephone is ready to use. To obtain optimal perform-
ance of the telephone, be sure to charge the battery for 15 to 20 hours
.
4
. Replace the battery compartment cover and retaining screw.
5. Insert the provided rubber screw cover.
6. Turn the telephone base so the back panel is facing you.
Insert either end of the RJ-45 cable into the jack on the back
of the telephone labeled
LINE
.
7. Insert the other end of the cable into the jack on the AC
adapter labeled
PHONE
.
8. Insert one end of the RJ-11 line cord into the jack on the AC
adapter labeled
LINE
.
9. Insert the other end of this line cord into a telephone jack.
10. Plug the AC adapter into an unswitched electrical outlet.
11. Once your telephone is connected, remove the plastic
overlay and place the paper faceplate over the keys. Replace
the plastic overlay by hooking the tabs on the overlay into
the recessed slots located on both sides. The overlay is
easiest to insert when the left or right side tabs are inserted
first, and the middle of the overlay is slightly bowed to allow
for insertion of the other tabs.
12. Place the cordless handset on the base unit.
CHARGING THE BATTERY
The rechargeable Nickel Metal Hydride (NiMH) battery must be
fully charged before using the phone for the first time. It is recom-
mended that that battery pack be charged for approximately 15
to 20 hours, without interruption, before use. To charge the battery,
place the handset, keypad down, in the base unit. Make sure the
CHARGE
LED on the base lights. If the LED does not light:
1. Ensure that the AC adapter is plugged in.
2. Ensure that the AC adapter is not plugged into a switched
electrical outlet.
3. Ensure that the handset charging contacts at the bottom of
the handset are making good contact with the base unit’s
charging contacts.
CLEANING THE BATTERY CONTACTS
To maintain a good charge, it is important to clean all charging
contacts on the handset and base unit. Use a pencil eraser or
other contact cleaner.
Do not use any liquids or solvents.
BATTERY SAFETY INSTRUCTIONS
1. Use only Teledex-approved battery replacements.
2. Dispose of used batteries according to local codes pertaining
to NiMH batteries.
3. Do not dispose of batteries in fire, as they may explode
4. Charge the telephone's batteries only while in the telephone
handset, and only by using the telephone base unit to charge.
Do not attempt to remove the batteries and charge them in
a separate charging unit.
5. Do not short-circuit the battery pack, as this may cause it to
explode or catch fire.
ADJUSTING THE RING VOLUME
The up and down volume keys will adjust the ringer volume of
the telephone. Additionally, the CL2200 series telephone has an
optional “ascending” ring volume mode, where the ring volume
begins at the lowest setting, then automatically rings louder
with each successive ring during an incoming call. To select the
ascending ring volume mode, follow these steps:
For Line 1:
Press the
FLASH
key; then the
4
key; then the
STORE
key, then
the number
1
on the keypad.
For Line 2:
Press the
FLASH
key; then the
4
key; then the
STORE
key, then
the number
2
on the keypad.
ADJUSTING SPEAKERPHONE VOLUME
The speakerphone has eight (8) levels. When the speakerphone
is activated, the volume is initially set at level six (6). To adjust
the speakerphone volume, locate the volume up/down keys,
located on the front surface of the phone below the keypad.
Pressing the “down” arrow key will decrease the volume level,
while pressing the “up” arrow key will increase it.
ADJUSTING HANDSET RECEIVE VOLUME
The handset has four (4) volume levels. The volume is initially set
at level two (2). To adjust the handset volume, locate the volume
up/down keys, located on the handset, below the “
#
” key.
Pressing the “minus”
(-)
key will decrease the volume level,
while pressing the “plus”
(+)
key will increase it.
IMPORTANT SAFETY INSTRUCTIONS
WHEN USING YOUR TELEPHONE EQUIPMENT, BASIC SAFETY PRECAU-
TIONS SHOULD ALWAYS BE FOLLOWED TO REDUCE THE RISK OF FIRE,
ELECTRIC SHOCK AND INJURY TO PERSONS, INCLUDING THE FOLLOWING:
1. READ AND UNDERSTAND ALL INSTRUCTIONS.
2. FOLLOW ALL WARNINGS AND INSTRUCTIONS MARKED ON THE
PRODUCT.
3. UNPLUG THE PRODUCT FROM THE WALL OUTLET BEFORE CLEANING.
DO NOT USE LIQUID CLEANER OR AEROSOL CLEANERS. USE A DAMP
CLOTH FOR CLEANING.
4. DO NOT USE THIS PRODUCT NEAR WATER, FOR EXAMPLE, NEAR A
BATHTUB, WASH BOWL, KITCHEN SINK OR LAUNDRY TUB, IN A WET
BASEMENT, OR NEAR A SWIMMING POOL.
5. DO NOT PLACE THIS PRODUCT ON AN UNSTABLE CART, STAND OR
TABLE. THE PRODUCT MAY FALL, CAUSING SERIOUS DAMAGE TO THE
PRODUCT.
6. SLOTS AND OPENINGS IN THE CABINET AND THE BACK OF BOTTOM
ARE PROVIDED FOR VENTILATION, TO PROTECT IT FROM OVERHEATING.
THESE OPENINGS MUST NOT BE BLOCKED OR COVERED. THE OPENINGS
SHOULD NEVER BE BLOCKED BY PLACING THE PRODUCT ON THE BED,
SOFA, RUG OR ANY OTHER SIMILAR SURFACE. THIS PRODUCT SHOULD
NEVER BE PLACED NEAR OR OVER A RADIATOR OR HEAT REGISTER.
THIS PRODUCT SHOULD NOT BE PLACED IN A BUILT-IN INSTALLATION
UNLESS PROPER VENTILATION IS PROVIDED.
7. NEVER PUSH OBJECTS OF ANY KIND INTO THIS PRODUCT THROUGH
CABINET SLOTS AS THEY MAY TOUCH DANGEROUS VOLTAGE POINTS
OR SHORT OUT PARTS THAT COULD RESULT IN A RISK OF FIRE OR
ELECTRIC SHOCK. NEVER SPILL LIQUID OF ANY KIND ON THE PRODUCT.
8. TO REDUCE THE RISK OF ELECTRIC SHOCK DO NOT DISASSEMBLE
THIS PRODUCT. BUT TAKE IT TO A QUALIFIED SERVICE FACILITY IF
SERVICE OR REPAIR WORK IS REQUIRED. OPENING OR REMOVING
COVERS MAY EXPOSE YOU TO DANGEROUS VOLTAGES OR OTHER
RISKS. INCORRECT REASSEMBLY CAN CAUSE ELECTRIC SHOCK WHEN
THE APPLIANCE IS SUBSEQUENTLY USED.
9. UNPLUG THIS PRODUCT FROM THE WALL OUTLET AND REFER
SERVICING TO QUALIFIED SERVICE PERSONNEL UNDER THE FOLLOW-
ING CONDITIONS:
- WHEN THE POWER SUPPLY CORD OR PLUG IS DAMAGED OR FRAYED.
- IF LIQUID HAS BEEN SPILLED INTO THE PRODUCT.
- IF THE PRODUCT HAS BEEN EXPOSED TO RAIN OR WATER.
- IF THE PRODUCT DOES NOT OPERATE NORMALLY BY FOLLOWING
THE OPERATING INSTRUCTIONS. ADJUST ONLY THOSE CONTROLS THAT
ARE COVERED BY THE OPERATING INSTRUCTIONS, AS IMPROPER
ADJUSTMENT OF OTHER CONTROLS MAY RESULT IN DAMAGE, AND
MAY REQUIRE EXTENSIVE WORK BY A QUALIFIED TECHNICIAN TO
RESTORE THE PRODUCT TO NORMAL OPERATION.
- IF THE PRODUCT HAS BEEN DROPPED OR THE CABINET HAS BEEN
DAMAGED.
- IF THE PRODUCT EXHIBIT A DISTINCT CHANGE IN PERFORMANCE.
10. AVOID USING A TELEPHONE (OTHER THAN A CORDLESS TYPE)
DURING AN ELECTRICAL STORM. THERE MAY BE A REMOTE RISK OF
ELECTRIC SHOCK FROM LIGHTNING.
11. DO NOT USE THE TELEPHONE TO REPORT A GAS LEAK IN THE
VICINITY OF THE LEAK.
PLEASE SAVE THESE INSTRUCTIONS
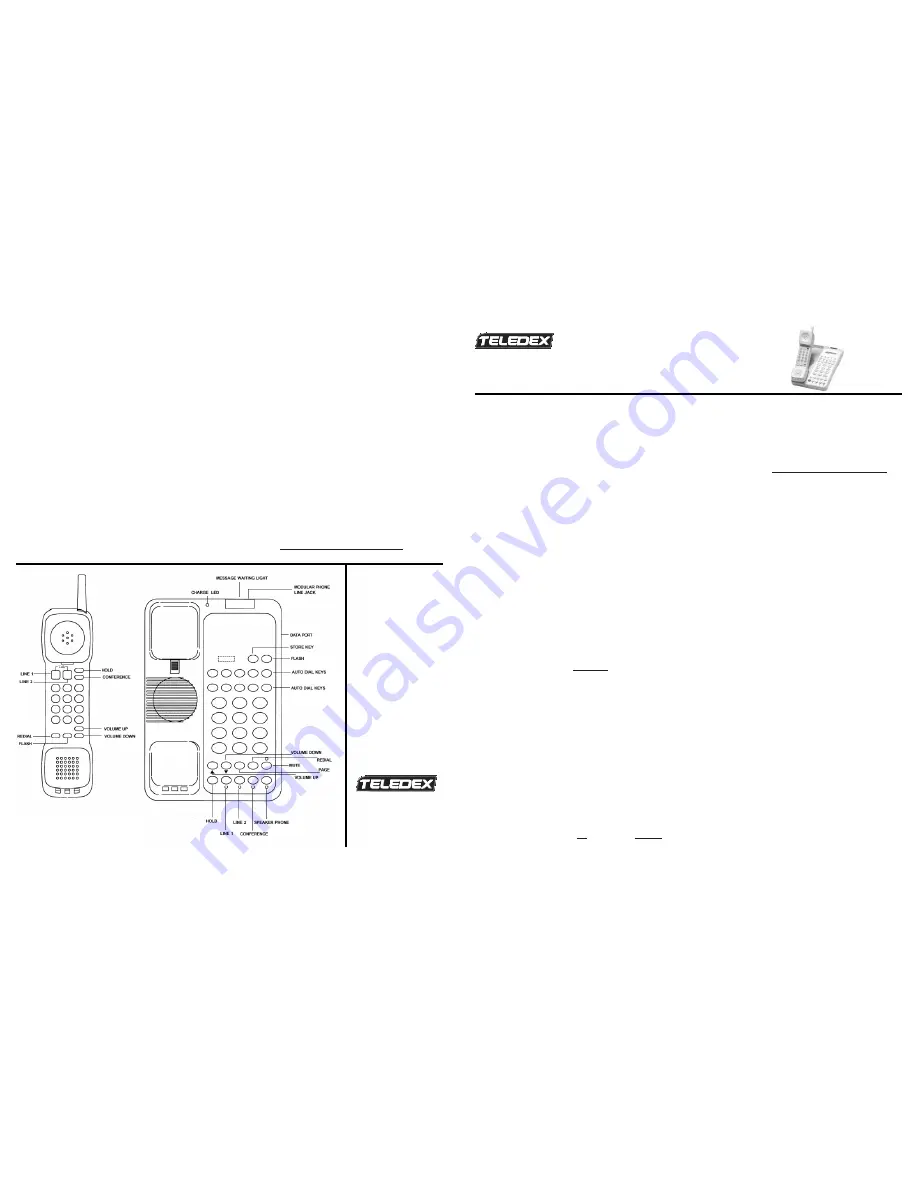
CL2200 SERIES DIAGRAM
CL2200 SERIES USERS GUIDE
2.4 GHz Two-Line Digital Cordless Guestroom Telephone
Part Number 600-0480-49A
Copyright © 2003 Teledex LLC
ALL RIGHTS RESERVED
CONTACTING TELEDEX
Telephone
(408) 363-3100
(800) 794-8353
Internet
www.teledex.com
store.teledex.com
sales@teledex.com
Postal Mail
6311 San Ignacio Avenue
San Jose, CA 95119 USA


