background image


 SBC AVL 4G User Manual 

 25.11.2019

Release 1.0 

Summary of Contents for SBC AVL 4G

Page 1: ...SBC AVL 4G User Manual 25 11 2019 Release 1 0 ...

Page 2: ...on 6 3 2 Technical features 7 3 3 Functional Overview 8 3 4 Wiring description 9 3 5 Delivery Content and Accessories 10 4 Operating Set up 11 4 1 Operating the device 11 4 2 Insert the SIM Card 12 4 3 Close the cover 14 5 Status indicators 15 6 Connect to the vehicle 16 6 1 Placing the device into the vehicle 16 6 2 Wiring connection 16 7 Configuring a device 17 7 1 Basic event types 17 7 2 Power...

Page 3: ...n 2 Safety addresses the audience for this manual the indented use of this device and safety related information important to read before using the device 3 Product Description provides a brief overview about the functions and features of the device as well as the available accessories 4 Operation Setup guides you with detailed step by step procedures through the process of commissioning the devic...

Page 4: ... non observance Indicates that the device can be damaged by electrostatic discharge This note contains helpful suggestions or references to material not covered in the document 2 Safety This device has been designed in accordance with state of the art standards manufactured with utmost care using high quality materials and tested Nevertheless its use may constitute a risk to persons or cause mater...

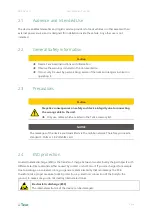
Page 5: ...to connecting the wrong cable to the unit Only use cables which are listed in the Telic accessory list NOTICE The messages of the device are transmitted via the mobile network Therefore you need a standard 3 Volts or 1 8 Volts SIM card 2 4 ESD protection An electrostatic discharge ESD is the transfer of charge between two electrically charged objects with different electrical potentials either cau...

Page 6: ...ncture Do not open cells do not disassemble battery packs Do not expose contents to water Do not connect with false polarity Do not weld or solder to the battery s body Only authorized official Telic replacement batteries must be used in the devices The batteries included with the devices must only be used in the device The batteries must never be used in any other device unless specifically autho...

Page 7: ...93 86 EEC These directives are implemented by each member country of the EC independently and in a different way In accordance with these directives the batteries do not contain dangerous substances The reaction products are inorganic and do not represent environmental risks once the decomposition process is terminated 3 Product Description This chapter provides an overview about the functions and...

Page 8: ...00 only positioning data Data transmission modes TCP IP or UDP IP RS232 transparent mode support of local RS232 protocols 3 Level Watchdog System Driver identification for up to 50 IDs Hardware Features Housing Small Compact Design Integrated mobile communication and GNSS antennas Integrated 3D Accelerometer for Motion detection Robust SIM card holder 1 8 3V for Mini SIM cards Status Indicators 3 ...

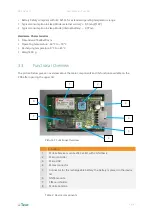
Page 9: ... 70 C Recharging temperature 0 C to 45 C Weight 50 g 3 3 Functional Overview The picture below gives an overview about the main components and its functions available on the PCB after opening the upper lid Picture 1 Functional Overview Function 1 Mobile Service module LTE Cat M1 with 2G fallback 2 Microcontroller 3 Micro USB 4 Molex connector 5 Connector for the rechargeable battery the battery is...

Page 10: ... DIG_OUT1 Orange pin3 Optional DIG_OUT2 Brown pin2 Optional RS232 LVTTL RX White pin 9 Optional RS232 LVTTL TX Blue pin 10 Optional Table 3 SBC AVL 4G Cable Color description The following voltage ranges apply 7 V to 32 V for VCC external power supply Ignition Input Dig IN 0 V for GND Please observe also the following wiring diagrams Picture 4 Wiring 1 wire Sensors Picture 2 SBC AVL 4G Cable Pin a...

Page 11: ...e the same common ground as the device The voltages on inputs and outputs must be identical 3 5 Delivery Content and Accessories In addition to the SBC AVL 4G the following accessories can be part of the shipment if previously ordered Accessory Name Order code Functionality Picture Connection cable SBC AVL 4G 16032 Automotive molex cable for on vehicle installation Cigarette lighter charger SBC AV...

Page 12: ...cessories 4 Operating Set up The operation set up of the tracking device can be realized in few quick steps Please take proper ESD protection measures e g electrical connection of the body to ground to make sure you don t destroy internal electronics Repair of ESD damages caused by user s negligence will not be covered by Telic s warranty Electrostatic discharge ESD is the sudden and momentary ele...

Page 13: ... 4 2 Insert the SIM Card A working SIM card from a suitable network provider must be properly inserted so that the device operates correctly If the SIM card is not PIN free it has to be ensured that the PIN is set to 0000 To speed up the log in process into the mobile network the SIM card should contain no or only a few phone book entries The messages of the SBC AVL 4G are transmitted via the mobi...

Page 14: ...on the SIM card holder Do not touch the contacts of the SIM card If necessary to clean the contacts with a soft cloth Picture 9 Where to insert the SIM Card When inserted correctly the gold contacts of the SIM card should be facing down Flip the SIM card holder back into its original position and slide the lock back on right till it is locked If you cannot close the SIM card holder you may have in...

Page 15: ...ual Telic AG Pg 14 4 3 Close the cover Please close the SBC AVL 4G housing by pushing the top cover against the down side until there is no more space between the 2 surfaces Picture 10 How to close the SBC AVL 4G Housing ...

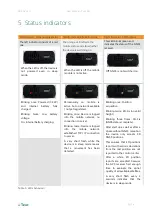
Page 16: ...nking twice Device is logged into the mobile network established TCP IP connection to server A very short flash while the device is in sleep mode means that a movement has been detected This LED blinks green and indicates the status of the GNSS receiver Off GNSS is not switched on Blinking once Position acquisition Blinking twice 2D Fix no valid height Blinking three times 3D Fix GNSS data is comp...

Page 17: ... of the vehicle in each direction In order to optimize the quality of the signal received the surface of the internal GNSS antenna must be installed looking at the sky see the label indication on the device box this side up 6 2 Wiring connection Please connect the Telic SBC AVL 4G with the vehicle according to the following instructions using the connection cable Please do not connect the connecto...

Page 18: ...een travelled Angular course change event the message is generated once there is a direction change of a configurable minimum angle in x degrees x being configured at a configurable minimum speed of y km h y being configured Periodic Wakeup Routine Message even when the unit is in stand by mode the message is generated either every x hours x being configurable or at a fixed time configurable durin...

Page 19: ...rst case you will need a simple cable micro USB USB connectors and a serial terminal program e g Realterm In the second case you will need in the device a SIM supporting SMS M2M SIMs typically don t support them Before you insert the SIM card and activate the device make sure the PIN is disabled or set to 0000 Otherwise it can happen that the PIN is entered incorrectly three times and the SIM fall...

Page 20: ...00000000022222220000000022000000 0 0 0 0 24 3 30 3 0 6 Remark the 0011 6digitsIMEI of the SMS becomes CONFIG in the serial command the rest remains unchanged Vehicle Medium Resolution Off by Motion Position messages are generated either after 5 km distance or as soon as the driving direction has been changed more than 45 degrees provided that the vehicle is exceeding 20Km h Driving long distances ...

Page 21: ...p mode This profile should be used for all kind of tracking applications where a high accurate position track is needed Power mode input sleep mode 1 Time interval 300 sec Distance interval 1 000 mt Course change 30 degrees In addition the following extra messages are generated and sent to the server Power Supply connected disconnected Ignition signal on off Digital Input 2 signal on off Device st...

Page 22: ...pplication Enabling Platform able to interpret messages sent by our telematics devices and present them in an user friendly way thanks to its graphical interface The device can be managed through Kentaur once it is connected to the platform 8 1 Connecting the device to Kentaur Once the device has been set up please refer to the chapters 4 and 5 the user has to connect the device to Kentaur in acco...

Page 23: ...e the link from the mail and get into Kentaur In case you are already registered you can simply enter your Username and Password to access Kentaur If you already have a valid account but forgot your password then please select Forgot password You will receive an email with further instructions By activating the Remember me button your browser saves your login credentials and automatically fills in...

Page 24: ...dow will pop up Choose a name for your dashboard Add the widgets you want to see on your dashboard by clicking the Add button At the Device info widget you first have to choose which parameter of the device info shall be shown by opening the drop down menu ...

Page 25: ...u In the Top Line on the left side you can switch between the main windows which are dashboard devices and users the last option is visible only if you are Administrator This menu is always available no matter where you are at On the right side you have the options to from left to right Change from normal screen to full screen Change language German and English are available Check your user profil...

Page 26: ...te lock and unlock the dashboard On the right side widgets can be added the sign is shown in orange if the dashboard is unlocked if it is shown in grey widgets cannot be added as dashboard is locked Furthermore you can choose if this dashboard shall be the default one shall be removed or the previous layout shall be restored ...

Page 27: ...ne The filter and search function is located on the right top side It is a free form search function as minimum three characters must be entered Columns can be added or deleted in this view by selecting the setting button shown as a gear wheel By selecting the tab Users in the top menu the tabular overview of all users in your domain will be shown In order to view details of one device just click ...

Page 28: ...g 27 Here you can check the details of the device check the content of the last message or inspect data across multiple data ranges With this data inspection routes can be viewed in a map view or messages picked for further inspection ...

Page 29: ... level distance altitude or speed can be viewed in a graphical overview Only the data points being transmitted in the messages can be displayed For example if the device has no battery included this graph does not show any data for battery level Adding devices Devices can be added by selecting the Add device button orange Plus button This opens a new pop up window in which you have to enter the re...

Page 30: ... but as shown in the screenshot above you can select one of the pre defined configuration profiles You have to click into the field Conf profiles The options will show up You have to choose one of the options and press the Safe button see below the configuration will be acquired automatically by the device ...

Page 31: ... by motion Position messages are generated and sent either after 1 km distance or as soon as the driving direction has been changed more than 30 deg Additionally once every 5 Minute a position message is sent Driving long distances will be covered by one position message each 1km driving short distances is managed by generating position messages each time the driving direction is changed more than...

Page 32: ... be added A pop up window with the required and optional information fields appear There are three levels of users Role Administrator short Admin An Admin has all rights of adding changing and deleting devices and users in his domain The Admin account should be permanent and not temporary ...

Page 33: ...rectly to him User accounts are permanent however we do recommend to set a specific expiry date Demo A demo account is only to be used for limited test accounts particularly for tests with single devices A demo account must have a specific expiry date set usually for a standard test of 30 days that can be extended by the Admin at any convenience ...

Page 34: ...phone and checking whether or not your cell phone is able to log into a mobile network The SIM card has been locked by the provider Please check whether the SIM card is locked This can be done e g by putting the SIM card into your cell phone and checking whether your cell phone is able to log into a mobile network If it is not the case then please try to make a phone call If you are successful the...

Page 35: ...d by mode if its power mode entails this Then the RS232 LV TTL interface has to be used in case you need to analyse the behaviour of the device when entering leaving the sleep mode The micro USB interface is set by default In order to select the RS232 LV TTL interface the following command must be given the device XCONFIG 010 1 Or 00c1 6 digits IMEI 010 1 In order to go back to the micro USB inter...

Page 36: ...SBC AVL 4G User Manual Telic AG Pg 35 This SW tool will create a traces file that can be forwarded to Telic s support team for an in depth analysis ...

Reviews: