Tell Manufacturing | A Division of Spectrum Brands Inc.
1-800-433-4047 | TEL035007-CL5500-111021
Tell Manufacturing | A Division of Spectrum Brands Inc.
1
4
1-800-433-4047 | TEL035007-CL5500-111021
INSTALLATION OF CL5510 LOCKS
Installation holes must be drilled in the correct positions.
Lock components must be vertically and horizontally
accurate in relation to each other and to the door.
WEDGE THE DOOR FIRMLY TO PREVENT MOVEMENT
WHILE DRILLING AND CHISELING.
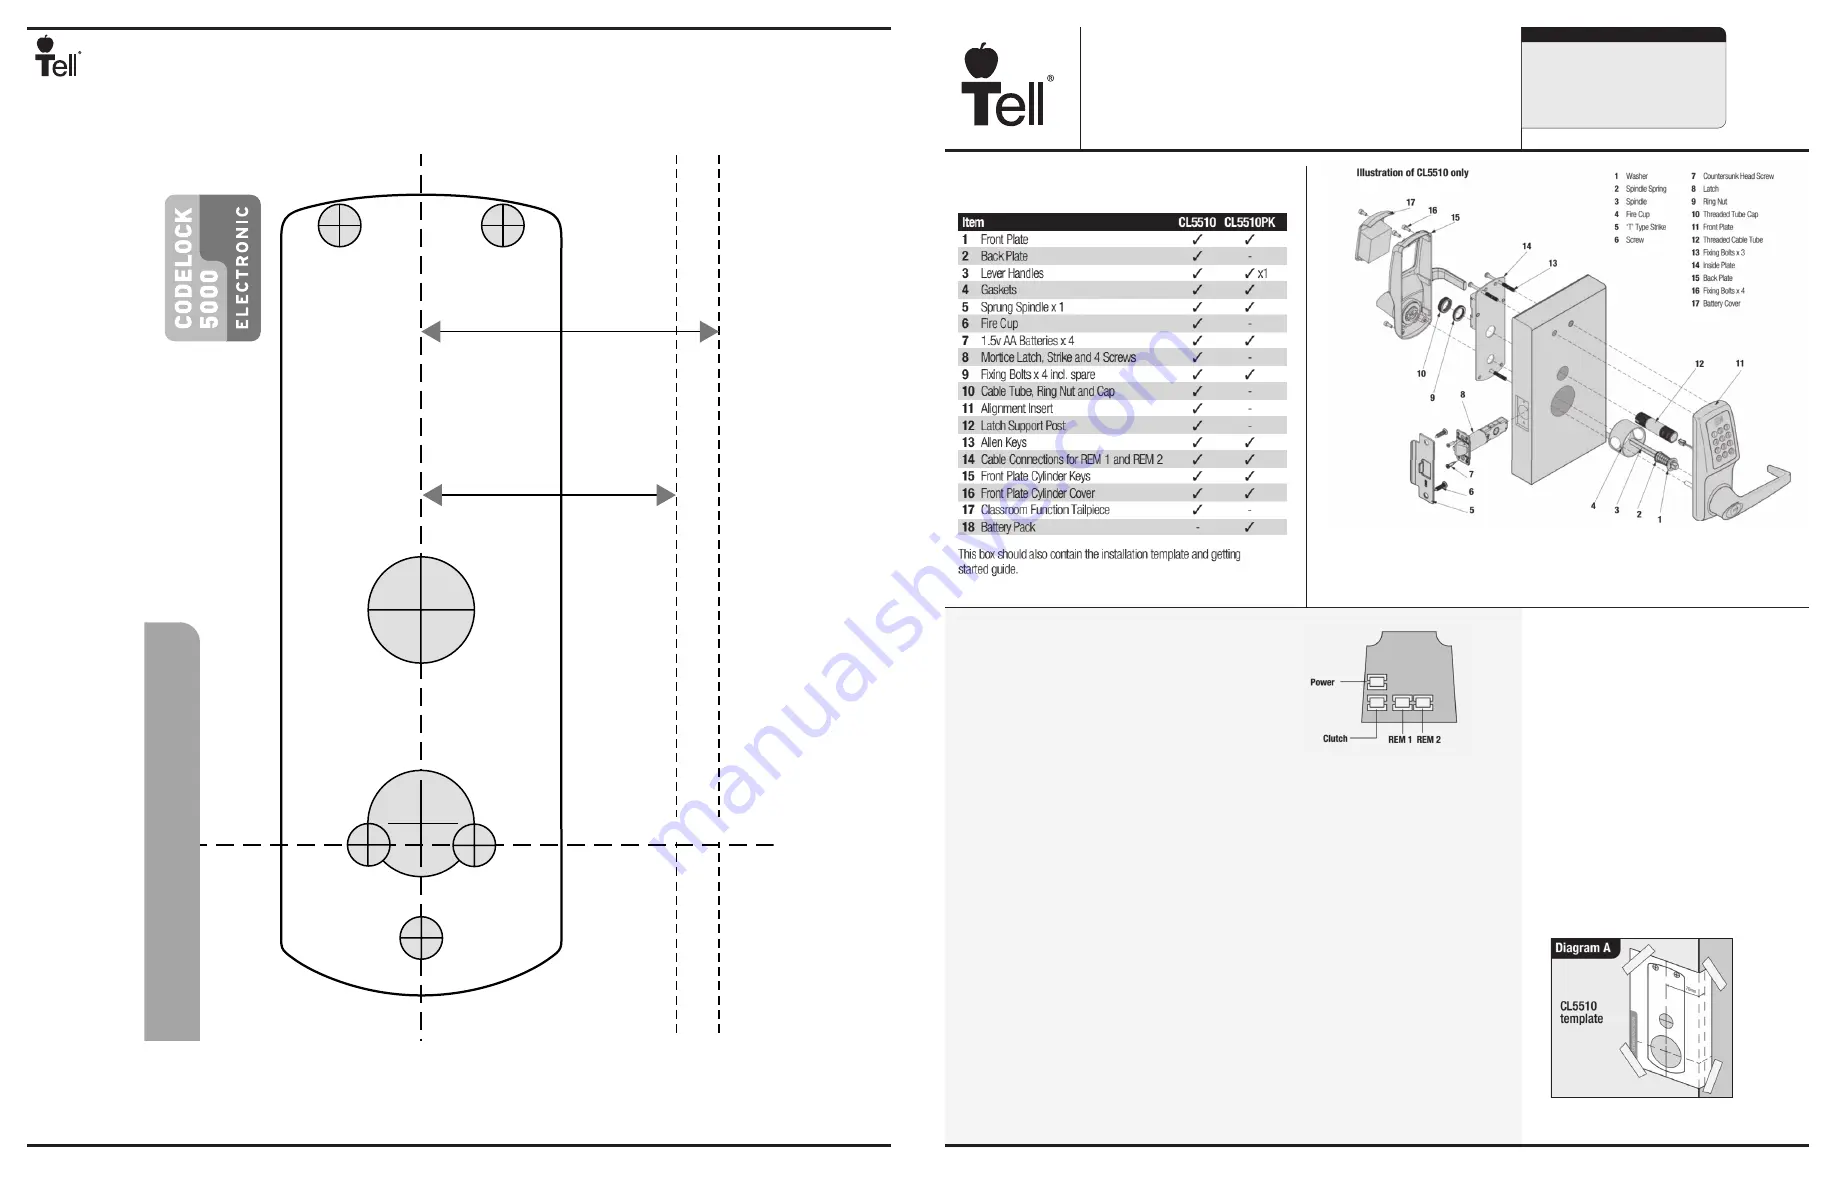
1. Lightly mark a height line on the edge and both faces
of the door, to indicate the top of the lock when fitted.
Crease the template along one of the dotted lines -
60mm (2 3⁄8”) or 70mm (2 3⁄4”) latch - and tape it to
the door with the top in line with the height line. Mark
the holes to be drilled. Mark the center line of latch on
to the door edge. Apply the template to the other side of
the door precisely against the height line and the center
line of latch mark. Mark the holes to be drilled again.
(See diagram A).
INSTALLATION INSTRUCTIONS FOR
CL5500 CODELOCK
BOX CONTENTS
– Check the contents of the box are correct
CL5510 LATCH FUNCTION
Outside handle turns freely without operating the latchbolt. When the code is entered the keypad will
flash blue and the handle will retract the latchbolt. The latch automatically locks the door when closed.
The key will open the door without the code.
OPERATIONS CHECK
• Familiarize yourself with the operation of the lock and
check that all the parts work properly.
• Remove the battery cover from the back plate and
install the 4 x AA cells supplied.
• Connect the cables from the front plate and back plate.
A BEEP should be heard when you do this. If no BEEP
is heard then check that the batteries are correctly
installed.
• Place the long spindle in the front plate socket and
using finger grip only, test that the spindle is easily
moved 80° in both directions. Leave socket in the
centered position.
• Enter the factory Master Code #12345678.
• The keypad will flash blue and the spindle should not
turn as before. After 5 seconds the keypad will flash red
and the spindle should turn easily again. This confirms
that the clutch engaged correctly when the code was
entered.
N.B. When the Master Code is entered 3 times
consecutively without performing a programming
function, a penalty time of 10 seconds is activated.
• Disconnect the cables.
SPECIAL FIXING NOTE
Remote Release Option
Cables are provided for the REM 1 and REM 2 terminals
on the circuit board.
REM 1 is for connection to a reception desk push button
or a door intercom system. Pressing the button will cause
the keypad to flash blue on the lock and release the lock
for the pre-set time.
REM 2 is for connection to the building alarm system
to release a door in an emergency. This allows rooms,
wards, offices to be easily checked to ensure that no
person is trapped or overlooked during an emergency
evacuation. When activated REM 2 will maintain the
unlocked condition for 30 minutes, the keypad will flash
red and BEEP during this time.
The lock will automatically lock again after 30 minutes. If
necessary Program 7 can be used to re-lock before the
end of the 30 minutes.
REM 1 and REM 2 do not require additional power. They
are normally open contacts requiring a momentary or
maintained signal to close.
CL102664 CL5510 BS Lever X Lever
• Phillips screwdriver
• Pliers (for cutting bolts)
• Chisel - 25mm (1”)
• Power drill
• Drill bits 10mm (3/8”), 25mm
(1”), and 54mm (2-1/8”)
• Hammer
• Utility knife
• Adhesive tape
• Pencil
• Bradawl
• Tape measure
Tools Required
HEIGHT LINE
70mm
(2
3
/
4
”)
60mm
(2
3
/
8
”)
10mm
(
3
/
8
”)
10mm
(
3
/
8
”)
10mm
(
3
/
8
”)
10mm
(
3
/
8
”)
10mm
(
3
/
8
”)
25mm
(1”)
25mm
(1”)
FOLD A
ROUND DOOR EDGE
FOLD A
ROUND DOOR EDGE
OUTLINE
OF
BACK PLA
TE
CENTRE LINE OF LATCH
IN
ST
ALL
AT
IO
N
T
EM
PL
AT
E


