background image

ELLIPTICAL USER’S GUIDE

FOR MODELS :


  615E


  645E

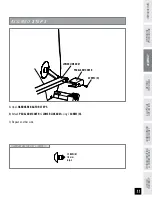
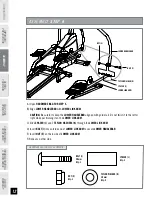
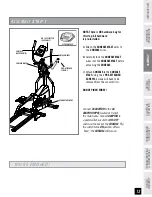
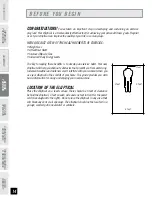
Summary of Contents for 615E

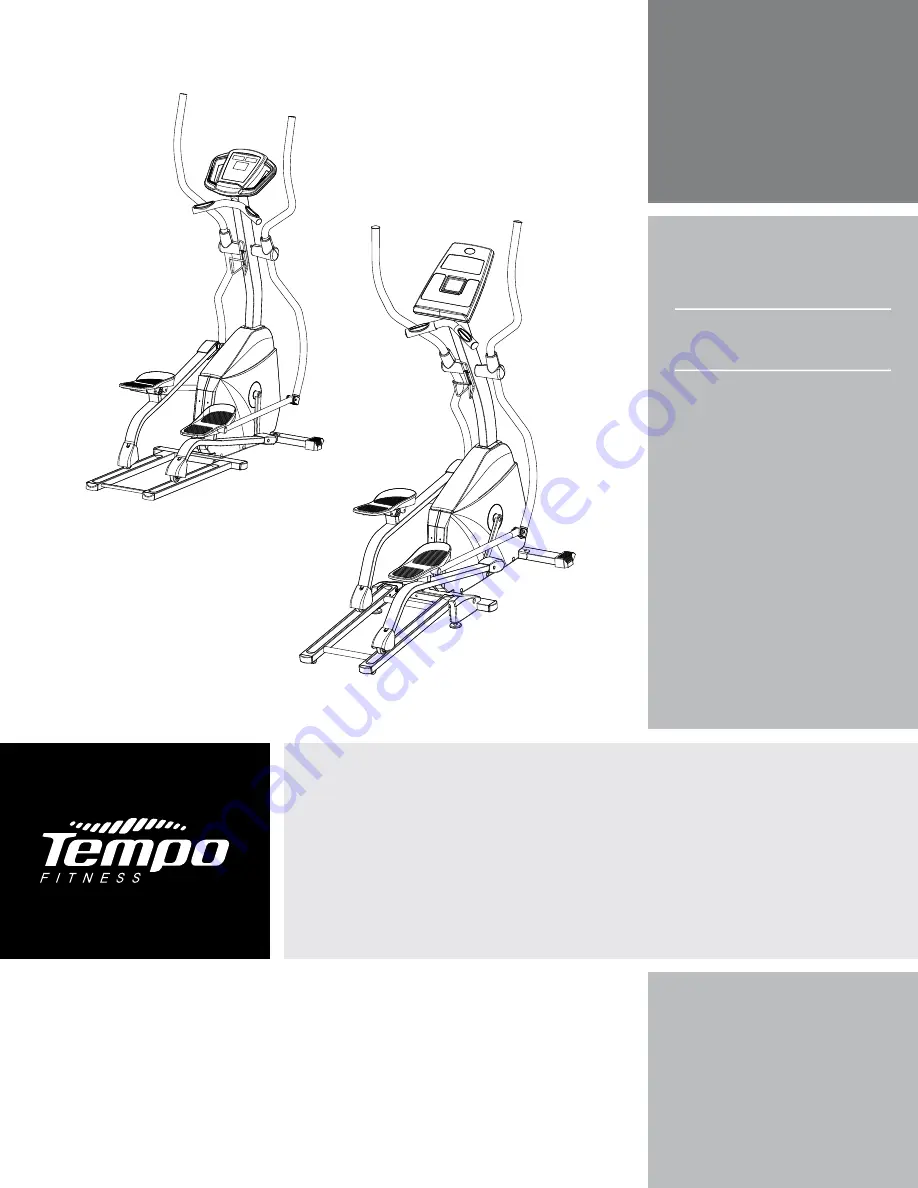
Page 1: ...ELLIPTICAL USER S GUIDE FOR MODELS 615E 645E ...

Page 2: ......

Page 3: ...onomics and innovative features you need to get stronger and healthier faster Because we re committed to designing fitness equipment from the inside out we use only the highest quality components It s a commitment we back with one of the strongest frame to brake warranty packages in the industry You want exercise equipment that offers the most comfort the best reliability and the highest quality i...

Page 4: ...to keep a grip on the handlebars while exercising mounting or dismounting the machine Do not wear clothes that might catch on any part of the elliptical Do not turn pedal arms by hand Make sure handlebars are secure before each use Do not insert or drop any object into any opening Unplug elliptical before moving or cleaning it To clean wipe surfaces down with soap and slightly damp cloth only neve...

Page 5: ...ons should be taken UNPACKING Unpack the product where you will be using it Place the product on a level surface It is recommended that you place a protective covering on your floor During each assembly step ensure that ALL nuts and bolts are in place and partially threaded in before completely tightening any ONE bolt Note A light application of grease may aid in the installation of hardware Any g...

Page 6: ...lebar Cover Sets CONSOLE 645E SHOWN 615E CONSOLE UPPER HANDLEBAR MAIN FRAME LOWER HANDLEBAR LOWER LINK ARM FRONT STABILIZER TUBE CONSOLE MAST PIVOTING FOOT PAD PEDAL ARM c 2 Lower Link Arms c 2 Pedal Arm Covers c 1 Top Cap c 1 Water Bottle Cage c 1 Power Supply c 4 Hardware Bags GRIP PULSE HANDLEBAR COVER WATER BOTTLE CAGE If you have questions or if there are any missing parts contact Customer Te...

Page 7: ...HERS B C Attach the GUIDERAIL SET to the MAIN FRAME using 2 BOLTS C and 2 WASHERS B from the front Then finish securing the GUIDERAIL SET to the MAIN FRAME by inserting 2 BOLTS D and 2 WASHERS B from above and secure to 2 NUTS E from below BOLT C 70 mm Qty 2 WASHER B 17 mm Qty 6 BOLT D 55 mm Qty 2 NUT E Qty 2 BOLT A 20 mm Qty 2 HARDWARE BAG FOR STEP 1 CONTENTS NUTS E BOLTS D GUIDERAIL SET WASHER B...

Page 8: ... CONSOLE WIRES through the CONSOLE MAST Discard wire when finished C Attach the CONSOLE MAST to the MAIN FRAME using 1 BOLT F 1 SPRING WASHER G and 1 WASHER B from the front and 2 BOLTS D 2 WASHERS B and 2 NUTS E from the side D Attach WATER BOTTLE CAGE using PRE ATTACHED SCREWS BOLT F 20 mm Qty 1 BOLT D 55 mm Qty 2 SPRING WASHER G Qty 1 WASHER B 17 mm Qty 3 NUT E Qty 2 HARDWARE BAG FOR STEP 2 CON...

Page 9: ...upport NOTE There is NO hardware bag for this step All hardware is pre installed A Remove PRE ATTACHED BOLT WASHERS from CONSOLE MAST B Slide LOWER HANDLEBARS onto CONSOLE MAST and attach by re inserting PRE ATTACHED BOLT WASHERS C Remove PRE ATTACHED SET SCREWS from UPPER HANDLEBARS D Slide UPPER HANDLEBARS onto LOWER HANDLEBARS Secure UPPER HANDLEBARS to LOWER HANDLEBARS using PRE ATTACHED SET S...

Page 10: ...WER LINK ARM PEDAL ARM BRACKET PEDAL ARM BRACKET PRE ATTACHED WASHER PRE ATTACHED BOLTS NOTE There is NO hardware bag for this step All hardware is pre installed A Remove pre attached bolts bracket and washer from lower link arm B Insert LOWER LINK ARM into PEDAL ARM BRACKET C Secure LOWER LINK ARM to PEDAL ARM by re inserting PRE ATTACHED BOLTS BRACKET and WASHERS D Repeat on other side ...

Page 11: ...ONDITIONING GUIDELINES TROUBLESHOOTING MAINTENANCE LIMITED WARRANTY ASSEMBLY STEP 5 SCREW H LOWER LINK ARM PEDAL ARM COVER A Open HARDWARE BAG FOR STEP 5 B Attach PEDAL ARM COVER to LOWER LINK ARM using 1 SCREW H C Repeat on other side SCREW H 10 mm Qty 2 HARDWARE BAG FOR STEP 5 CONTENTS ...

Page 12: ... HANDLEBAR with LOWER LINK ARM CAUTION Be careful to keep the LOWER HANDLEBAR aligned with guide rail Do not twist it to the left or right while positioning it on the LOWER LINK ARM C Slide SPACER J and 2 TEFLON WASHERS K through the LOWER LINK ARM D Insert BOLT I into outside end of LOWER LINK ARM to secure LOWER HANDLEBAR E Insert NUT E on the inside of LOWER LINK ARM F Repeat on other side SPAC...

Page 13: ...OLE MAST before attaching the CONSOLE C Attach CONSOLE to the CONSOLE MAST using the 4 PRE ATTACHED SCREWS screws will have to be removed from the console first DO NOT PINCH WIRES Connect AC ADAPTOR to the AC ADAPTOR INPUT located at front of the main frame Connect ADAPTOR to a power outlet Locate the ON OFF switch on the back of the CONSOLE Flip the switch to the ON position After a beep the CONS...

Page 14: ... Tone Increased Daily Energy Levels The key to reaping these benefits is to develop an exercise habit Your new elliptical will help you eliminate obstacles that prevent you from exercising Inclement weather and darkness won t interfere with your workout when you use your elliptical in the comfort of your home This guide provides you with basic information for using and enjoying your new machine LO...

Page 15: ...ar and not the plastic cover Our ellipticals are well built and heavy weighing up to 200 lbs 91 kgs Use care and additional help if necessary when moving ADJUSTABLE INCLINE FEATURE The 645E has a 2 level adjustable incline feature which adds variety to your workouts To adjust the incline up or down stand on the side of the elliptical and place your hand firmly on the top of the shroud as shown Wit...

Page 16: ...protective sheet of clear plastic on the overlay of the console that should be removed A Monitor Displays Speed Time Pulse Distance Level Calories and Program Profiles B START Stop Press to start pause end your workout C ENTER Used to set your program D RESET Press to reset the elliptical E up down ARROW KEYS Used to adjust resistance and select programs F BOOK RACK Holds reading material 615E CON...

Page 17: ...ing the ARROW KEYS 3 Press START or ENTER to begin program QUICK START SELECTING PROGRAMS SELECTING CUSTOM PROGRAMS 1 Select CUSTOM PROGRAM using the PROGRAM SELECT key and press ENTER 2 Set the RESISTANCE PROFILES using the ARROW KEYS and press ENTER after each RESISTANCE PROFILE is set to the desired level repeat until all 15 segments are set Note if START is pressed it will take you back to pre...

Page 18: ... Press to start pause end your workout Hold for 3 seconds to reset the elliptical C ENTER MODE Used to enter information during the workout and to scroll through the workout displays If held for 5 seconds information will automatically scroll D PROGRAM SELECT Used to select your program E up down ARROW KEYS Used to adjust resistance and time F BEEP ON OFF Used to turn on off console beep G Reading...

Page 19: ...ATION 1 Turn on Elliptical 2 Press START button and begin exercising 3 Program will automatically default to Manual P1 the time will count up from 0 00 and the resistance will default to level 1 4 The resistance level can be adjusted during the workout 1 Select a program using the PROGRAM SELECT key and press ENTER 2 Set TIME using the ARROW KEYS 3 Press START to begin QUICK START SELECTING PROGRA...

Page 20: ...down hills by gradually increasing and decreasing the resistance P6 WEIGHT LOSS Promotes weight loss by raising and lowering the resistance level while keeping you in your fat burning zone P7 WEIGHT LOSS PLUS A more challenging workout that will burn calories and fat P8 Fat BLAST Gradually increases resistance to get your body into the optimal workout zone P9 CARDIO BURN High intensity program tha...

Page 21: ...IOUSLY STORED After you set the time and press START STOP the previously stored program will begin 4 Press ENTER to begin the program after all 15 segments have been set NOTE To reset the memory press and hold the ENTER button for 5 seconds Handlebars Place the palm of your hands directly on the grip pulse handlebars Both hands must grip the bars for your heart rate to register It takes 5 consecut...

Page 22: ... start slowly and gradually increase your exercise times If you ve been sedentary during the past year it may be a good idea to keep your exercise times to as little as five minutes initially Your body will need time to adjust to the new activity If your goal is weight loss a longer exercise session at lower intensities has been found to be most effective A workout time of 48 minutes or more is re...

Page 23: ...ercentage of the maximum number of times your heart can beat per minute Target Zone will vary for each individual depending on age current level of conditioning and personal fitness goals The American Heart Association recommends working out at a Target Heart Rate Zone of between 60 and 75 of your maximum heart rate A beginner will want to workout in the 60 range while a more experienced exerciser...

Page 24: ...the toes of your left foot about 18 from the wall and the right foot about 12 behind the other foot Lean forward pushing against the wall with your palms Keep your heels flat and hold this position for a count of 15 seconds Make sure that you do not bounce while stretching Repeat on the other side 2 STANDING QUADRICEP STRETCH Using a wall to provide balance grasp your left ankle with your left han...

Page 25: ...e program Below are some common exercise goals Weight Loss lower intensity longer duration workouts Improve Body Shape and Tone interval workouts alternate between high and low intensities Increased Energy Level more frequent daily workouts Improved Sports Performance high intensity workouts Improved Cardiovascular Endurance moderate intensity longer duration workouts If possible try to define you...

Page 26: ... CONDITIONING GUIDELINES WEEK WEEKLY GOAL WEEKLY TOTALS DAY SUNDAY MONDAY TUESDAY WEDNESDAY THURSDAY FRIDAY SATURDAY DATE DISTANCE CALORIES TIME COMMENTS WEEK WEEKLY GOAL WEEKLY TOTALS DAY SUNDAY MONDAY TUESDAY WEDNESDAY THURSDAY FRIDAY SATURDAY DATE DISTANCE CALORIES TIME COMMENTS MONTH MONTHLY GOAL MONTHLY TOTALS WEEK DISTANCE CALORIES TIME WEEKLY LOG SHEETS MONTHLY LOG SHEET ...

Page 27: ...teries replace batteries on back of console PROBLEM The console turns on but the Time RPM s do not count SOLUTION Verify the following Turn off machine and unplug power cord Remove the console and check that all connections to the console are secure and not damaged or pinched If doing the above does not fix the problem the speed sensor and or magnet may have become dislodged or damaged PROBLEM The...

Page 28: ...te reading to be erratic If the above troubleshooting section does not remedy the problem discontinue use and turn the power off WHEN YOU ARE NEAR THE EQUIPMENT CALL CUSTOMER TECH SUPPORT AT THE NUMBER ON THE BACK PANEL The following information may be asked of you when you call Please have these items readily available Model Name Serial Number Date of Purchase receipt or credit card statement In ...

Page 29: ...ss products seem quieter in a large store showroom because there is generally more background noise than in your home Also there will be less reverberation on a carpeted concrete floor than on a wood overlay floor Sometimes a heavy rubber mat will help reduce reverberation through the floor If a fitness product is placed close to a wall there will be more reflected noise HOW LONG WILL THE DRIVE BE...

Page 30: ...ance schedule be followed AFTER EACH USE DAILY Turn off the elliptical by unplugging the power cord from the wall outlet Wipe down the elliptical with a damp cloth Never use solvents as they can cause damage to the elliptical Inspect the power cord If the power cord is damaged contact Tempo Fitness Make sure the power cord is not underneath the elliptical or in any other area where it can become p...

Page 31: ... natural disasters of any kind power reduction fluctuation or failure from whatever cause unusual atmospheric conditions collision introduction of foreign objects into the covered unit or modifications that are unauthorized or not recommended by Tempo Fitness Incidental or consequential damages Tempo Fitness is not responsible or liable for indirect special or consequential damages economic loss l...

Page 32: ...ments you may contact one of our trained customer technicians via phone email or our website Customer Tech Support Hotline 1 866 99 Tempo Email comments Tempo fitness com Website www Tempo fitness com Customer Tech Support hours Monday Friday 8 am 5 pm CST excluding holidays Note Please read the troubleshooting section before contacting Customer Tech Support DO NOT return the product to the store ...

Reviews: