background image

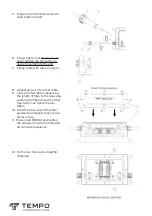
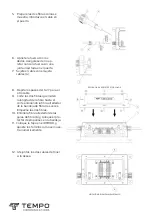
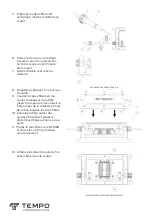
1.   Strip 8.1mm cable as shown above. Peel 

toner wire back as necessary.

2.  Place nut (5) on cable.
3.  Insert 8.1mm gasket on cable for small 


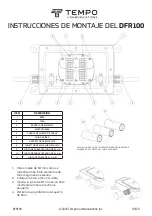
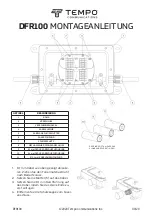
DFR100 

ASSEMBLY INSTRUCTIONS

DFR100 


© 2020 Tempo Communications Inc.   


09/20

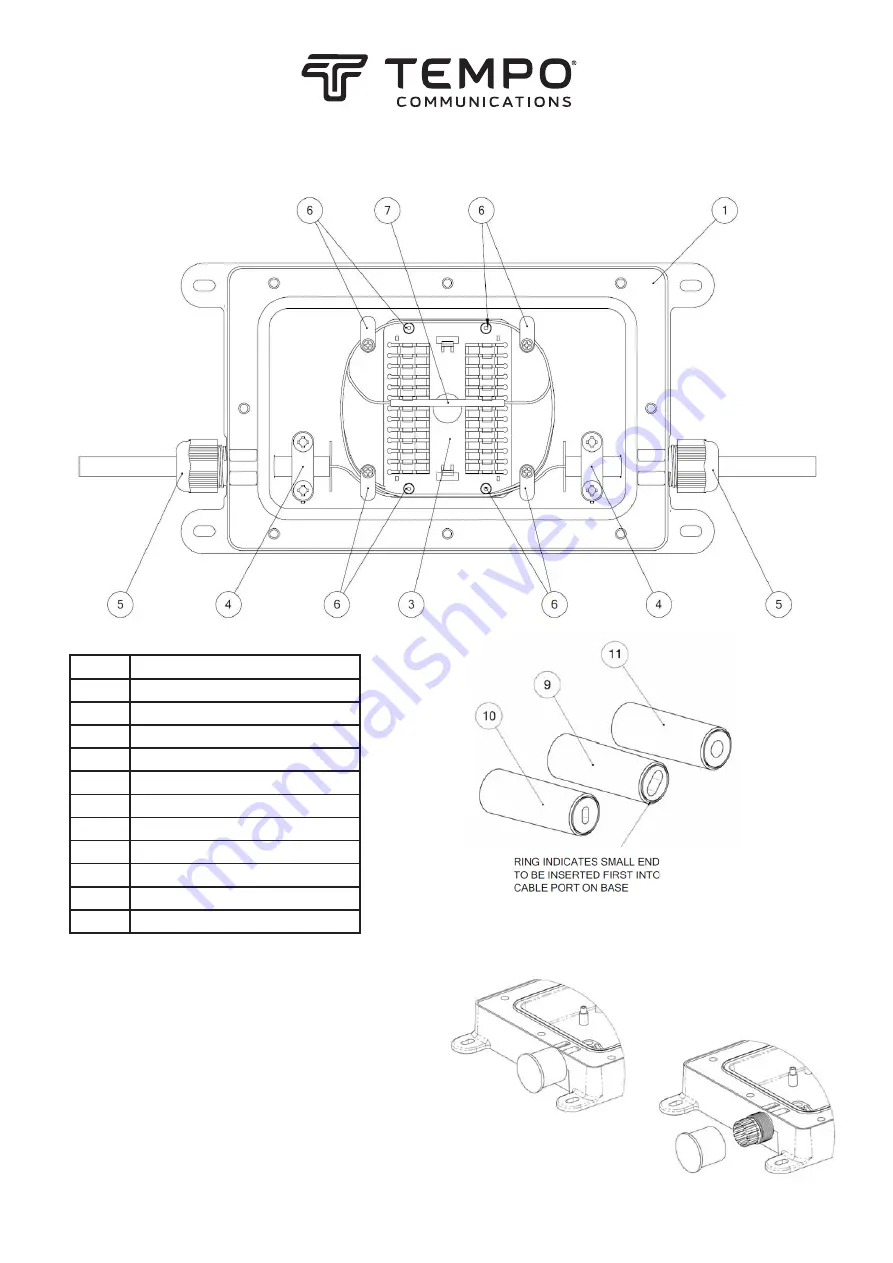
ITEM

DESCRIPTION

1

BASE

2

LID

3

SPLICE TRAY

4

CABLE CLAMP

5

CABLE PORT NUT

6

FIBER GUIDE

7

SPLICE PROTECTOR

8

MECHANICAL SPLICE CONNECTOR

9

8.1mm OVAL CABLE GASKET

10

5.4mm OVAL CABLE GASKET

11

Ø 5.1mm CABLE GASKET

Summary of Contents for DFR100

Page 1: ...sket on cable for small DFR100 ASSEMBLY INSTRUCTIONS DFR100 2020 Tempo Communications Inc 09 20 ITEM DESCRIPTION 1 BASE 2 LID 3 SPLICE TRAY 4 CABLE CLAMP 5 CABLE PORT NUT 6 FIBER GUIDE 7 SPLICE PROTEC...

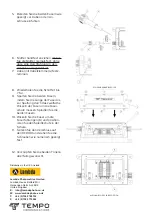
Page 2: ...cable with cable clamp 4 8 Repeat steps 1 7 for other cable tray two times Splice the two guides 6 and position splice pro tector in tray 11 Place lid on DFR100 and tighten the screws using the recom...

Page 3: ...erto EL ANILLO INDICA QUE EL EXTREMO PEQUE O SE INSERTAR PRIMERO EN EL PUERTO DEL CABLE EN LA BASE INSTRUCCIONES DE MONTAJE DEL DFR100 DFR100 2020 Tempo Communications Inc 09 20 ITEM DESCRIPCI N 1 BAS...

Page 4: ...l sujeta cables 4 8 Repita los pasos del 1 al 7 para el otro cable W Y 9 9 Z E W tector de empalmes en la bandeja W apriete los tornillos como se mues tra num ricamente Y _ si lo desea 800 642 2155 9...

Page 5: ...on du L ANNEAU INDIQUE LE PETIT EMBOUT INS RER D ABORD DANS LE PORT DE C BLE SUR LA BASE DFR100 INSTRUCTIONS DE MONTAGE DFR100 2020 Tempo Communications Inc 09 20 ARTICLE DESCRIPTION 1 BASE 2 COUVERCL...

Page 6: ...nt la 9 E protecteur d pissure dans la cas sette 11 Placez le couvercle sur le DFR100 et serrez les vis tel qu indiqu num riquement ensemble si vous le voulez EMPLACEMENT DE L PISSURE M CANIQUE S QUEN...

Page 7: ...n 4 Entfernen Sie die Schutzkappe vom Faser anschluss DER RING ZEIGT AN DASS DAS KLEINE ENDE ZUERST IN DEN DFR100 MONTAGEANLEITUNG DFR100 2020 Tempo Communications Inc 09 20 ARTIKEL BESCHREIBUNG 1 BAS...

Page 8: ...z in der Schale 11 Setzen Sie den Verschluss auf den DFR100 und ziehen Sie die Schrauben wie numerisch gezeigt fest abel falls gew nscht MECHANISCHE SPLEISSPOSITION SCHRAUBENANZIEHFOLGE 1390 Aspen Way...

Reviews: