background image

KIT NO. 9014094

Page 1 of 16

9014108 Rev. 01 (11- 2017)

Tennant Company

www.tennantco.com

T7 Disk Model

ec-H2O NanoClean Affiliate Kit

This kit includes the necessary parts to convert a standard disk model into an ec-H2O

t

NanoClean model.

The kit is intended for T7 models manufactured after serial number 10740597 (March 31, 2015).

INSTALLATION INSTRUCTIONS:

Installation Time: 4 Hours
Special Tools Required:

Cartridge By-Pass Tool to test

machine for leaks after install (provided separately).

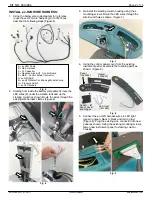
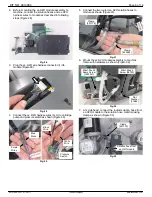
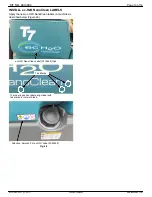
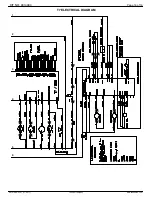
PREPARE MACHINE FOR KIT INSTALL:

1. Drain the solution and recovery tanks.
2. Park the machine on a level surface, lower the scrub

head and remove the key.

3. Disconnect the seat wire harness connector and lift

seat from machine (Figure 1).

FOR SAFETY: When servicing machine wear personal

protection equipment as needed.

Fig. 1

3. Remove the small box from the battery compartment

shroud to access the two mounting screws that

secures shroud. Remove screws and lift battery

compartment shroud from machine (Figure 2).

Twist

box to

remove

from

shroud

Fig. 2

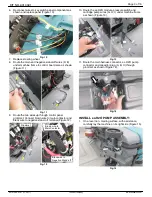
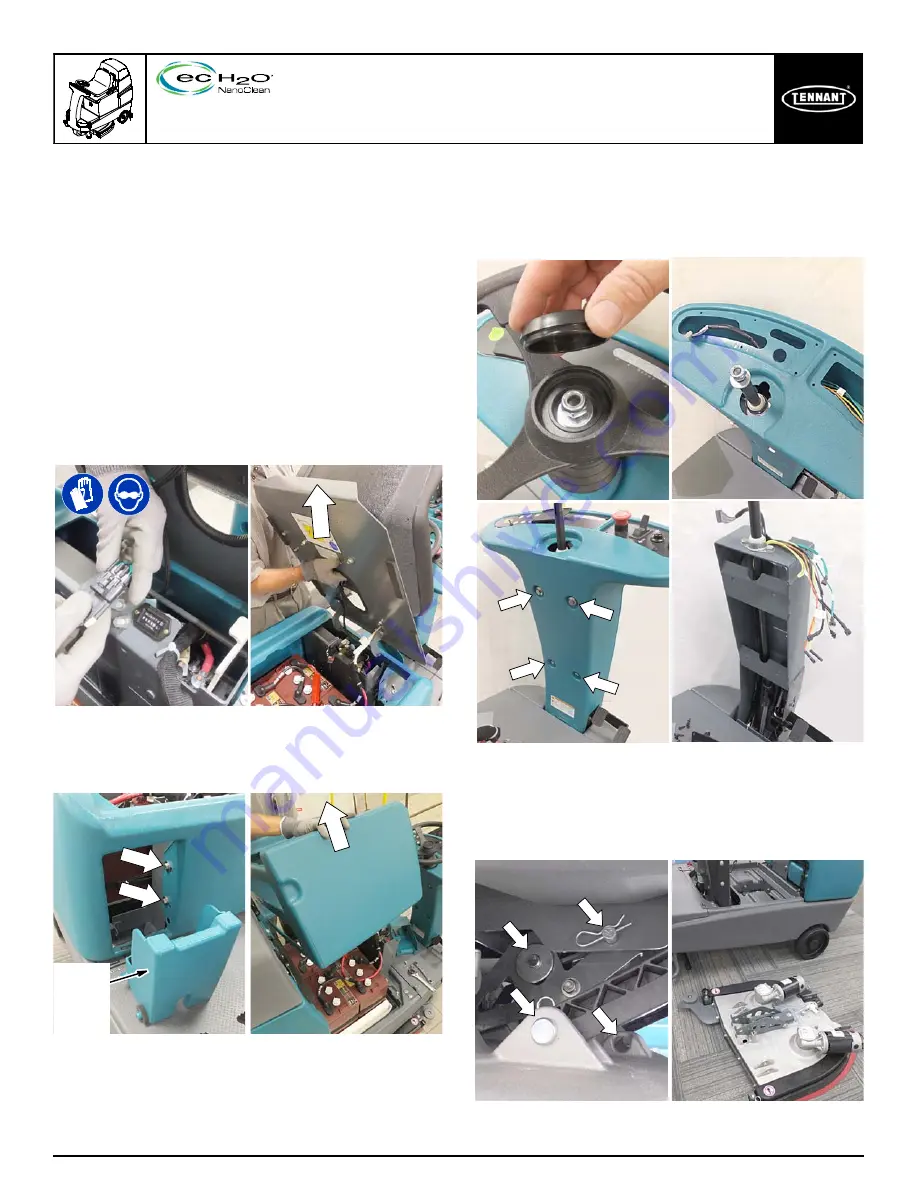
4. Remove batteries and battery tray from the machine.

5. Disconnect steering wheel and instrument panels from

steering column. Remove four screws and lift steering

column housing from column (Figure 3).

Fig. 3

6. Remove scrub head from machine. To remove, pull 4

pins from scrub head assembly as shown. Disconnect

brush motor wire connectors, solution hose

connection, solution valve wires and ground wire from

scrub head. Carefully slide scrub head out from under

machine (Figure 4).

Fig. 4

Summary of Contents for SpeedGleam 7

Page 1: ...e seat wire harness connector and lift seat from machine Figure 1 FOR SAFETY When servicing machine wear personal protection equipment as needed Fig 1 3 Remove the small box from the battery compartment shroud to access the two mounting screws that secures shroud Remove screws and lift battery compartment shroud from machine Figure 2 Twist box to remove from shroud Fig 2 4 Remove batteries and bat...

Page 2: ...res F under the solution tank and up the steering column as shown Route the wires through the existing wire harness clamps Figure 6 E Fig 6 3 Re install the steering column housing using the 4 mounting screws Route the LED wires through the small round hole as shown Figure 7 Fig 7 4 Using the control panel cover from the existing instrument panel assemble the following parts as shown Figure 8 Gask...

Page 3: ...nel grommet Connect brown wire to main contactor and black wire to negative stand off terminal Figure 12 Brown wire to Main Contactor Black wire to Negative Stand off Grommet Fig 12 10 Route the ec H2O module pressure switch and cartridge pump wires G H I under machine frame as shown Figure 13 Fig 13 11 Route the main harness connector ec H2O pump connector and capacitor plug A B C through grommet...

Page 4: ...onnect the ec H2O pump assembly to machine frame as shown Figure 18 ec H2O Pump Assembly Screw 2 1020341 Fig 18 5 Connect the ec H2O wire harness pump connector to pump Figure 19 Connect the capacitor plug into ec H2O harness connector C Capacitor Plug 1040868 Fig 19 6 Cut end of solution hose to remove hose plug Using clamp connect solution hose to pump as shown Figure 20 Clamp 54333 Cut off hose...

Page 5: ... head area Solution Hose 376720 Solution Hose 376720 Clamp 607775 Fitting 20950 Fig 23 PREPARE SCRUB HEAD 1 Carefully turn scrub head over and install hose support brackets at each motor hub location as shown Figure 24 Hose Support Bracket 1052298 Washer 01685 Fig 24 2 Cut the hose plug off from the manifold hose as shown Figure 25 Cut hose plug off Fig 25 3 Re install the scrub head on machine wi...

Page 6: ...ump and pressure switch as shown Figure 30 Pressure Switch Black Wire White Wire Blue Wires Purple Wires Fig 30 5 Connect the two routed ec H2O solution hoses to module as shown Figure 30 Clamp 607775 Clamp 603654 Fig 31 6 Mount the ec H2O module assembly to machine frame with hardware as shown Figure 32 Clamp 607775 M8x1 25x20 Screw 09740 M8x1 25x20 Sems Screw 1020341 Flat Washer 01685 Fig 32 7 A...

Page 7: ... module The solution flow lights will momentarily turn off after 2 seconds Release the button when the LEFT solution flow indicator light turns on in approximately 4 seconds Figure 37 When the button is released the solution flow indicators will blink the current machine configuration for 10 seconds see Table After the 10 second window the lights will revert back to normal operation Repeat step to...

Page 8: ...nd then turn off followed by displaying the current flow rate setting Figure 40 Fig 40 4 Press the ec H2O system button to the on I position 5 The ec H2O system indicator light will turn on when the propel pedal is pressed Figure 41 Solid Green Light Normal operation Solid or blinking Red Light System fault Check all ec H2O wire harness connections and refer to Service Manual ec H2O System Indicat...

Page 9: ...r for Water Conditioning Cartridge Carefully read and understand the following steps before performing procedure 1 Turn key to the on position Figure 45 2 Press and hold the service switch on the module for 10 seconds After releasing the service switch the three solution flow indicator lights will begin to ripple move back and forth Attention If you hold the service switch too long the 1st and 3rd...

Page 10: ...om INSTALL ec H2O NanoClean LABELS Apply the new ec H2O NanoClean labels on machine as described below Figure 46 ec H2O NanoClean Label 1216520 Qty2 To properly position labels align label with tick marks in rotomold tank Attention Solution Fill ec H2O Label 1050003 Tick Marks Fig 46 ...

Page 11: ...ev 01 11 2017 Tennant Company www tennantco com T7 ec H2O NanoClean Affiliate Kit Parts List 32 33 34 35 36 37 1 2 2 4 3 7 8 37 9 4 10 14 10 12 38 10 28 29 10 6 10 29 11 13 29 29 28 5 30 31 22 18 18 15 16 17 23 21 20 19 24 24 25 26 39 39 27 ...

Page 12: ...146 Hose Afmkt Pvc 0 06id 38od 05ft 1 17 1212573 Fitting Plstc Tee Qf06 Qf06 Qf06 1 18 1014987 Hose Afmkt Pvc Clr 0 25id 01ft 1 19 1214339 Fitting Plstc E90 Qfo4 Qm04 1 20 9014147 Hose Afmkt Pvc 0 06id 25od 05ft 1 21 1214339 Fitting Plstc E90 Qfo4 Qm04 1 22 613735 Clamp Hose Wir 40 42 Yel 1 23 1216973 Pump Assy Dispenser 1 24 9014210 Hose Afmkt Pvc Brd 25id 44od 05ft 1 25 1212855 Fitting Plstc Tee...

Page 13: ... Qty 1 1050592 Panel Instmt Lh Ec H2o 1 2 1052607 Gasket Panl Instmt Lh 13 Foam Adh 1 3 1041822 Light Led 312d 2 Volt Tri Color ec H2O Model 1 4 1046428 Seal Afmkt Rbr Clsd Adh 02ft ec H2O Model 1 5 1052298 Bracket Support Hose T7 ec H2O Model 2 6 01684 Washer Flat 0 27b 0 69d 05 Ss ec H2O Model 2 7 1216520 Label Logo Ech2o Nano 2 8 1050003 Label User Attention Ec H2o 1 ...

Page 14: ...Page 14 of 16 KIT NO 9014094 9014108 Rev 01 11 2017 Tennant Company www tennantco com T7 ec H2O NanoClean Wire Harness 1 Ref Part No Description Qty 1 1074374 Harness Assy Wire T7 Ec H2o G2 1 ...

Page 15: ...Page 15 of 16 KIT NO 9014091 9014108 Rev 01 11 2017 Tennant Company www tennantco com T7 ELECTRICAL DIAGRAM 1 2 3 4 5 6 ...

Page 16: ...Page 16 of 16 KIT NO 9014094 9014108 Rev 01 11 2017 Tennant Company www tennantco com T7 ELECTRICAL DIAGRAM 1 2 4 5 3 6 ...

Reviews: