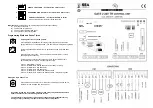
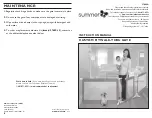
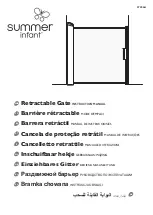
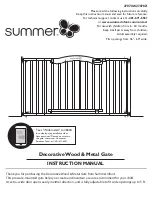
background image

Zappa Rail  |  Installation Guide

1

Rural Fencing

Zappa Rail.

Installation Guide

Summary of Contents for Zappa Rail

Page 1: ...Zappa Rail Installation Guide 1 Rural Fencing Zappa Rail Installation Guide...

Page 2: ...Zappa Rail Installation Guide 2 Timberline x4 Rail Red Gum...

Page 3: ...tting Started 4 Installation Tips 4 1 Electrifying 4 2 Tools Required 5 Instructions 6 Option One Using Line Strainer 6 Option Two Using Insulstrainer 12 Joining Zappa Rail using a Line Strainer 16 Jo...

Page 4: ...chieve this by purchasing a Zappa Rail Joining Buckle or a Line Strainer can be used Screwing the brackets in too hard can cause damage and make it difficult for the Zappa Rail to slide through the br...

Page 5: ...5 Drill with 8mm Tek Head Shifter or 20mm Spanner Scissors or Shape Knife Safety Glasses Screwdriver Set Square Wire Cutters Pencil Tape Measure Tools Required What you will need to get the job done R...

Page 6: ...directly to the strainer post at your desired height using the nut and bolt provided Refer to installation tips on end assembly construction Screw the top of each bracket onto the posts along the fen...

Page 7: ...d in place 3 4 Attach the Zappa Rail to the first end bracket Slide the Zappa Rail through cut out one then back through cut out two Make sure that at least 100mm of Zappa Rail is pulled through the E...

Page 8: ...you leave an extra 1000mm to thread through the End Bracket Use a set square to mark a square out Cut both wires using wire cutters then using a sharp knife or scissors cut through the plastic or cut...

Page 9: ...pa Rail run then replace the centre insert 7 Attach the Zappa Rail to the second end bracket keeping it as tight as possible Slide the Zappa Rail through cut out one then back through cut out two Make...

Page 10: ...Zappa Rail Installation Guide 10 9 Tension the Zappa Rail using two ratchets one on the top and one on the bottom Once tensioned hold in place using the rods provided What you will need...

Page 11: ...Zappa Rail Installation Guide 11...

Page 12: ...tion tips on end assembly construction Attach the Insulstrainer at the same height as the End Bracket Put nut and bolt not supplied through the middle of the Insulstrainer and fasten using four Tek sc...

Page 13: ...the bottom of bracket to hold in place Screw the top of each bracket onto the posts along the fence run using a Tek screw Do not screw the bottom of the bracket 4 What you will need Top Bracket Side...

Page 14: ...end bracket Slide the Zappa Rail through cut out one then back through cut out two Make sure that at least 100mm of Zappa Rail is pulled through the End Bracket Cut out one Cut out two Fasten the bot...

Page 15: ...ess Zappa rail and re tension To release the tension you will need to tighten the Insulstrainer with a spanner and release the latch using a screwdriver What you will need Please note Do not put your...

Page 16: ...Zappa Rail using the line starainer remove the rods then thread the two ends through the line stainer ensuring that it is overlapping at least 100mm Tension the Zappa Rail using two rachets one on th...

Page 17: ...il Installation Guide 17 Slide the Zappa Rail in through the middle cut out and back though the smaller cut out on the same side Repeat for the other side Joining Zappa Rail using a Joining Buckle One...

Page 18: ...Zappa Rail Installation Guide 18 Head Office 2415 Geelong Portarlington Road Portarlington 3223 Victoria Australia P 613 5259 2555 E sales thinkfencing com au www thinkfencing com au...

Reviews: