background image

VCR

THOMSON multimedia vous propose ce Manuel d’Utilisation en ligne, à titre informatif, dans le but de vous
permettre un accès rapide aux instructions d’utilisation des produits Thomson. Néanmoins ce Manuel d’Utilisation
en ligne ne saurait remplacer le Manuel d’Utilisation original disponible dans l’emballage des produits Thomson.

THOMSON multimedia provides you with this on line Instruction Manual for information purposes only in order to allow
you easy access to Thomson’s products operating instructions. This on line Instruction Manual does not replace the
original Instruction Manual available in the packaging of Thomson products.

THOMSON multimedia le ofrece este Manual de Instrucciones en línea con carácter meramente informativo para
facilitarle el acceso a las instrucciones de uso de los productos Thomson. Sin embargo, este Manual de
Instrucciones en línea no sustituye en modo alguno al Manual de Instrucciones disponible en el embalaje de los
productos Thomson.

Um Ihnen einen schnellen und einfachen Zugang zu den Gebrauchsanweisungen unserer Produkte zu
verschaffen, hat THOMSON diese hier “on-line” gestellt. Diese “on-line” Gebrauchsanweisungen dienen allerdings
lediglich zu Informationszwecken und ersetzen selbstverständlich nicht die den Produkt-Verpackungen
beiliegenden Gebrauchsanweisungen.

THOMSON multimedia vi propone, a titolo informativo, il seguente Manuale di Utilizzazione “on-line”, al fine di
permettervi un accesso rapido alle istruzioni per l’utilizzo dei prodotti THOMSON. Ciononostante, il Manuale di
Utilizzazione “on-line” non costituisce un sostituto al Manuale di Utilizzazione originale, fornito nell’imballaggio dei
prodotti THOMSON.

THOMSON multimedia tillhandahåller denna “on line” manual för information endast för att ge dig enkel tillgång till
Thomson-produkternas bruksanvisningar. Manualen ersätter inte originalbruksanvisningen som bifogas med
Thomson-produkterna.

THOMSON multimedia coloca à sua disposição o Manual de Instruções on line com carácter meramente
informativo para lhe facilitar o acesso às instruções de utilização dos produtos Thomson. No entanto, este Manual
de Instruções não substitui o Manual de Instruções original, disponível na embalagem dos produtos Thomson.

Summary of Contents for M9960

Page 1: ...einfachen Zugang zu den Gebrauchsanweisungen unserer Produkte zu verschaffen hat THOMSON diese hier on line gestellt Diese on line Gebrauchsanweisungen dienen allerdings lediglich zu Informationszwecken und ersetzen selbstverständlich nicht die den Produkt Verpackungen beiliegenden Gebrauchsanweisungen THOMSON multimedia vi propone a titolo informativo il seguente Manuale di Utilizzazione on line ...

Page 2: ...ce Suisse S A Service Relations Seewenweg 5 Consommateurs 4153 Reinach 46 Quai Alphonse Le Gallo Suisse 92100 Boulogne Billancourt Tel 061 716 96 50 Tel 08 03 82 14 42 Fax 061 716 96 55 Minitel 3615 THOMSON TV http www thomson europe com http www thomson fr http www thomson europe com UK and Ireland GB IRL Dear Customer Thank you for purchasing this THOMSON multimedia product and for your confiden...

Page 3: ...w thomson europe com http www thomson europe com Italia e Svizzera I CH Caro Cliente Vi ringraziamo di aver acquistato questo prodotto Thomson multimedia e della fiducia riposta nella nostra azienda Questo prodotto risponde alle norme di sicu rezza ed è stato sottoposto a severi controlli durante la produzione Tuttavia se dovesse presentarsi un difetto entro 12 mesi dalla data d acquisto il prodot...

Page 4: ...homson europe com Portugal P Estimado Cliente Agradecemos lhe por ter adquirido este produto THOMSON multimedia e pela sua confiança na nossa marca Este produto está conforme com todas as normas de segurança e foi submetido a testes rigorosos durante o seu fabrico Contudo no caso de ocorrer alguma avaria o produto ou a s peça s defeituosa s com excepção de acessórios ou peças de desgaste será repa...

Page 5: ...niejsza gwarancja dotyczy Produkt w elektronicznych powszechnego uýytku wyprodukowanych przez zak ady wchodzˆce w sk ad koncernu THOM SON multimedia zakupionych w sklepach na terytorium Rzeczypospolitej Polskiej TCE gwarantuje sprawne dzia anie tych Produkt w zgodnie z warunkami technicznymiieksploatacyjnymiopisanymiwichinstrukcjiobs ugi 2 Okres gwarancji wynosi 24 miesiˆce gwarancji od daty zakup...

Page 6: ...vedenŽ v tomto ãZ ru n m listžÒ plat takŽ pro dalä vùrobky koncernu THOMSON Group a to zna ky Telefunken Saba a Nordmende 11 Pokud nebyly vady vùrobku reklamov ny v souladu s vùäe uvedenùmi podm nkami pro poskytov n z ruky nem kupuj c pr vo vùrobek vr tit THOMSON multimedia Czech s r o ul Doprav kó 3 184 00 Praha 8 http www thomson europe com Россия RUS Уважаемый клиент Благодарим за покупку проду...

Page 7: ...él a Vevõnek kell a terméket a kijelölt szervízbe beszállítania Ha vita merül fel a hiba jellegével kapcsolatban pl javítható vagy nem értékcsök kenés mértéke a garanciára kötelezettnek a jogszabályban erre felhatalmazást kapott független minõségvizsgálati szerv szakvéleményét kell beszereznie Ha a garanciára kötelezett e szakvéleményt nem szerzi be aVevõ maga is jogosult e szervet megkeresni Asza...

Page 8: ...ttot eller garan tisedeln har ändrats på något sätt eller har gjorts oläslig efter inköpet kan garanti nekas Garantivillkor och garantitid för din produkt gäller enligt lagstadgade garantiregler i det land där inköpet har gjorts och om så skett enligt överenskommelse med din handlare Ελληνικά GR Αγαπητέ αγοραστή Ευχαριστούµε για την επιλογή και την εµπιστοσύνη που δείχνετε στα προϊÞντα τησ THOMSON...

Page 9: ...l tŽnek Žs vagy visszaad s nak d tuma Datum opravy Дата окончания ремонта A bejelentett hiba oka Bид неисправности и замена запасных частей A javit s m dja KicserŽlt fÎdarabok megnevezŽse Uj garanci lis hat ridÎ Numer KIG Javit si munkalap sz ma Piecz serwisu Szerviz bŽlyegzÎje Raz tko servisn ho stÞediska Фамилия мастера и штамп сервисного центра Your guarantee ...

Page 10: ...amage the equipment Thomson Multimedia is not liable if the television is used other than in accordance with this manual Guarantee SETTING UP Ensure that the mains supply in your house complies with that indicated on the identification sticker located on the back of your appliance Install the video recorder horizontally away from any source of heat fireplace or appliances creating strong magnetic ...

Page 11: ...TR A HE AV Y DU TY VCR Coaxial cable 75 Ω Power cord 2 non rechargeable batteries type AA Video recorder Remote control of the video recorder or of the television set depending on the selection or either VCR or TV Scart cable 12 pins connected depending on the video recorder model Please respect the environment and prevailing regulations Before you dispose of batteries or accumulators ask your dea...

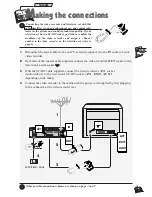
Page 12: ...o the television s SCART socket AV 1 EXT 1 AUX 1 depending on the make 4 Connect the video recorder to the mains with the power cord supplied by first plugging in the connector at the video recorder rear AV1 EXT1 AUX1 AV1 IN OUT 220V 240V 50Hz 1 2 3 4 J J Connecting the video recorder and television set with this cable simplifies set up and subsequent use and considerably improves the picture and ...

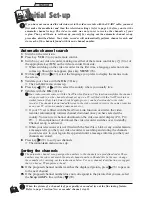
Page 13: ...tted with the NextView Link or any similar feature a message tells you that your video recorder is searching and storing the channels you can receive in your region Keep patient until a message informs you that your channels are stored 8 Press key B B 11 to sort your channels ð The ORGANISER menu comes up Automatic channel search J J The automatic channel set up assigns the numbers to the channels...

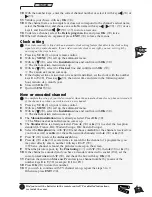
Page 14: ... in the following order hour minute day month year 6 Store with OK 10 7 Quit with EXIT 14 Clock setting J J To complete the set up of your video recorder when the automatic channel set up has not stored all of the channels or when you wish to store a new channel 1 Press key VCR 1 on your remote control 2 With key MENU 15 call up the SUMMARY menu 3 With key W W 12 select the Installation line and c...

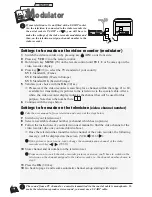
Page 15: ...ntinue with the steps below Settings to be made on the video recorder modulator J J Take the user manual of your television and carry out the steps below 7 Switch on your television set 8 Select an available channel number a channel which has no picture 9 Follow the instructions of your television user manual to find the video channel of the video recorder the one you noted down above ð Once the t...

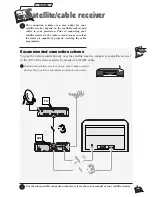
Page 16: ...is capable of properly receiving the cable programmes Recommended connection scheme To give the video recorder priority over the satellite receiver connect your satellite receiver to the AV2 of the video recorder by means of a SCART cable J J Position the satellite receiver on top of the video recorder and see that you leave the infrared windows uncovered AV2 TV J J For the other possible connecti...

Page 17: ...iver positions itself on channel 12 check whether channel 12 is indicated by the display of the satellite receiver even if there is no image to be seen on the television screen J J The display of channel 12 by the decoder is not always effective During the test example TPS you ll have to watch your decoder s display until it briefly indicates the number 12 9a Should the satellite receiver not use ...

Page 18: ...o recorder TV set The pictures from another set operating in the play mode and connected to AV2 are conveyed to the socket AV1 When your television is connected to this socket you can watch the pictures from the set connected Sockets AV1 AV2 AV3 AV4 DOLBY Prologic and the double D symbol are trademarks of DOLBY Laboratories Licensing Corporation Audio Video or Dolby Pro Logic amplifier The two cin...

Page 19: ... 4 15 19 23 24 25 26 20 21 22 27 28 29 3 4 5 6 7 14 15 9 8 13 To switch your video recorder on and off To select the decoder function To call up the SHOWVIEW menu To display the information screen inactive To call up the SUMMARY menu 18 To switch over to another channel Rewind Play Fast forward To mark an index Counter reset To double the recording time with LP Stop Pause Still image Recording To ...

Page 20: ...unit connected to the video recorder front side 0 23 SA Pictures and sound of a satellite channel 01H15M35S Tape counter 09 53 Time SP Play recording at standard speed Standard Play LP Play recording at half speed Long Play SLP Super Long Play VIDEO The video recorder transmits the pictures and the sound to the television set VPS The current telecast is in the VPS mode PDC The current telecast is ...

Page 21: ...hange the speed and direction of accelerated play Accelerated play Press key PAUSE 28 repeatedly to wind forward image by image Still image Pause 1 Press key PAUSE 28 2 Press key REW 24 or FWD 26 repeatedly to change the speed and direction of slow motion Variable slow motion 1 Press key STOP 27 2 Press key REW 24 or FWD 26 1 Switch the video recorder to STOP 2 Press key STOP EJECT on the video re...

Page 22: ... long play LP with key SP LP 22 J J LP doubles the length of your tape 240 minutes in SP become 480 minutes i e 8 hours in LP 4a Simple recording Press key REC 29 ð the video recorder switches on Record Pause Press key PLAY 25 ð the video recorder starts the recording 4b Recording with automatic stop Press key REC 29 twice ð the video recorder starts recording for a 30 minute period Press key REC ...

Page 23: ...itch the video recorder on standby with key B B 3 ð The indication appears on the display of your video recorder to tell you that your programming was successful J J If you don t know the ShowView code of the telecast you wish to record you ll have to use the TIMER menu 1 Display the SUMMARY menu with key MENU 15 2 Select Timer with key W W 12 3 Confirm with OK 10 ð The TIMER menu comes up 4 Make ...

Page 24: ...y a satellite receiver or any other unit supporting this feature and connected to socket AV1 or AV2 by means of a SCART cable This connection scheme prevents you from having to programme both units 1a Programming by EXTERNAL TIMER tick off the External timer box in the menu PREFERENCES page 19 to trigger the recording via socket AV1 1b Programming by the menu RECORD TIMER programme the connected u...

Page 25: ...ent tape length remaining Go to a particular position Return to a particular position J J The video recorder detects the type of any standard tape loaded E60 E120 E180 E240 for 60 120 180 and 240 minutes of recording time For all other tapes hired films you must enter the cassette type The video recorder will then be able to accurately calculate and display the elapsed and remaining time of your t...

Page 26: ... Select the desired option with key C 13 or B 11 J J Your video recorder comes with an automatic colour standard detection system PAL SECAM PAL MESECAM that works in both play and record mode When playing a tape causes problems scrambled pictures or black and white you ll have to force the play mode by selecting one of the available options PAL SECAM MESECAM If you wish to record a tape in a parti...

Page 27: ...st with key C 13 or B 11 J J To obtain optimum sound quality set the level so that the number of red bars lit remains as small as possible when the sound reaches the highest intensity 1 Load a tape and press PLAY 25 2 Display the SUMMARY menu with key MENU 15 then select HiFi controls with key W W 12 3 Confirm with OK 10 ð The HIFI CONTROLS menu comes up 4 With key C 13 or B 11 select the sound tr...

Page 28: ... limit ShowView 10 J J Select VPS PDC to start recording at the exact beginning of the programme provided that the channel broadcasts VPS or PDC signals this information is available on the video recorder control screen Some channels telecast their programmes with VPS Video Programme System or PDC Programme Delivery Control signals These signals allow accurate triggering and stop of a recording wh...

Page 29: ...lay or record a tape When the end of the tape is reached it is automatically rewound until the beginning and play or recording is resumed This function used in combination with the LP feature provides you with a recording of 8 hours when using an E240 tape Continuous play press PLAY 25 for 6 seconds Continuous recording press REC 29 and then PLAY 25 for 5 seconds ð The display of the video recorde...

Page 30: ...1 RADIOMARELLI 019 REX 005 SABA 001 000 005 010 019 020 SALORA 005 AKAI 008 020 AKARI 028 BANG OLUFSEN 009 019 BLAUPUNKT 023 BRANDT 001 000 010 020 BRIONVEGA 019 BLUESKY 020 CGE 016 CONTINENTAL EDISON 004 DAEWOO 020 025 ELBE 005 015 023 FERGUSON 001 003 004 000 010 020 FINLUX 020 024 019 FISHER 008 FORMENTI 019 GOLDSTAR 020 GRUNDIG 023 024 016 HITACHI 007 IMPERIAL 016 JVC 013 BRAND OF YOUR TV SET ...

Page 31: ...dards LL BG DKK or BG DKK depending on the model Number of storable channels 99 Modulator UHF Channel 21 to 69 Pre set at the factory on channel 60 Standards L G K Remote control Infrared 33 Khz Batteries 2 x 1 5 V AA Menu language French English German Italian Spanish Swedish Danish Dutch Polish Czech Hungarian Russian depending on the model Automatic functions On using any key Play with protecte...

Page 32: ...THOMSON multimedia 46 quai A Le Gallo 92648 Boulogne Cedex France RCS NANTERRE B 322 019 464 http www thomson multimedia com Copyright THOMSON multimedia ...

Reviews: