
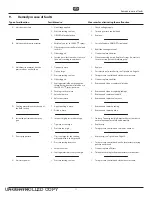

TOLERANCES (except as noted)
MATERIAL:
Wagner Spray Tech Corporation
1770 Fernbrook Lane
Minneapolis, Minnesota 55447
DECIMAL
XX±
XXX±
FRACTIONAL
ANGULAR
TITLE:
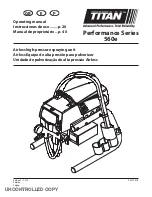
Owner’s manual, 560e I
THIS DRAWING & ANY ACCOMPANYING
SPECIFICATIONS ARE THE EXCLUSIVE
PROPERTY OF WAGNER SPRAY TECH.
MUST BE KEPT CONFIDENTIAL AND ARE
NOT TO BE USED OR REPRODUCED
WITHOUT THE WRITTEN PERMISSION
OF WAGNER SPRAY TECH CORP.
SCALE:
DWG. NO.
0552997
REV.
B
DR.
CH.
REF.
SHEET
SIZE
APP.
LET
REVISION
DATE
ECN
BY
CH
A
Release for CEI print
06/08/15
30367
CL
CL
B
Add altitude spec
06/24/15
30493
CL
CL
C
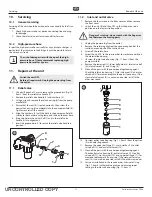
Product Literature Specifications
1.
Booklet style owner’s manual
2.
11” x 17” paper
3.
92 brightness
4.
20 lb paper
5.
Folded and stapled – 2 places in spine, evenly spaced
6.
Edge trimmed for clean look
7.
This page to be used for owner’s manual specifications only – do not print.
Delete
this
page
before
printing
Do
not
this
page
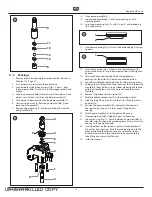
Uncontrolled Copy


