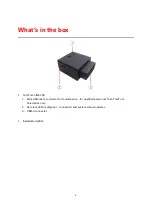
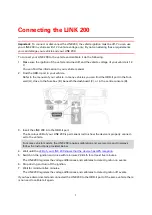
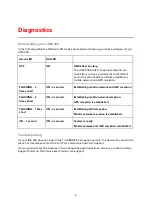
background image


TomTom LINK 200 

Reference Guide 


Summary of Contents for LINK 200

Page 1: ...TomTom LINK 200 Reference Guide ...

Page 2: ...u need for the installation 4 Safety first 5 Important safety notices and warnings 5 Preparations 6 Activating the LINK 200 6 Choosing the correct position 6 Connecting the LINK 200 7 Diagnostics 8 Understading your LINK 200 8 Troubleshooting 8 Technical data 9 Addendum 10 ...

Page 3: ... 1 Mini USB cable connector for maintenance for qualified personnel from TomTom Telematics only 2 Bi colour LED red green connection and system status indicator 3 OBD II connector Installation leaflet What s in the box ...

Page 4: ...in vehicles equipped with an OBD II port and 12V vehicle voltage What you need for the installation Before starting the installation of your TomTom LINK 200 read the safety notices and warnings carefully and make sure you have the following A computer or a smartphone with an internet connection The WEBFLEET Contract Confirmation letter including the Activation Code and the Customer Number All part...

Page 5: ... or life of you or others If your device includes a mo bile network module do not use it near unprotected electrical units or in areas where the use of mobile telephones is prohibited such as hospitals and aircraft Caution danger of explosion Parts of the TomTom LINK 200 can cause sparks that can lead to explosions This may en danger human health and life Do not use the unit in areas with high ris...

Page 6: ...choose the correct position in which to install your LINK 200 Take the following into consideration Do not expose the LINK 200 to direct sunlight and or high temperature for long periods to ensure proper operation To ensure GPS reception using the integrated GPS receiver the top of the device must not be obstructed by metal items To ensure mobile network reception using the integrated antenna the ...

Page 7: ... centre console D 3 Insert the LINK 200 into the OBD II port The bi colour LED of your LINK 200 is permanent red to show the device is properly connect ed to the vehicle For some vehicle models the LINK 200 requires calibration and we recommend to always follow the instructions provided below 4 Wait until the LED of your LINK 200 shows that the device has GPS reception 5 Switch on the ignition and...

Page 8: ...ion FLASHING 2 times short ON 3 seconds Establishing mobile network reception GPS reception is established FLASHING 1 time short ON 3 seconds Establishing GPS reception Mobile network reception is established ON 1 second ON 3 seconds System is ready Mobile network and GPS reception established Troubleshooting If your LINK 200 does not report trips To WEBFLEET properly anymore the device may need t...

Page 9: ... Atlas V Integrated GPS antenna Acceleration sensor 3D acceleromenter USB Mini USB 2 0 Supply voltage 12 V min 8 V to max 18 V Connector OBD II connector Temperature Operation 25 C to 60 C Dimensions 27 mm x 48 mm x 49 5 mm Current consump tion average values During operation 100 to 150 mA During transmission 200 to 250 mA Standby 6 5 mA Technical data ...

Page 10: ...t shall not be treated as household waste In line with EU Directive 2002 96 EC for waste electrical and electronic equipment WEEE this electrical product must not be disposed of as unsorted municipal waste Please dispose of this product by returning it to the point of sale or to your local municipal collec tion point for recycling By doing this you will help conserve the environment This document ...

Page 11: ...All rights reserved TomTom and the two hands logo are registered trade marks of TomTom Telematics B V or one of its subsidiaries Please see tomtom com legal for limited warranty and end user licence agreements applying to this product ...

Reviews: