background image

Bedienungsanleitung

ES-800 Akku-Exzenterschleifer

Best.-Nr. 1881819

Seite 2 - 14

Operating Instructions

ES-800 Battery Powered Random 

Orbital Sander

Item No. 1881819

Page 15 - 27

Summary of Contents for 1881819

Page 1: ...Bedienungsanleitung ES 800 Akku Exzenterschleifer Best Nr 1881819 Seite 2 14 Operating Instructions ES 800 Battery Powered Random Orbital Sander Item No 1881819 Page 15 27 ...

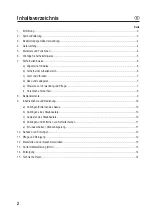
Page 2: ... Ladegerät 7 e Hinweise zur Verwendung und Pflege 7 f Persönliche Sicherheit 8 8 Bedienelemente 9 9 Inbetriebnahme und Bedienung 10 a Anbringen Entfernen des Akkus 10 b Anbringen eines Staubbeutels 10 c Ausleeren des Staubbeutels 10 d Anbringen und Entfernen von Schleifscheiben 11 e Ein Ausschalten Drehzahlregelung 11 10 Beheben von Störungen 12 11 Pflege und Reinigung 12 12 Ersatzteile und Verbra...

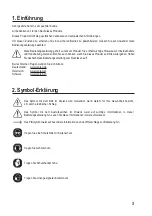
Page 3: ...n Heben Sie deshalb diese Bedienungsanleitung zum Nachlesen auf Bei technischen Fragen wenden Sie sich bitte an Deutschland www conrad de Österreich www conrad at Schweiz www conrad ch 2 Symbol Erklärung Das Symbol mit dem Blitz im Dreieck wird verwendet wenn Gefahr für Ihre Gesundheit besteht z B durch elektrischen Schlag Das Symbol mit dem Ausrufezeichen im Dreieck weist auf wichtige Information...

Page 4: ...rch und bewahren Sie sie sicher auf Reichen Sie das Produkt nur zusammen mit der Bedienungsanleitung an Dritte weiter Alle enthaltenen Firmennamen und Produktbezeichnungen sind Warenzeichen der jeweiligen Inhaber Alle Rechte vorbehalten 4 Lieferumfang Exzenterschleifer Schleifscheibe Körnung 80 Staubbeutel Bedienungsanleitung Akku und Ladegerät sind separat erhältlich siehe Abschnitt 12 Ersatzteil...

Page 5: ...dass sich weder Umstehende noch entzündliche Werkstoffe in der Nähe desArbeitsbereichs befinden Berühren Sie die Schleifscheibe nicht solange diese in Bewegung ist Von einer Weiterverwendung abgenutzter gerissener oder stark verunreinigter Schleifscheiben ist abzusehen Tragen Sie bei der Arbeit mit dem Exzenterschleifer immer eine geeignete Atemschutzmaske und Schutzbrille Sorgen Sie bei der Durch...

Page 6: ...urde oder erheblichen Transportbelastungen ausgesetzt wurde Gehen Sie stets vorsichtig mit dem Produkt um Stöße Schläge oder sogar das Herunterfallen aus geringer Höhe können das Produkt beschädigen Beachten Sie auch die Sicherheits und Bedienhinweise der übrigen Geräte die an dieses Produkt angeschlossen sind Wenden Sie sich an einen Fachmann sollten Sie sich in Bezug auf die Arbeitsweise die Sic...

Page 7: ...klich geeignet ist Mit dem richtigen Elektrowerkzeug lassen sich dieArbeiten besser und sicherer in dem Tempo ausführen für das es auch ausgelegt ist Üben Sie bei Schleifarbeiten nicht zu viel Druck auf die zu bearbeitende Oberfläche sondern lassen Sie den Exzenterschleifer die Arbeit verrichten Zu viel Druck kann sowohl bei dem Schleifgerät als auch bei der Schleifscheibe zu vorzeitigen Abnutzung...

Page 8: ...eiden Sie die unbeabsichtigte Inbetriebnahme des Geräts Tragen Sie den Exzenterschleifer deshalb nie mit dem Finger an der Einschalttaste Bei der Durchführung von Schleifarbeiten sollten Sie sich nicht zu weit über das Werkstück lehnen Achten Sie stets auf einen festen Stand und behalten Sie beide Füße auf dem Boden Auf diese Weise behalten Sie auch in unvorhergesehenen Situationen immer die Kontr...

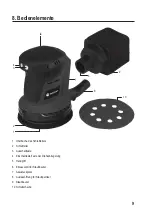
Page 9: ... 7 1 Oberfläche des Schleiftellers 2 Schleifteller 3 Ausschalttaste 4 Einschalttaste Taste der Drehzahlregelung 5 Handgriff 6 Einlassventil für Staubbeutel 7 Akkusteckplatz 8 Auslassöffnung für Staubpartikel 9 Staubbeutel 10 Schleifscheibe ...

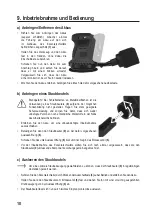
Page 10: ...hutzausrüstung und sorgen Sie dafür dass sich weder unbefugte Personen noch entzündliche Werkstoffe in der Nähe des Arbeitsbereichs befinden Entfernen Sie den Akku um eine unbeabsichtigte Inbetriebnahme auszuschließen Befestigen Sie dann den Staubbeutel 9 an der dafür vorgesehenen Auslassöffnung 8 Schieben Sie dazu die Auslassöffnung 8 bis zum Anschlag in das Einlassventil 6 Vor der Inbetriebnahme...

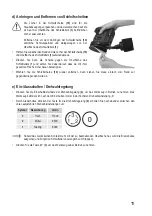
Page 11: ...che sicher daran befestigt ist Möchten Sie die Schleifscheibe 10 wieder entfernen dann ziehen Sie diese einfach vom Rand zur gegenüberliegenden Seite ab e Ein Ausschalten Drehzahlregelung Drücken Sie die Einschalttaste Taste der Drehzahlregelung 4 um das Werkzeug in Betrieb zu nehmen Das Werkzeug befindet sich nach dem Einschalten immer in der höchsten Drehzahleinstellung 3 Durch wiederholtes Drüc...

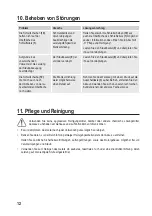
Page 12: ...von der zu bearbeitenden Oberfläche noch weiter Die Bremsvorrichtung weist möglicherweise einen Defekt auf Nehmen Sie das Werkzeug mit einem Druck auf die Ausschalttaste 3 außer Betrieb entfernen Sie den Akku und wenden Sie sich an unseren technischen Kundendienst oder anderes Fachpersonal 11 Pflege und Reinigung Verwenden Sie keine aggressiven Reinigungsmittel Alkohol oder andere chemische Lösung...

Page 13: ...formitätserklärung DOC Hiermit erklärt Conrad Electronic SE Klaus Conrad Straße 1 D 92240 Hirschau dass dieses Produkt den nachstehend aufgeführten Richtlinien entspricht 2006 42 EG 2014 30 EU 2011 65 EU Die Fertigung erfolgte unter Einhaltung der folgenden Normen EN 62841 1 2015 EN 62841 2 4 2014 EN 55014 2017 EN 55014 2 2015 Der vollständige Text der EU Konformitätserklärung ist unter der folgen...

Page 14: ...itrag zum Umweltschutz 15 Technische Daten Betriebsspannung 20 V Lithium Ionen Akku separat erhältlich Art Exzenterschleifer Motor Bürstenlos Drehzahleinstellungen ohne Last 6000 U min 8500 U min 11000 U min Schwingung 15 8 m s2 K 1 50 m s2 A bewerteter Emissions Schalldruckpegel LpA 80 5 dB A KpA 3 dB A A bewerteter Schallleistungspegel LWA 91 5 dB A KWA 3 dB A Schleifteller ø125 mm Umlauf ø2 5 m...

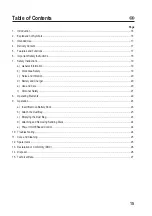
Page 15: ...rea Safety 19 c Noise and Vibration 20 d Battery and Charger 20 e Use and Care 20 f Personal Safety 21 8 Operating Elements 22 9 Operation 23 a Insert Remove Battery Pack 23 b Attach the Dust Bag 23 c Emptying the Dust Bag 23 d Attaching and Removing Sanding Discs 24 e Power On Off Speed Control 24 10 Troubleshooting 24 11 Care and Cleaning 25 12 Spare Items 25 13 Declaration of Conformity DOC 26 ...

Page 16: ...nstructions for reference If there are any technical questions please contact International www conrad com contact United Kingdom www conrad electronic co uk contact 2 Explanation of Symbols The symbol with the lightning in the triangle is used if there is a risk to your health e g due to an electric shock The symbol with the exclamation mark in the triangle is used to indicate important informati...

Page 17: ... them in a safe place Make this product available to third parties only together with its operating instructions All company names and product names are trademarks of their respective owners All rights reserved 4 Delivery Content Sander Sanding disc 80 grit Dust bag Operating instructions Battery and charger sold separately see section 12 Spare Items 1Up to Date Operating Instructions Download the...

Page 18: ...not use dust bag and keep other persons and combustible material from work area Do not touch the moving sanding sheet Do not continue to use worn torn or heavily clogged sanding sheets Always wear a dust mask and safety goggles when using the sander Ventilate your work area adequately when you perform sanding operations Some materials contain chemicals which may be toxic Take caution to prevent du...

Page 19: ...is visibly damaged is no longer working properly has been stored for extended periods in poor ambient conditions or has been subjected to any serious transport related stresses Please handle the product carefully Jolts impacts or a fall even from a low height can damage the product Also observe the safety and operating instructions of any other products which are connected to the product Consult a...

Page 20: ...ttery and battery charger operating instructions for further information e Use and Care Do not force the power tool Use the correct power tool for your application The correct power tool will do the job better and safer at the rate for which it was designed Do not apply too much force when sanding let the sander do the work Too much force may prematurely wear out the sander and the pad Do not use ...

Page 21: ...ill reduce the risk of personal injury Avoid accidental starts Do not carry the sander with your finger over the power on button Do not reach out too far when sanding Keep your feet firmly on the ground at all times This will enable you retain control over the power tool in unexpected situations Dress safely Do not wear loose clothing or jewellery Keep your hair clothing and gloves away from the p...

Page 22: ...ing Elements 2 1 3 4 8 9 5 6 10 7 1 Pad surface 2 Oscillating plate 3 Power off button 4 Power on speed control 5 Palm grip 6 Dust bag inlet valve 7 Battery pack slot 8 Dust exhaust port 9 Dust bag 10 Sanding disc ...

Page 23: ...hen sanding metal as sparks can be generated Wear the appropriate safety gear andkeep other persons and combustible material away from the work area Remove the battery to prevent an accidental start Attach the dust bag 9 to the dust exhaust port 8 Gently press and rotate to insert all the way Make sure the dust bag 9 is properly attached before using the sander c Emptying the Dust Bag The dust bag...

Page 24: ...ol button 4 will cycle through speeds Icon Description RPM 3 High 11000 2 Medium 8500 1 Low 6000 The brake pad will engage and quickly stop the sanding pad when the unit is raised from the work area To turn the power off press the power off button O 3 10 Troubleshooting Problem Cause Suggestion Sanding discs 10 do not adhere to pad surface 1 Debris is reducing the effectiveness of the hook and loo...

Page 25: ...ousing free of dirt and dust as far as possible Wipe the equipment with a clean fibre free cloth or blow it with compressed air at low pressure 12 Spare Items Item No Description 1881809 Li ion rechargeable battery AP 1000 20 V 2 Ah 1881810 Li ion rechargeable battery AP 1100 20 V 4 Ah 1881811 20 V 2 3 A charger ALG 1000 for AP 1000 20 V 2 Ah 1881812 20 V 5 0 A charger ALG 1100 for AP 1100 20 V 4 ...

Page 26: ...f conformity www conrad com downloads Select a language by clicking on a flag symbol and enter the product order number in the search box You can then download the EU declaration of conformity in PDF format 14 Disposal Electronic devices are recyclable waste and must not be disposed of in the household waste At the end of its service life dispose of the product in accordance with applicable regula...

Page 27: ...pm 8500 rpm 11000 rpm Vibration 15 8 m s2 K 1 50 m s2 Weighted sound pressure level LpA 80 5 dB A KpA 3 dB A Weighted sound power level LwA 91 5 dB A KwA 3 dB A Base ø125 mm Orbit ø2 5 mm Pad brake yes Operating Storage conditions 0 to 40 C 0 85 RH non condensing Dimensions W x H x D 125 x 150 x 200 mm without dust bag Weight 900 g ...

Page 28: ...n Die Publikation entspricht dem technischen Stand bei Drucklegung Copyright 2019 by Conrad Electronic SE This is a publication by Conrad Electronic SE Klaus Conrad Str 1 D 92240 Hirschau www conrad com All rights including translation reserved Reproduction by any method e g photocopy microfilming or the capture in electronic data processing systems require the prior written approval by the editor...

Reviews: