background image

Form No. 3436-332 Rev A

48in, 54in, or 60in Recycler

®

Kit

Proline Commercial Walk-Behind Mower with Floating Cutting Unit

Model No. 140-1914

Model No. 140-1915

Model No. 140-1916

Installation Instructions

Installation

Loose Parts

Use the chart below to verify that all parts have been shipped.

Procedure

Description

Qty.

Use

Right baffle

1

Carriage bolt (5/16 x 3/4 inch)—48-inch
decks only

1

Carriage bolt (5/16 x 3/4 inch)—54-inch
decks only

2

Nut (5/16 inch)—48-inch and 60-inch
decks only

3

3

Nut (5/16 inch)—54-inch decks only

4

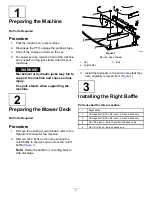
Install the right baffle.

Discharge chute cover

1

Bolt (3/8 x 1 inch)—48-inch decks only

3

Bolt (3/8 x 1 inch)—54-inch and 60-inch
decks only

2

Nut (3/8 inch)—48-inch and 54-inch
decks only

3

Nut (3/8 inch)—60-inch decks only

2

Nut (5/16 inch)—60-in decks only

1

Bolt (3/8 x 1-1/4 inches)—54-inch decks
only

1

4

Bolt (5/16 x 1-1/4 inches)—60-inch
decks only

1

Install the discharge chute cover.

Kicker baffle

2

5

Hex-washer-head bolt (5/16 x 3/4 inch)

4

Install the kicker baffles (48-inch decks
only).

Left baffle

1

Carriage bolt (5/16 x 3/4 inch)—48-inch,
54-inch, and 60-inch decks

1

Nut (5/16 inch)—48-inch decks only

3

6

Nut (5/16 inch)—54-inch and 60-inch
decks only

4

Install the left baffle.

Decal

1

7

Mulching blades

3

Install the decal and mulching blades.

© 2019—The Toro® Company
8111 Lyndale Avenue South
Bloomington, MN 55420

Register at www.Toro.com.

Original Instructions (EN)

Printed in the USA

All Rights Reserved

*3436-332* A


Summary of Contents for 140-1914

Page 1: ...3 8 x 1 inch 54 inch and 60 inch decks only 2 Nut 3 8 inch 48 inch and 54 inch decks only 3 Nut 3 8 inch 60 inch decks only 2 Nut 5 16 inch 60 in decks only 1 Bolt 3 8 x 1 1 4 inches 54 inch decks only 1 4 Bolt 5 16 x 1 1 4 inches 60 inch decks only 1 Install the discharge chute cover Kicker baffle 2 5 Hex washer head bolt 5 16 x 3 4 inch 4 Install the kicker baffles 48 inch decks only Left baffle...

Page 2: ...dure 1 Remove the existing mower blades refer to the Operator s Manual for the machine 2 Remove the 2 bolts and 2 nuts securing the cutoff baffle to the deck and remove the cutoff baffle Figure 1 Note Retain the baffle for converting back to side discharge g209902 Figure 1 54 inch deck shown 1 Nut 3 Bolt 2 Cutoff baffle 3 Install the fasteners in the same holes that they were originally removed fr...

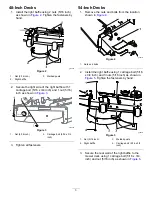
Page 3: ...Carriage bolt 5 16 x 3 4 inch 3 Tighten all fasteners 54 Inch Decks 1 Remove the nuts and bolts from the location shown in Figure 4 g308772 Figure 4 1 Nuts and bolts 2 Install the right baffle using 1 carriage bolt 5 16 x 3 4 inch and 3 nuts 5 16 inch as shown in Figure 5 Tighten the fasteners by hand g209901 Figure 5 1 Nut 5 16 inch 3 Welded posts 2 Right baffle 4 Carriage bolt 5 16 x 3 4 inch 3 ...

Page 4: ...ers by hand g219326 Figure 8 1 Nut 5 16 inch 3 3 Welded post 3 2 Right baffle 3 Tighten the fasteners by hand 4 Installing the Discharge Chute Cover Parts needed for this procedure 1 Discharge chute cover 3 Bolt 3 8 x 1 inch 48 inch decks only 2 Bolt 3 8 x 1 inch 54 inch and 60 inch decks only 3 Nut 3 8 inch 48 inch and 54 inch decks only 2 Nut 3 8 inch 60 inch decks only 1 Nut 5 16 inch 60 in dec...

Page 5: ...s Install the discharge chute cover using 1 bolt 3 8 x 1 1 4 inches 2 bolts 3 8 x 1 inch and 3 nuts 3 8 inch as shown in Figure 11 g307460 Figure 11 1 Bolt 3 8 x 1 1 4 inches 3 Bolts 3 8 x 1 inch 2 Nuts 3 8 inch 60 inch Decks Install the discharge chute cover using 1 carriage bolt 5 16 x 1 1 4 inches 1 nut 5 16 inch 2 bolts 3 8 x 1 inch and 2 nuts 3 8 inch as shown in Figure 12 g308758 Figure 12 1...

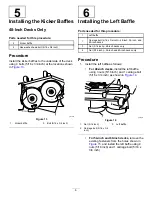
Page 6: ...Left baffle 1 Carriage bolt 5 16 x 3 4 inch 48 inch 54 inch and 60 inch decks 3 Nut 5 16 inch 48 inch decks only 4 Nut 5 16 inch 54 inch and 60 inch decks only Procedure 1 Install the left baffle as follows For 48 inch decks install the left baffle using 3 nuts 5 16 inch and 1 carriage bolt 5 16 x 3 4 inch as shown in Figure 14 g012841 Figure 14 1 Nut 5 16 inch 3 Left baffle 2 Carriage bolt 5 16 x...

Page 7: ...ighten all fasteners 7 Installing the Decal and Mulching Blades Parts needed for this procedure 1 Decal 3 Mulching blades Procedure 1 Install the decal to the mower deck in the location shown in Figure 16 g209974 Figure 16 1 30 mm 1 19 inches 2 17 mm 0 65 inches 2 Install the mulching blades on machine refer to the Operator s Manual for the machine 7 ...

Page 8: ...tting height mow more often in early spring As the grass growth rate slows in mid summer mow less frequently If you cannot mow for an extended period first mow at a high cutting height then mow again 2 days later at a lower height setting Using a Slower Cutting Speed To improve cut quality use a slower ground speed in certain conditions Avoiding Cutting Too Low When mowing uneven turf raise the cu...

Reviews: