background image

Form No. 3358-435 Rev B

Power Clear™ Snowthrower

Model No. 38585—Serial No. 280000001 and Up

Model No. 38586—Serial No. 280000001 and Up

Operator's Manual

Introduction

Read this information carefully to learn how to operate
and maintain your product properly and to avoid injury
and product damage. You are responsible for operating
the product properly and safely.

You may contact Toro directly at www.Toro.com for
product and accessory information, help finding a
dealer, or to register your product.

Whenever you need service, genuine Toro parts, or
additional information, contact an Authorized Service
Dealer or Toro Customer Service and have the model
and serial numbers of your product ready. Figure 1
identifies the location of the model and serial numbers
on the product. Write the numbers in the space
provided.

Figure 1

1.

Model and serial number location

Model No.

Serial No.

This manual identifies potential hazards and has
safety messages identified by the safety alert symbol
(Figure 2), which signals a hazard that may cause serious
injury or death if you do not follow the recommended
precautions.

Figure 2

1.

Safety alert symbol

This manual uses 2 words to highlight information.

Important

calls attention to special mechanical

information and

Note

emphasizes general information

worthy of special attention.

Warning

CALIFORNIA

Proposition 65 Warning

The engine exhaust from this product

contains chemicals known to the State of

California to cause cancer, birth defects,

or other reproductive harm.

This spark ignition system complies with Canadian
ICES-002.

The enclosed

Engine Owner’s Manual

is supplied

for information regarding the US Environmental
Protection Agency (EPA) and the California
Emission Control Regulation of emission systems,
maintenance, and warranty. Replacements may be
ordered through the engine manufacturer.

Safety

This snowthrower meets or exceeds the B71.3
specifications of the American National Standards
Institute in effect at the time of production.

Read and understand the contents of this manual
before you start the engine.

This is the safety alert symbol. It is used to alert

you to potential personal injury hazards. Obey all
safety messages that follow this symbol to avoid
possible injury or death.

Improperly using or maintaining this snowthrower
could result in injury or death. To reduce this

© 2008—The Toro® Company
8111 Lyndale Avenue South
Bloomington, MN 55420

Register at www.Toro.com.

Original Instructions (EN)

Printed in the USA

All Rights Reserved

Summary of Contents for Power Clear 38585

Page 1: ... uses 2 words to highlight information Important calls attention to special mechanical information and Note emphasizes general information worthy of special attention Warning CALIFORNIA Proposition 65 Warning The engine exhaust from this product contains chemicals known to the State of California to cause cancer birth defects or other reproductive harm This spark ignition system complies with Cana...

Page 2: ...wipe up spilled fuel If fuel is spilled on clothing change clothing immediately Use extension cords and receptacles as specified by the manufacturer for all units with electric starting motors Do not attempt to clear snow from a gravel or crushed rock surface This product is intended for use only on paved surfaces Never attempt to make any adjustments while the engine is running except when specif...

Page 3: ...owing list contains safety information specific to Toro products or other safety information that you must know Rotating rotor blades can injure fingers or hands Stay behind the handles and away from the discharge opening while operating the snowthrower Keep your face hands feet and any other part of your body or clothing away from moving or rotating parts Before adjusting cleaning repairing and i...

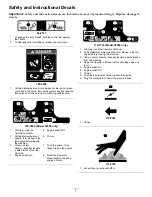
Page 4: ...ard rotor blades stop the engine before leaving the machine 6 Primer 3 Thrown object hazard keep bystanders a safe distance from the machine 7 Push the primer three times to prime the engine 4 Engine switch On 8 Read the Operator s Manual before checking engine oil level 114 3753 Model 38586 only 1 Warning read the Operator s Manual 2 Cutting dismemberment hazard rotor blades stop the engine befor...

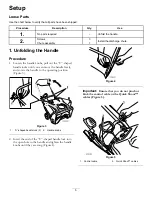
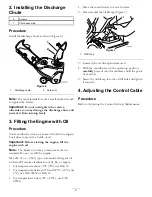
Page 5: ...ll out the U shaped handle locks until you can move the handle freely and rotate the handle to the operating position Figure 3 Figure 3 1 U shaped handle lock 2 2 Handle knobs 2 Insert the end of the U shaped handle lock into the open hole in the handle and tighten the handle knobs until they are snug Figure 4 Figure 4 Important Ensure that you do not pinch or kink the control cable or the Quick S...

Page 6: ...f oil may contain more than is required Do not overfill the engine Max fill 21 oz 0 62 l type automotive detergent oil with an API service classification of SJ SL or higher For temperatures above 32 F 0 C use SAE 30 For temperatures between 0 F and 32 F 18 C and 0 C use SAE 5W30 or SAE 10 For temperatures below 0 F 18 C use SAE 0W30 1 Move the snowthrower to a level surface 2 Clean around the oil ...

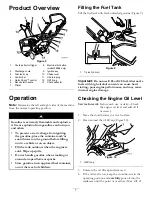
Page 7: ...gine is cold Wipe up spills Do not handle gasoline when smoking or around an open flame or sparks Store gasoline in an approved fuel container out of the reach of children Filling the Fuel Tank Fill the fuel tank with fresh unleaded gasoline Figure 9 Figure 9 1 1 4 inch 6 mm Important Do not use E85 or E20 fuel Alternative fuels with high alcohol content can cause hard starting poor engine perform...

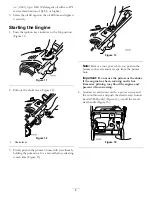
Page 8: ...3 times with your thumb holding the primer in a for a second before releasing it each time Figure 13 Figure 13 Note Remove your glove when you push in the primer so that air cannot escape from the primer hole Important Do not use the primer or the choke if the engine has been running and is hot Excessive priming may flood the engine and prevent it from starting 4 Connect an extension cord to a pow...

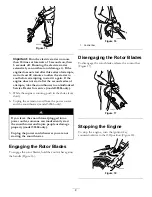
Page 9: ...running push in the choke lever slowly 6 Unplug the extension cord from the power source and the snowthrower model 38586 only If you leave the snowthrower plugged into a power outlet someone can inadvertently start the snowthrower and injure people or damage property model 38586 only Unplug the power cord whenever you are not starting the snowthrower Engaging the Rotor Blades To engage the rotor b...

Page 10: ...om any ice buildup With the ignition key in the Off position pull the recoil starter handle several times or push the electric start button once model 38586 only to prevent the recoil and electric starters from freezing up In snowy and cold conditions some controls and moving parts may freeze Do not use excessive force when trying to operate frozen controls If you have difficulty operating any con...

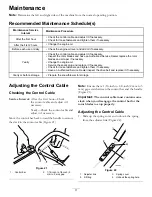
Page 11: ... Have an Authorized Service Dealer inspect the drive belt and replace it if necessary Yearly or before storage Prepare the snowthrower for storage Adjusting the Control Cable Checking the Control Cable Service Interval After the first hour Check the control cable and adjust it if necessary Yearly Check the control cable and adjust it if necessary Move the control bar back toward the handle to remo...

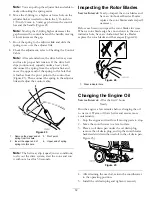
Page 12: ...sert the upper end of spring into this hole 4 Upper end of spring Note The belt may slip squeal in wet conditions to dry out the drive system start the rotor and run it without a load for 30 seconds Inspecting the Rotor Blades Service Interval Yearly Inspect the rotor blades and have an Authorized Service Dealer replace the rotor blades and scraper if necessary Before each session inspect the roto...

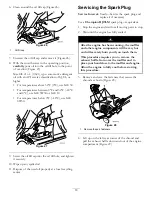
Page 13: ...roperly at a local recycling center Servicing the Spark Plug Service Interval Yearly Service the spark plug and replace it if necessary Use a Champion RJ19LM spark plug or equivalent 1 Stop the engine and wait for all moving parts to stop 2 Wait until the engine has fully cooled After the engine has been running the muffler and other engine components will be very hot and will severely burn you if...

Page 14: ...Set the gap on the plug to 0 030 inch 0 76 mm Figure 31 Figure 31 1 Center electrode insulator 3 Air gap not to scale 2 Side electrode 9 Install the spark plug and tighten the plug securely 10 Connect the wire to the spark plug 11 Tip the snowthrower forward onto its front to make installing the exhaust baffle easier Figure 32 Figure 32 12 From the rear left position insert the exhaust baffle up i...

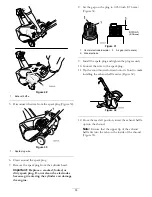
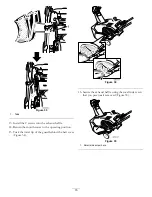
Page 15: ...fle 14 Return the snowthrower to the operating position 15 Tuck the lower lip of the guard behind the belt cover Figure 34 Figure 34 16 Secure the exhaust baffle using the small side screw that you previously removed Figure 35 Figure 35 1 Small side screw here 15 ...

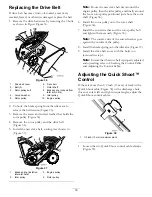
Page 16: ...ute the new drive belt first around the engine pulley then the idler pulley and finally around the loose rotor pulley positioned just above the rotor shaft Figure 36 6 Install the rotor pulley onto the rotor shaft Figure 36 7 Install the curved washer and the rotor pulley bolt and tighten them securely Figure 36 Note The concave side of the curved washer goes against the outside of the pulley 8 In...

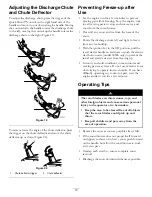
Page 17: ...the discharge chute aligns with the arrow on the shroud Figure 41 Figure 41 4 Hold the discharge chute in the straight ahead position pull the lower cable casing downward until you remove the slack in the cable and tighten the screw on the lower cable clamp securely Figure 42 Figure 42 1 Lower cable casing 5 Pull the upper cable casing forward until you remove the slack in the cable and tighten th...

Page 18: ...ol and siphon the fuel tank or run the engine until it stops 4 Start the engine and run it until it stops 5 Choke or prime the engine start it a third time and run the engine until it will not start 6 Dispose of unused fuel properly Recycle it according to local codes or use it in your automobile Note Do not store stabilized gasoline for more than 90 days 7 While the engine is still warm change th...

Page 19: ...en any loose fasteners Repair or replace any damaged parts 15 Cover the snowthrower and store it in a clean dry place out of the reach of children Allow the engine to cool before storing it in any enclosure 19 ...

Page 20: ...s such as filters fuel lubri cants oil changes spark plugs cable linkage adjustments or brake and clutch adjustments Any product or part which has been altered or misused or required replacement or repair due to accidents or lack of proper maintenance Repairs necessary due to electrical supply irregularities Pickup and delivery charges Operational misuse neglect or accidents Repairs or attempted r...

Reviews: