background image

Start

Online Manual

e-STUDIO202S

Summary of Contents for E-STUDIO202S

Page 1: ...Start Online Manual e STUDIO202S ...

Page 2: ...Appear 25 Failed to Install the Driver Windows 2000 XP 26 Faint Uneven or Smeared Print Output 27 Characters or Graphics are not Printed in Correct Position 28 Nothing Prints 29 Poor Scanning Result 30 The Scanned Image is Incorrectly Positioned 31 Unable to Scan the Image 32 Uninstalling the Software 33 Printer Driver Features 34 1 How to Use the Online Manual 2 Print 3 Scan 4 Troubleshooting 5 P...

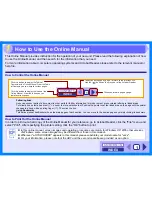
Page 3: ...cking its bookmark How to Print Out the Online Manual In order to print out a hard copy of the Online Manual for your reference go to Acrobat Reader click the File menu and select Print After specifying the printer setting click the OK button to print Note zIn this online manual screen images and operating procedures are mainly for Windows XP With other versions of Windows some screen images may b...

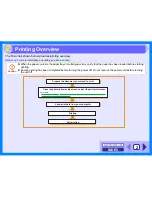
Page 4: ...tarting printing zEnsure printing has been completed before turning the power off Do not remove the power cord before turning the unit off Prepare the document you intend to print Send print data from your computer Printing Exit printing Open the printer driver setup screen and set the print preferences Reference Printer Driver Settings Printing a Watermark Fitting the Printed Image to the Paper P...

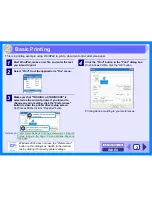
Page 5: ...es button to open the printer driver setup screen On Windows 98 Me click the Properties button Reference Printer Driver Settings Printing a Watermark Fitting the Printed Image to the Paper Printing Multiple Pages on One Page 4 Click the Print button in the Print dialog box On Windows 98 Me click the OK button Printing starts according to your preferences Note Windows 2000 does not have the Prefere...

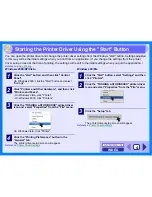
Page 6: ...ect Settings 2 Click Printers and Other Hardware and then click Printers and Faxes On Windows Vista click Printer On Windows 2000 click Printers 3 Click the TOSHIBA e STUDIOXXXX printer driver icon and select Properties from the File menu On Windows Vista click Printer 4 Click the Printing Preferences button in the General tab The printer driver setup screen will appear Reference Printer Driver Se...

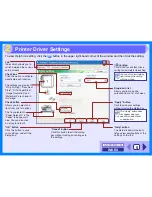
Page 7: ...ermark are shown in this image The tray selected in Paper Selection in the Paper tab appears in blue You can also click on a tray to select it Cancel button Click this button to exit the dialog box without making any changes to the settings Apply button Click to save your settings without closing the dialog box Help button The Help window will open to let you view explanations of the settings on t...

Page 8: ...ab Reference See Basic Printing for details on how to open the printer driver How to Print a Watermark From the Watermark drop down list select the watermark for example CONFIDENTIAL you wish to print on your document and start printing For details on watermark settings view printer driver Help Reference Printer Driver Settings Print sample Printing a Watermark ...

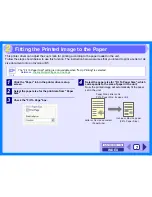
Page 9: ... paper size for the print data from Paper Size 3 Check the Fit To Page box 4 Select the paper size for Fit To Paper Size which corresponds to the size of paper in the unit Now the printed image will automatically fit the paper set in the unit Note The Fit To Paper Size setting is not available when N Up Printing is selected Reference Printing Multiple Pages on One Page Paper Size Letter or A4 Fit ...

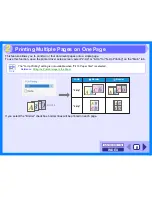
Page 10: ...er setup screen select 2 Up or 4 Up for N Up Printing on the Main tab If you select the Border checkbox border lines will be printed on each page Note The N Up Printing setting is not available when Fit To Paper Size is selected Reference Fitting the Printed Image to the Paper 2 Up 4 Up Border Border N Up Printing Multiple Pages on One Page ...

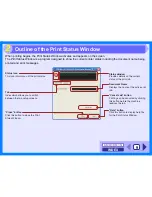
Page 11: ...ent status of the print job Document Name Displays the name of the active print job Help button Click this button to display help file for the Print Status Window Status icon This icon informs you of the print status Tab Index which allows you to switch between the two setup screens Cancel Job button Printing can be canceled by clicking this button before the machine receives the job Close button ...

Page 12: ...t all scanner functions are available using Button Manager Place the original in the scanning position Reference For more detail refer to the ORIGINAL PLACEMENT in the Operation Manual Start up the Scanner and Camera Wizard from Control Panel in your computer Start up a Twain compliant or WIA compliant application and select the unit s scanner driver Change the unit to scanner mode and select scan...

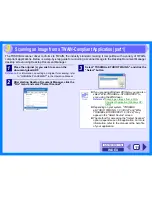
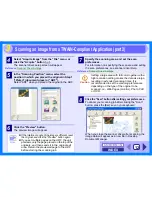
Page 13: ...ting Desktop Document Manager click the File menu and select Select Scanner 3 Select TOSHIBA e STUDIO TWAIN S and click the Select button Note zIf you are using Windows XP Vista you can also select WIA TOSHIBA e STUDIOXXXX to scan using the WIA driver Reference Scanning an Image from a WIA Compliant Application Windows XP Vista zDepending on your system TOSHIBA e STUDIO TWAIN S 1 0 32 32 and WIA T...

Page 14: ...ng job after clicking the Scan button press the Esc key on your keyboard When you close the scanner driver after scanning the image data will appear as a new file in Desktop Document Manager Note zIf the rotation or angle of the image is different reset the original and click the Preview button again zIf you set multiple pages on the ADF the unit previews only the page placed on the top of the ori...

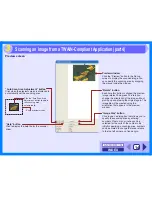
Page 15: ...tton Previews the document Scan button Click to scan an original or image according to your preferences Before clicking the Scan button check if your preferences are set correctly Select ADF when you placed the original in the ADF Scanning Mode menu Switch the scanning mode between the Preset and Custom Settings screen For details on each of these settings click the Help button to display Help Not...

Page 16: ...ly Entire preview screen Rotate button Each time this button is clicked the preview image rotates 90 degrees This lets you change the orientation of the image without picking up and placing the original again The image file will be created using the orientation that appears in the preview window Image Size button Click to open a dialog box that allows you to specify the scanning area by entering n...

Page 17: ... Reference For information on setting an original for scanning refer to ORIGINAL PLACEMENT in the Operation Manual 2 After starting Paint click the File menu and select From Scanner or Camera The scan screen of the WIA driver will appear Note If you have WIA drivers for other devices installed in your computer the Select Device screen will open Select TOSHIBA e STUDIOXXXX and click the OK button T...

Page 18: ...lder for the scanned image and save the image To cancel your scanning job after clicking the Scan button click the Cancel button Note zIf you select Document Feeder for the Paper source and click the Preview button the top original in the ADF is previewed The previewed original is sent to the original exit area and the following original stops in the ADF To eject the original press C clear key and...

Page 19: ...nt glass ADF Reference For information on setting an original for scanning refer to ORIGINAL PLACEMENT in the Operation Manual 2 Click the start button click Control Panel click Printers and Other Hardware and then click Scanners and Cameras 3 Click the TOSHIBA e STUDIOXXXX icon and then click Get pictures in Imaging Tasks The Scanner and Camera Wizard will appear 4 Click the Next button Scanning ...

Page 20: ...at and folder for saving the image and then click the Next button JPG BMP TIF or PNG can be selected for the format To begin scanning click the Next button Note zIf you select Document Feeder for the Paper source and click the Preview button the top original in the ADF is previewed The previewed original is sent to the original exit area so you will need to return it to the ADF before starting the...

Page 21: ...rm and then click the Next button If you are ready to end the session click Nothing I m finished working with these pictures 8 Click the Finish button The Scanner and Camera Wizard closes and the scanned image is saved in the specified folder Scanning an Image from the Scanner and Camera Wizard Windows XP part 3 ...

Page 22: ...s Refer to Button Manager Settings to specify and change the scan menu options Tab Click to set scan menu options Show TWAIN setting screen when scanning You can select whether or not the TWAIN screen is shown When the checkbox is selected the TWAIN screen appears when scanning is executed to let you adjust the scanning conditions Application Selection area Select the start up application here Hel...

Page 23: ... Mode Edge and other scan settings in the Scan Setup area Reference Outline of Button Manager 6 Click the OK button You have completed the settings Note If the Button Manager icon does not appear on the task bar click the start button select All Programs Programs on Windows 98 Me 2000 select TOSHIBA Button Manager S and then click Button Manager to start Button Manager Note zWhen the Show TWAIN se...

Page 24: ...t is making copies Check Your Computer Plug and Play Screen does not Appear Failed to Install the Driver Windows 2000 XP Check the Connection between the Unit and Computer A 1 2 B What type of trouble do you have Printing trouble Scanning trouble B A Faint Uneven or Smeared Print Output Characters or Graphics are not Printed in Correct Position Nothing Prints Uninstalling the Software Printing tro...

Page 25: ...ce See INSTALLING THE SOFTWARE in the Operation Manual for more details on interface connection CHECK 3 Are any other USB peripherals being connected along with the unit If other USB peripherals are connected through the same hub disconnect them to see if the problem still exists If the USB cable becomes disconnected If the USB cable becomes disconnected even only once during the unit s operation ...

Page 26: ...is insufficient memory close unnecessary applications to increase memory available for printing or scanning If you are still unable to print or scan install more memory into your computer CHECK 2 Is your hard disk fragmented When data is frequently stored deleted the hard disk may become fragmented causing a reduction in printing or scanning speed In this case it is recommended to defragment your ...

Page 27: ...tinue On Windows 2000 double click the System icon click the Hardware tab and click the Device Manager button On Windows 98 Me double click the System icon and click the Device Manager tab Universal Serial Bus controllers will appear in the list of devices 3 Click the icon beside the Universal Serial Bus controllers Two items will display your Controller chipset type and Root Hub If these items ap...

Page 28: ...and then click System On Windows 2000 double click the System icon 3 Click the Hardware tab and then click the Driver Signing button The following dialog box will open 4 Check the What action do you want Windows to take File signature verification on Windows 2000 If the option Block has been selected for your computer then the driver will not be installable Select the option Warn and then install ...

Page 29: ...tor lights up the developer should be replaced DEVELOPER REPLACEMENT SHOULD ONLY BE DONE BY AN AUTHORIZED TOSHIBA SERVICE TECHNICIAN Contact your authorized service representative as soon as possible CHECK 5 Is it near time to replace the toner cartridge When it is near time to replace the toner cartridge the toner cartridge replacement required indicator will light up on the unit operation panel ...

Page 30: ...mage Orientation option is set to your requirements CHECK 3 Is the paper loaded correctly If a document is physically damaged when it is output or the image is skewed on the paper discard the damaged sheet reinsert the paper supply and print again Insert the paper so that there is no visible space between the paper and the paper guides Reference See LOADING PAPER in the Operation Manual for more d...

Page 31: ...he unit ready for scanning or printing CHECK 3 Is your unit selected correctly in the current application for the print job When choosing Print from the File menu located in applications be sure you have selected TOSHIBA e STUDIOXXXX printer displayed in the Print dialog box CHECK 4 Has the printer driver been installed properly Check if the printer driver has been installed following the steps li...

Page 32: ...compliant application and are using Mono 2 gradation no Green Mono 2 gradation no Red or Mono 2 gradation no Blue mode make sure that a suitable value is specified for the B W Threshold setting A larger threshold value makes your output darker whilst a small threshold value makes it lighter To adjust the threshold automatically click the Auto Threshold button on the Image tab of the Custom Setting...

Page 33: ...for the detail on how to set the original CHECK 2 Have you set the original correctly on the document glass Place the original on the document glass in the direction as shown in the illustration below CHECK 3 Have you set the original correctly on the ADF To scan from the ADF align the guide to the original as shown in the illustration below Align the center of the original with mark Align the gui...

Page 34: ...ere enough computer memory Your computer may not have enough available memory to hold the document you want to scan Lower the scan resolution CHECK 5 Has the specified period of program timeout already elapsed Neither printing nor scanning jobs can be sent to the unit from your computer during the specified period of program timeout after copying To send a scanning job immediately press the clear ...

Page 35: ... click Control Panel 2 Click Add or Remove Programs On Windows 98 Me 2000 double click the Add Remove Programs icon The following dialog box will open Delete the TOSHIBA e STUDIOXXXX Series MFP driver and the TOSHIBA Button Manager S from the list of applications For more information refer to your operating manual or to the help files for your operating system 3 Restart your computer The deletion ...

Page 36: ...ttings Factory Defaults User Settings Setting Name Up to seven names 20 characters each Paper Paper Size Ledger Fit To Page 1 Letter Legal Executive Invoice Foolscap Folio A3 Fit To Page 1 A4 A5 A6 B4 Fit To Page 1 B5 COM10 Monarch DL C5 8K Fit To Page 1 16K Custom Paper Letter 2 Fit To Page On Off Off Image Orientation Portrait Landscape Rotate 180 degrees Portrait Paper Source Tray 1 Tray 2 Peri...

Page 37: ...oto Normal 2 Gradation Print On Off Off Image Adjustment Brightness 0 to 100 50 Contrast 0 to 100 50 Watermarks Watermark None TOP SECRET CONFIDENTIAL DRAFT ORIGINAL COPY None Text Size 6 to 300 200 Angle 90 to 90 45 Gray Scale 0 to 255 192 On First Page Only On Off Off Printer Driver Features part 2 ...

Page 38: ...driver 13 WIA driver 16 Preview Screen 14 Print 2 Print Status Window 9 Printer Driver Features 34 Printer Driver Settings 5 Printing a Watermark 6 Printing Overview 2 S Scan 10 Scan button TWAIN driver 13 WIA driver 16 Scan Setup 20 Scanner and Camera Wizard 10 Scanning an Image Scanner and Camera Wizard 17 TWAIN driver 11 WIA driver 15 Scanning Mode 13 Scanning Overview 10 Scanning Position 12 S...

Page 39: ...R080520F8700 TTEC OME08009400 ...

Reviews: