background image

RG 5.375 x 8.375 ver 2.3.3

Tecra

®

 M5 Series 

Resource Guide

Keep this guide in a convenient place to access important 
information about your computer.

If you need assistance:

Toshiba’s Support Web site
pcsupport.toshiba.com

Toshiba Global Support Centre
Calling within the United States (800) 457-7777
Calling from outside the United States (949) 859-4273 

Please fill in for your reference and future use:

Model name______________________________________

Part number______________________________________

Serial number____________________________________

Summary of Contents for Tecra M5 Series

Page 1: ...shiba s Support Web site pcsupport toshiba com Toshiba Global Support Centre Calling within the United States 800 457 7777 Calling from outside the United States 949 859 4273 Please fill in for your reference and future use Model name______________________________________ Part number______________________________________ Serial number____________________________________ ...

Page 2: ...serting a PC Card 30 Removing a PC Card 31 Learning the basics 31 Using the Toshiba Dual Pointing Device 32 Using the TouchPad 32 Using the optical drive 33 Moving the computer 36 Mobile computing 36 Taking care of your battery 40 If something goes wrong 43 If you need further assistance 46 Power cord cable connectors 47 Features and specifications 47 Index 48 ...

Page 3: ...R DAMAGE TO OR LOSS OF ANY BUSINESS PROFITS PROGRAMS DATA NETWORK SYSTEMS OR REMOVABLE STORAGE MEDIA ARISING OUT OF OR RESULTING FROM THE USE OF THE PRODUCT EVEN IF ADVISED OF THE POSSIBILITY THEREOF Protection of Stored Data For your important data please make periodic back up copies of all the data stored on the hard disk or other storage devices as a precaution against possible failures alterat...

Page 4: ... GmbH Hammfelddamm 8 41460 Neuss Germany VCCI Class B Information Modem Warning Notice Conformity Statement The equipment has been approved to Commission Decision CTR 21 for pan European single terminal connection to the Public Switched Telephone Network PSTN However due to differences between the individual PSTNs provided in different countries regions the approval does not of itself give an unco...

Page 5: ...nery any company trader or user shall not change the frequency increase the power or change the features and functions of the original design Article 17 Any use of low power radio frequency electric machinery shall not affect aviation safety and interfere with legal communications In the event interference is caused the use of such electric machinery shall be immediately discontinued Operation of ...

Page 6: ...usiness Law of Japan The Name of the radio equipment refer to the equipment label provided on the computer JAPAN APPROVALS INSTITUTE FOR TELECOMMUNICATIONS EQUIPMENT Approval Number D01 1128JP TELECOM ENGINEERING CENTER Approval Number 03NY A0018 03GZDA0017 The following restrictions apply Do not disassemble or modify the device Do not install the embedded wireless module into other device 5 17 GH...

Page 7: ...le cas d une utilisation privée à l extérieur d un bâtiment au dessus d un espace public aucun enregistrement n est nécessaire pour une distance de moins de 300m Pour une distance supérieure à 300m un enregistrement auprès de l IBPT est requise Pour les enregistrements et licences veuillez contacter l IBPT Deutschland License required for outdoor installations Check with reseller for procedure to ...

Page 8: ...re is not allowed for operation in any European Community country Nederland License required for outdoor installations Check with reseller for procedure to follow Licentie verplicht voor gebruik met buitenantennes Neem contact op met verkoper voor juiste procedure Australia Austria Belgium Canada Denmark Finland France Germany Greece Ireland Italy Liechtenstein Luxembourg Netherlands New Zealand N...

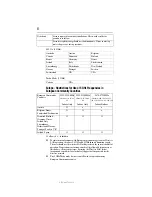
Page 9: ...consult with the local technical support staff responsible for the wireless network to ensure the Access Point device s are properly configured for European Community operation Approved Countries Regions for use for the Atheros AR5001X Mini PCI Wireless Network Adapter This equipment is approved to the radio standard by the countries regions in the following table Do not use this equipment except ...

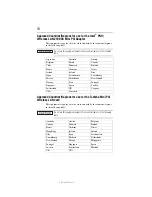
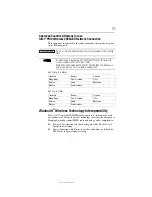
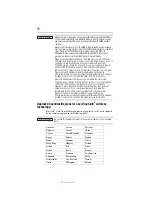
Page 10: ...e countries regions in the following table Do not use this equipment except in the countries regions in the following table Argentina Australia Austria Belgium Brazil Canada Chile Denmark Finland France Germany Greece Iceland Ireland Italy Japan Liechtenstein Luxembourg Mexico Netherlands New Zealand Norway Peru Portugal Singapore Spain Sweden Switzerland UK Uruguay USA Venezuela Australia Austria...

Page 11: ...vailable in battery mode 802 11b g 2 4 GHz 802 11a 5 GHz Bluetooth Wireless Technology Interoperability Bluetooth Cards from TOSHIBA are designed to be interoperable with any product with Bluetooth wireless technology that is based on Frequency Hopping Spread Spectrum FHSS radio technology and is compliant to Bluetooth Specification as defined and approved by The Bluetooth Special Interest Group L...

Page 12: ...tp www toshiba europe com computers tnt bluetooth htm in Europe or pcsupport toshiba com in the United States for more information Bluetooth and Wireless LAN devices operate within the same radio frequency range and may interfere with one another If you use Bluetooth and Wireless LAN devices simultaneously you may occasionally experience a less than optimal network performance or even lose your ne...

Page 13: ...tuations or environments the use of Bluetooth wireless technology may be restricted by the proprietor of the building or responsible representatives of the organization These situations may for example include Using the equipment with Bluetooth wireless technology on board airplanes or In any other environment where the risk of interference to other devices or services is perceived or identified a...

Page 14: ...and medical radio emission electric machinery Using this Equipment in Japan In Japan the frequency bandwidth of 2 400 MHz to 2 483 5 MHz for second generation low power data communication systems such as this equipment overlaps that of mobile object identification systems premises radio station and specified low power radio station Article 14 Unless approved for any model accredited low power radi...

Page 15: ...ipulated in the Radio Law of Japan The Name of the radio equipment EYXF2CS TELECOM ENGINEERING CENTER Approval Number 01NYDA1305 The following restrictions apply Do not disassemble or modify the device Do not install the embedded wireless module into other device The frequency bandwidth of this equipment may operate within the same range as industrial devices scientific devices medical devices mic...

Page 16: ...thorized Toshiba service provider if any repair or adjustment is required Location of the Required Label Sample shown below Location of the label and manufacturing information may vary This appliance contains a laser system and is classified as a CLASS 1 LASER PRODUCT To use this model properly read the user s guide carefully and keep it for your future reference Never attempt to disassemble adjus...

Page 17: ...ulations is prohibited Notice The information contained in this manual including but not limited to any product specifications is subject to change without notice TOSHIBA CORPORATION AND TOSHIBA AMERICA INFORMATION SYSTEMS INC TOSHIBA PROVIDES NO WARRANTY WITH REGARD TO THIS MANUAL OR ANY OTHER INFORMATION CONTAINED HEREIN AND HEREBY EXPRESSLY DISCLAIMS ANY IMPLIED WARRANTIES OF MERCHANTABILITY OR...

Page 18: ...hPad is a trademark of Synaptics Inc Adobe and Photoshop are either registered trademarks or trademarks of Adobe Systems Incorporated in the United States and or other countries ExpressCard is a trademark of PCMCIA i LINK is a registered trademark of Sony Corporation Bluetooth word mark and logos are owned by the Bluetooth SIG Inc and any use of such marks by Toshiba is under license Other tradema...

Page 19: ...s to the most common problems For more detailed information descriptions of other features and more extensive troubleshooting guidelines see the electronic user s guide preinstalled on your system It is also available on the Web at pcsupport toshiba com Safety icons This guide contains safety instructions that must be observed to avoid potential hazards that could result in personal injuries damag...

Page 20: ...ay also contain guides for other programs that may come with your system For accessory information visit Toshiba s Web site at accessories toshiba com Setting up your computer and getting started The Toshiba Instruction Manual for Safety and Comfort that shipped with your computer contains helpful information for setting up your work environment and tips for working comfortably throughout the day ...

Page 21: ...thorized service center Computer base and palm rest can become hot Avoid prolonged contact to prevent heat injury to skin Read the enclosed Instruction Manual for Safety and Comfort Never place a heavy object on the computer and be careful not to drop a heavy object onto the computer It could damage the computer or cause system failure Your computer s features and specifications Certain notebook c...

Page 22: ... connection Failure to do so may result in a fire or electric shock possibly resulting in serious injury Be careful if you use a multiple connector An overload on one socket could cause a fire or electric shock possibly resulting in serious injury Always use the TOSHIBA AC adaptor that was provided with your computer and the TOSHIBA Battery Charger that may have been provided with your computer or...

Page 23: ...ifornia to cause birth defects or other reproductive harm Wash hands after handling 2 Plug the AC adaptor cord into the DC IN on the back of the computer Sample Illustration Connecting the AC adaptor cord to the computer 3 Connect the power cord cable to a live electrical outlet The AC power and battery lights on the indicator panel glow green Never attempt to connect or disconnect a power plug wi...

Page 24: ...utomatically recognize the printer the printer is then ready for use Refer to your printer documentation for further instructions TECHNICAL NOTE To determine if your printer supports Plug and Play check its documentation If your printer does not support Plug and Play you can set up the printer as described in Setting up a printer in the electronic user s guide To connect a printer to your computer...

Page 25: ...wdriver that is in good condition Installing a memory module with the computer s power on may damage the computer the module or both The computer has two memory slots Slot A and Slot B You can install one or two memory modules Before you install or remove a memory module turn off the computer using the Start menu If you install or remove a memory module while the computer is in Sleep or Hibernatio...

Page 26: ...crew that secures the memory module slot cover Sample Illustration Unscrewing the memory module slot cover 7 Remove the memory module slot cover 8 Place the screw and the cover in a safe place so that you can retrieve them later Static electricity can damage the memory module Before you handle the module touch a grounded metal surface to discharge any static electricity you may have built up Avoid...

Page 27: ...d on top of one another you must remove the top module before removing installing the bottom module 11 Pick up the memory module by its sides avoiding any contact with its connector Position the module toward the socket aligning the connector s notch with the matching key in the socket Sample Illustration Aligning the memory module with the socket 12 Firmly press the memory module into the memory ...

Page 28: ...eps 12 13 Sample Illustration Pressing down on the memory module Do not force the memory module into position The memory module should be completely inserted into the socket and level when secured in place Sample Illustration Inserting the memory module into the slot 14 Replace the memory module slot cover and secure it using the screw 15 Re insert the main battery For more information on insertin...

Page 29: ... the above cases the Sleep configuration will not be saved The following screen appears when you turn on the power If Start Windows Normally is highlighted then press Enter If one of the Safe Mode options is highlighted it is best to press Enter to go into Safe Mode then shut down and restart the system at which time Windows should boot back up normally When Safe Mode is suggested this could be a ...

Page 30: ...cteristic of the TFT manufacturing technology Over a period of time and depending on the usage of the computer the brightness of the screen will deteriorate This is also an intrinsic characteristic of the screen technology When the computer is operated on battery power the screen will dim and you may not be able to increase the brightness of the screen while on battery power Inserting a PC Card Be...

Page 31: ...ide it out of the slot Learning the basics Computing tips Save your work frequently Your work stays in the computer s temporary memory until you save it to the disk If the network you are using goes down and you must restart your computer to reconnect or your battery runs out of charge while you are working you will lose all work since you last saved HINT Some programs have an automatic save featu...

Page 32: ...the TouchPad The TouchPad the small smooth square cutout located in front of the keyboard is sensitive to touch and enables you to move the cursor with the stroke of a finger Simply move your finger on the TouchPad in the direction you would like to move the cursor To move the cursor to the top of the page push your finger forward on the TouchPad To move the cursor to the bottom of the page drag y...

Page 33: ...lly corresponds to the right mouse button right clicking Check your program s documentation to determine whether it uses the right mouse button Using the optical drive Optical storage has become the preferred medium for software music and video Digital versatile discs DVDs provide a significant increase in data storage and support features that are not available on any other video platform These f...

Page 34: ... to press the manual eject button located inside the hole Never use a pencil to press the manual eject button Pencil lead can break off inside the computer and damage it Inserting a compact disc Before putting on headphones to listen turn the volume down Do not set the volume too high when using the headphones Continuous exposure to loud sound can harm your hearing To insert a compact disc into th...

Page 35: ...rt the disc incorrectly it may jam the drive If this happens contact Toshiba support for assistance 9 Push the disc tray in by pressing gently on the center of the tray until it clicks into place You are ready to use the disc Removing a disc with the computer on To remove a disc CD or DVD with the computer turned on 1 Press the eject button on the drive Do not press the eject button while the in u...

Page 36: ...s are located Doing so could damage the system Mobile computing Your computer contains Toshiba EasyGuard The Toshiba EasyGuard technology is made up of four foundational elements that incorporate hardware and software innovations into various Toshiba notebooks that address the most common security reliability and connectivity issues faced by computer users EasyGuard Protect and Fix to fortify vita...

Page 37: ... necessary to let the battery fully discharge each time However for better accuracy of the battery meter it is helpful to fully discharge the battery periodically Please see Maintaining your battery on page 41 for procedures If the computer is continuously operated on AC power either through an AC adaptor or a port replicator if applicable to your system for an extended period more than a month th...

Page 38: ...required for system operation and will allow the battery to recharge Setting battery notification Your computer can be configured to warn you when the battery is running low For more information see Setting battery notification in the electronic user s guide Changing the main battery When your main battery has run out of power you have two options plug in the AC adaptor or install a charged main b...

Page 39: ...on mode in the electronic user s guide 3 Unplug and remove any cables connected to the computer including the AC adaptor 4 Close the display panel and turn the computer upside down 5 Slide the battery release lock to the unlocked position Sample Illustration Unlocking the battery release lock 6 Slide the battery release latch to release the battery 7 Pull the discharged battery out of the computer...

Page 40: ... the battery into position 3 Slide the battery release lock to the locked position 4 Turn the computer right side up 5 Reconnect any cables that were removed in step 3 of Removing the battery from the computer on page 39 6 Restart the computer Taking care of your battery The following sections offer tips on how to take care of your battery and prolong its life Safety precautions If the battery pac...

Page 41: ...nd operate it on battery power until the battery pack fully discharges Before doing so follow the steps below 1 Turn off the computer s power 2 Disconnect the AC adaptor and turn on the computer s power If it does not turn on go to step 4 3 Operate the computer on battery power for five minutes If the battery pack has at least five minutes of operating time continue operating until the battery pac...

Page 42: ...serious injury Always use the battery pack supplied as an accessory or an equivalent battery pack specified in the User s Manual Other battery packs have different voltage and terminal polarities Use of non conforming battery packs could generate smoke or cause fire or rupture possibly resulting in serious injury After repeated use the batteries will finally lose their ability to hold a charge and...

Page 43: ...Windows Task Manager window appears 2 Click the Applications tab If a program has stopped responding the words not responding appear beside its name in the list 3 Select the program you want to close then click End Task Closing the failed program should allow you to continue working If it does not continue with the next step 4 Close the remaining programs one by one by selecting the program name t...

Page 44: ...er may be in Sleep mode and have a software or resource conflict When this happens turning the power on returns you to the problem instead of restarting the system To clear the condition press Ctrl Alt and Del simultaneously Then shut down the computer via software or follow the steps if your program stops responding see Problems that are easy to fix on page 43 Clearing the condition may get the c...

Page 45: ...tached Try adjusting the contrast and brightness controls on the external monitor Press Fn and F5 simultaneously to make sure the display priority is not set for the built in screen Small bright dots appear on your TFT display when you turn on your computer Small bright dots may appear on your screen display when you turn on your computer Your display contains an extremely large number of thin fil...

Page 46: ...ween the PCMCIA socket and another device in the system Use Device Manager to make sure each device has its own I O base address See Fixing a problem with device manager in the electronic user s guide for more information Since all PC Cards share the same socket each card is not required to have its own address If you need further assistance If you have followed the recommendations in this section...

Page 47: ...reloaded software on your choice of media Name and version of the program involved in the problem along with its installation media Information about what you were doing when the problem occurred Exact error messages and when they occurred For technical support call the Toshiba Global Support Centre Within the United States at 800 457 7777 Outside the United States at 949 859 4273 Powercord cablec...

Page 48: ...3 control buttons TouchPad 33 D DC IN 23 display problems screen is blank 47 Dual Mode Pad using 33 E eject button optical drive 36 F files backing up 32 saving 31 I inserting CD DVD 36 PC Cards 30 installing main battery 40 42 memory module 24 K keyboard unexpected characters 47 keyboard problems not working 46 L lights AC power 21 M main battery changing 40 installing 40 42 removing 41 memory mo...

Page 49: ...acting Toshiba 49 display is blank 47 external monitor 47 keyboard not responding 46 keyboard produces unexpected characters 47 PC Card checklist 48 PC Card slot appears dead 48 program not responding 45 R real time clock RTC battery 39 removing CD DVD with computer off 37 with computer on 37 main battery 41 memory module 29 PC Cards 31 S safety precautions 20 saving files 31 screen problems blank...

Page 50: ......

Page 51: ......

Page 52: ...GMA500385010 01 07 ...

Reviews: