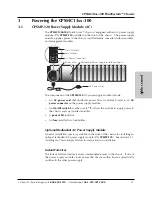
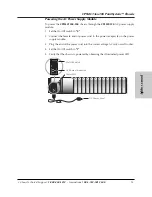
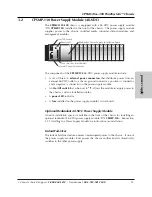
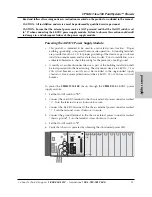
background image

Transition Networks

CPSMC13xx-100

13-Slot 

PointSystem™

Chassis

User’s Guide

Revision D

CPSMC1300-100
CPSMC1310-100
CPSMC1320-100

Summary of Contents for PointSystem CPSMC1300-100

Page 1: ...Transition Networks CPSMC13xx 100 13 Slot PointSystem Chassis User s Guide Revision D CPSMC1300 100 CPSMC1310 100 CPSMC1320 100 ...

Page 2: ...epartment of Communications Le présent appareil numérique n émet pas de bruits radioélectriques dépassant les limites applicables aux appareils numériques de la Class A prescrites dans le Règlement sur le brouillage radioélectrique édicté par le ministère des Communications du Canada European Regulations Warning This is a Class A product In a domestic environment this product may cause radio inter...

Page 3: ...le AC 12 3 2 CPSMP 130 Power Supply Module 48 VDC 14 3 3 CPSMP 140 Power Supply Module 24 VDC 16 3 4 Optional Dual Power Supply Modules 18 3 5 Power Supply Module Maintenance 19 3 5 1 Installing the Power Supply Module 19 3 5 2 Replacing the Power Supply Module 20 3 5 3 Replacing the Power Supply Fuse 21 4 CPSMC13xx 100 Chassis 23 4 1 Installing the CPSMC13xx 100 Chassis 23 4 1 1 Table Top Install...

Page 4: ...SNMP application such as Transition Networks FocalPoint management software installed at a remote Network Management Station NMS A remote Web browser A command line interface CLI at an attached terminal A command line interface CLI at a remote Telnet connection The management modules also make it possible to control up to eight 8 cascaded chassis fully populated with installed media converter slid...

Page 5: ...xx 100 13 Slot PointSystem chassis Item Part Number Redundant AC Power Supply 120 240 VAC CPSMP 120 optional Redundant 48 VDC Power Supply CPSMP 130 optional Redundant 24 VDC Power Supply CPSMP 140 optional Single Slot Master Management Module CPSMM 120 optional Dual Slot Master Management Module CPSMM 200 optional FocalPoint Software Disk 7223 included with the Master Management Modules Expansion...

Page 6: ...alculating the Power Consumption CAUTION Before installing the media converter refer to the power consumption data for each individual media converter provided in the user s guide shipped with each media converter The combined power consumption of all devices must not exceed the available power supply Failure to observe this caution could result in diminishing system reliability In other words the...

Page 7: ...is at the top of the module 3 Carefully slide the slide in module into the installation slot while aligning the module s circuit board with the installation guides NOTE Ensure that the slide in module is firmly seated inside the chassis 4 Push in and rotate the attached panel fastener screw clockwise to secure the slide in module to the chassis 5 Repeat steps 1 through 4 for any additional slide i...

Page 8: ...anel fastener screw is at the top 3 Carefully slide the replacement slide in module into the installation slot while aligning the module s circuit board with the installation guides NOTE Ensure that the slide in module is firmly seated inside the chassis 4 Rotate the attached panel fastener screw clockwise to secure the slide in module to the chassis CFMFF100 10BASE 2 CECF100 CFMFF100 0 50 Link Al...

Page 9: ...MM 120 Single Slot Master Management Module CPSMM 200 Dual Slot Master Management Module The optional CPSMM 200 Dual Slot Master Management Module can also be installed in the CPSMC13xx 100 chassis to enable network management This module has all of the features of the CPSMM 120 plus a pair of cascade ports which allow multiple PointSystem chassis to be connected Note also that this module require...

Page 10: ...installation slots at the far left position of the chassis 1b CPSMM 120 Single Slot Master Management Module OR CPSMM 210 Single Slot Expansion Management Module If chassis face plates are covering the installation slots remove the face plate from the one 1 installation slot at the far left position of the chassis 2 Align the management module with the chassis installation slot so that the panel f...

Page 11: ...the CPSMC13xx 100 chassis 1 Remove the management module to be replaced by loosening the panel fastener screw that secures the module to the chassis front Slide the module from the chassis 2 Align the replacement module with the installation slot so that the panel fastener screw is at the top 3 Carefully slide the replacement management module into the installation slot while aligning the module s...

Page 12: ... module to supply power to the chassis and any installed modules A power LED indicator An fuse installed in a fuse holder Optional Redundant AC Power Supply Module An extra installation space is available in the front of the chassis for installing an optional redundant AC power supply module P N CPSMP 120 See section 3 5 1 Installing the Power Supply Module for instructions on installation Instant...

Page 13: ...he CPSMP 120 AC power supply module 1 Set the On Off switch to 0 2 Connect the female end of power cord to the power receptacle on the power supply module 3 Plug the end of the power cord into the correct voltage AC rack or wall socket 4 Set the On Off switch to I 5 Verify that the chassis is powered by observing the illuminated power LED Power LED AC Power Connector On Off Switch AC Power Cord I ...

Page 14: ...lows the module to supply power to the chassis and any installed modules A power LED indicator A fuse installed on the power supply module s circuit board Optional Redundant 48 VDC Power Supply Module An extra installation space is available in the front of the chassis for installing an optional redundant 48 VDC power supply module P N CPSMP 130 See section 3 5 1 Installing the Power Supply Module...

Page 15: ...rior to installation use a voltmeter ohmmeter to check the wiring for the presence of earth ground A readily accessible disconnect device as part of the building installation shall be incorporated into the fixed wiring The disconnect device a 48 VDC 15 or 20A circuit breaker or switch must be included in the ungrounded supply conductor Overcurrent protection must be a 48 VDC 15 or 20A fuse or circ...

Page 16: ...lows the module to supply power to the chassis and any installed modules A power LED indicator A fuse installed on the power supply module s circuit board Optional Redundant 24 VDC Power Supply Module An extra installation space is available in the front of the chassis for installing an optional redundant 24 VDC power supply module P N CPSMP 140 See section 3 5 1 Installing the Power Supply Module...

Page 17: ... presence of earth ground A readily accessible disconnect device as part of the building installation shall be incorporated into the fixed wiring The disconnect device a 24 VDC 15 or 20A circuit breaker or switch must be included in the ungrounded supply conductor Overcurrent protection must be a 24 VDC 15 or 20A fuse or circuit breaker To power the CPSMC1320 100 chassis through the CPSMP 140 24 V...

Page 18: ...er supply However the CPSMC13xx 100 chassis can accommodate any combination of AC 48 VDC and 24 VDC power supplies See section 3 5 Power Supply Module Maintenance for instructions on installation Instant Fail Over The Instant Fail Over feature ensures uninterrupted power to the chassis If one of the power supply modules loses power the chassis mother board automatically switches to the other power...

Page 19: ...es the protective plate to the front of the chassis 2 Carefully slide the power supply module into the installation slot aligning the power supply module with the installation guides 3 Ensure that the power supply module is firmly seated inside the chassis If the power supply module does not fit flush against the frame remove the module and ensure that it is aligned with the installation guides be...

Page 20: ...ed from the external power source 2 Loosen the panel fastener screw that secures the power supply module to the chassis 3 Slide the power supply module from the chassis 4 Carefully slide the replacement power supply module into the installation slot aligning the power supply module with the installation guides 5 Ensure that the the power supply module is firmly seated against the back of the chass...

Page 21: ...rating Failure to observe this caution could result in equipment damage 1 Set the On Off switch on the power supply module to 0 2 Disconnect the power supply module from the external power source 3 From the inside edge of the power receptacle insert a small flat blade screwdriver into the groove on the front inside edge of the fuse holder and carefully pry the fuse holder from the power supply mod...

Page 22: ... that secures the module to the chassis 4 Slide the module from the chassis and place it on a flat surface 5 Remove the four 4 screws that secure the panel to the module see drawing below and remove the panel from module 6 The fuse is located inside the power supply module on the circuit board Remove the fuse from the fuse holder 7 Install a same size and rating replacement fuse in the fuse holder...

Page 23: ... If the chassis is installed in a closed or multi unit rack assembly the operating ambient temperature of the the rack environment may be greater than room ambient NOTE Reliable earthing of rack mounted equipment should be maintained Particular attention should be given to supply connections other than direct connections to the branch circuit e g use of power strips The chassis is designed so that...

Page 24: ...osition against the side of the chassis so that the chassis installation holes are visible through the universal bracket installation holes 4 Using a Phillips screwdriver install the three 3 screws through the mounting bracket into the installation holes on side of the chassis 5 Repeat steps 3 and 4 for the second mounting bracket 6 Locate four 4 screws not provided and optional clip nuts not prov...

Page 25: ...ired torque to the fasteners is specified by the connector s manufacturer To properly ground the CPSMC13xx 100 chassis 1 Obtain one 1 properly terminated grounding conductor 12 AWG copper wire gauge or larger with a two hole compression type grounding connector Note the manufacturer s applied torque that is required for the connector 2 Attach the grounding conductor to the chassis by placing the t...

Page 26: ...dules into two adjacent chassis for redundant management In this set up the two CPSMM 200 management modules auto negotiate so that one module is the primary while the other is in stand by mode If the primary module fails the stand by module automatically takes over and manages the network 24 hour Technical Support 1 800 260 1312 International 00 1 952 941 7600 Pwr INIT Pwr RX TX LNK PWR RESET I 0...

Page 27: ...e RJ 45 connector at one end of the cascade cable into the management module s RJ 45 port labeled OUT 3 At the next chassis in the series Plug the RJ 45 connector at the other end of the cascade cable into the management module s RJ 45 port labeled IN 4 At the same chassis as in step 3 Plug the RJ 45 connector at one end of the cascade cable into the management module s RJ 45 port labeled OUT 5 At...

Page 28: ...D indicators to help monitor the CPSMC13xx 100 chassis network Refer to the individual user s guide included with each Transition Networks slide in module to interpret the LED indicators CFMFF100 CFMFF100 CETCF100 CFETF100 CFETF110 CFMFF100 SPD PWR FRX CRX FLNK CLNK SPD PWR FRX CRX FLNK CLNK 10 100TX RX TX 10 100SX 100BASE TX RX TX 100BASE FX Link Alert E D 0 50 LA PWR RXF RXC LNK COL LKS PWR LKM ...

Page 29: ...o configure and manage the CPSMC13xx 100 chassis from an attached terminal or from a remote networked computer The firmware includes the Transition Networks Command Line Interface CLI a telnet server a Web browser and an SNMP Simple Network Management Protocol agent In addition Transition Networks FocalPoint application can be installed in the networked computer to provide a graphical user interfa...

Page 30: ...oth the RJ 45 Ethernet port and the NMS must be connected to a network with Internet access CFMFF100 CFMFF100 CETCF100 CFETF100 CFETF110 CFMFF100 SPD PWR FRX CRX FLNK CLNK SPD PWR FRX CRX FLNK CLNK 10 100TX RX TX 10 100SX 100BASE TX RX TX 100BASE FX Link Alert E D 0 50 LA PWR RXF RXC LNK COL LKS PWR LKM 10BASE 2 10BASE FL LKS PWR LKM LKS PWR LKM Multimode Singlemode TX RX TX RX Multimode Singlemod...

Page 31: ...agement module Contact Technical Support U S Canada 1 800 260 1312 International 00 1 952 941 7600 3 For the remaining slide in modules are ANY of the POWER LEDs NOT illuminated NO All slide in modules are receiving power Proceed to the next step YES For those slide in modules where the POWER LED is NOT illuminated Ensure the slide in module is firmly seated in the slot Contact Technical Support U...

Page 32: ...Power Supply Module Power Input 24 VDC 20 to 31VDC 4 83 Amp typical with a fully loaded chassis Power Output 12 VDC at 8 3 Amp maximum Environment Tmra 0 to 50 C 32 to 122 F manufacturer s rated ambient temperature Storage Temperature 40 to 80 C 40 to 176 F Humidity 5 to 95 non condensing Altitude 0 to 10 000 feet Compliance EN 55022 1998 Class A EN 55024 1998 FCC Part 15 Subpart B UL Listed 21 CF...

Page 33: ...inal Ready DTR 4 Signal Ground GND 5 Data Set Ready DSR 6 Request To Send RTS 7 Clear To Send CTS 8 RJ 45 Cable Category 5 Gauge 24 to 22 AWG Attenuation 22 0 dB 100m 100 MHz Maximum Cable Distance 100 meters Straight through or crossover cable may be used Shielded twisted pair STP or unshielded twisted pair UTP may be used Pins 1 2 and 3 6 are the two active pairs in an Ethernet network RJ 45 Pin...

Page 34: ...requirements of the media and port type For example Shielded RJ 45 cable used for 100Base Tx Ethernet MUST be grounded at both cable endpoints via shielded RJ 45 jacks Shielded RS 232 cable MUST have the shield grounded at both cable endpoints via shielded RS 232 connectors COAX cable used for 10Base 2 Ethernet MUST only be grounded at a single point The media converters provide a jumper option or...

Page 35: ...ff techsupport transition com Address Transition Networks 6475 City West Parkway Minneapolis MN 55344 USA telephone 952 941 7600 toll free 800 526 9267 fax 952 941 2322 Declaration of Conformity Name of Mfg Transition Networks 6475 City West Parkway Minneapolis MN 55344 USA Model PointSystem Chassis Part Number CPSMC1300 100 CPSMC1310 100 CPSMC1320 100 Regulation EMC Directive 89 336 EEC Purpose T...

Page 36: ... no charge Replace the product with an equivalent functional product or Refund the purchase price of a defective product To return a defective product for warranty coverage contact Transition Networks technical support department for a return authorization number Transition s technical support department can be reached through any of the following means Contact Tech Support 24 hours a day 800 260 ...

Page 37: ...e charge and return the product to the customer not repaired Non warranted products that are repaired by Transition Networks for a fee will carry a 180 day limited warranty All warranty claims are subject to the restrictions and conventions set forth by this document Transition Networks reserves the right to charge for all testing and shipping incurred if after testing a return is classified as No...

Page 38: ...38 CPSMC13xx 100 PointSystem Chassis ...

Reviews: