background image

Owner’s Manual

PROTECT YOUR INVESTMENT!

Register your product for quicker service  

and ultimate peace of mind. 

You could also win an 

ISOBAR6ULTRA surge protector— 

a $100 value!

www.tripplite.com/warranty

1

High-Voltage  

Monitored Rack PDUs

Models: PDUMNH20HV, PDUMNH30HV & PDUMNH32HV

1.  

Important Safety Instructions 

2

2.  

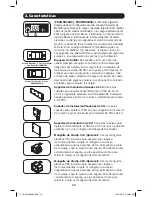
Features 

3

3.  

Installation 

3.1   Mounting the PDU 

3.2   Connecting the PDU 

3.3   Networking the PDU 

9

4.  

Technical Support 

9

5.  

Warranty & Product Registration 

10

Español 11
Français 21

Póññêèé

 31

1111 W. 35th Street, Chicago, IL 60609 USA • www.tripplite.com/support

Copyright © 2017 Tripp Lite. All rights reserved.

17-10-361-933684.indb   1

11/16/2017   9:46:29 AM

Summary of Contents for PDUMNH20HV

Page 1: ...PDUs Models PDUMNH20HV PDUMNH30HV PDUMNH32HV 1 Important Safety Instructions 2 2 Features 3 3 Installation 5 3 1 Mounting the PDU 5 3 2 Connecting the PDU 8 3 3 Networking the PDU 9 4 Technical Support 9 5 Warranty Product Registration 10 Español 11 Français 21 Póññêèé 31 1111 W 35th Street Chicago IL 60609 USA www tripplite com support Copyright 2017 Tripp Lite All rights reserved 17 10 361 93368...

Page 2: ... protected against excess currents short circuits and earth faults The electrical outlets supplying power to the equipment should be installed near the equipment and easily accessible Do not connect the PDU to an ungrounded outlet or to extension cords or adapters that eliminate the connection to ground Be sure to provide a local disconnect device on any models that are permanently installed witho...

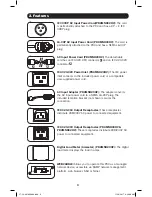
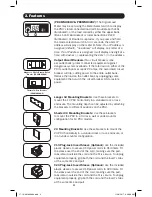
Page 3: ...ble user supplied power cord AC Input Adapter PDUMNH20HV The adapter converts the AC input power cord to a NEMA L6 20P plug The included retention bracket not shown secures the connection IEC 320 C13 Output Receptacles These receptacles distribute 208 230V AC power to connected equipment IEC 320 C19 Output Receptacles PDUMNH30HV PDUMNH32HV These receptacles distribute 208 230V AC power to connecte...

Page 4: ... to restore power Longer 1U Mounting Brackets Use these brackets to mount the 1U PDU horizontally in a standard rack or rack enclosure The mounting depth can be adjusted by attaching the brackets to different positions on the PDU Shorter 0U Mounting Brackets Use these brackets to mount the PDU in a 0U rack wall or under counter configuration for 1U PDU models 2U Mounting Brackets Use these bracket...

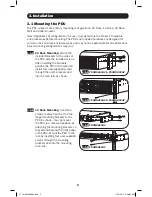
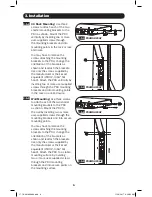
Page 5: ...figurations may vary 3 1 1 2U Rack Mounting Attach the included brackets to the sides of the PDU with the included screws After installing the brackets position the PDU in the rack and install four user supplied screws through the unit s brackets and into the rack rails as shown 3 1 2 1U Rack Mounting Use three screws to attach each of the two longer mounting brackets to the PDU as shown You can m...

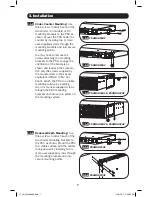
Page 6: ...nserting two or more user supplied screws through the PDU mounting brackets and into mounting points in the rack or rack enclosure 3 1 4 Wall Mounting Use three screws to attach each of the two shorter mounting brackets to the PDU as shown Mount the PDU to the wall by inserting two or more user supplied screws through the mounting brackets and into secure mounting points You may have tp remove the...

Page 7: ... the PDU change the orientation of the brackets as shown and reattach the brackets Use only the screws supplied by the manufacturer or their exact equivalent 8 32 3 16 flat head Attach the PDU to a stable mounting surface by inserting two or more user supplied screws through the PDU mounting brackets and into secure points on the mounting surface 3 1 6 Reduced Depth Mounting Use three screws to at...

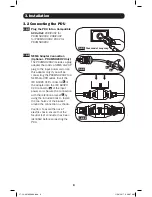
Page 8: ...his adapter only if you will be connecting the PDUMNH20HV to a NEMA L6 20R outlet Insert the IEC 60320 C19 connector A of the adapter into the IEC 60320 C20 connector B of the input power cord Secure the connection with the retention bracket C by using the included bolts to fasten the two halves of the bracket around the connection as shown Caution To avoid the risk of electric shock ensure that t...

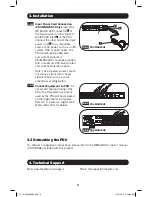
Page 9: ... source should not share a circuit with a heavy electrical load such as an air conditioner or refrigerator 3 2 4 Connect Equipment to PDU Do not exceed the load rating of the PDU The total electrical current used by the PDU will be displayed on the digital meter in amperes Refer to 2 Features Digital Load Meter Ammeter for details 3 2 4 PDUMNH20HV 3 2 4 PDUMNH30HV PDUMNH20HV 3 2 3 88 C A B 3 3 Net...

Page 10: ...te for details FCC Notice Class A This device complies with part 15 of the FCC Rules Operation is subject to the following two conditions 1 This device may not cause harmful interference and 2 this device must accept any interference received including interference that may cause undesired operation Note This equipment has been tested and found to comply with the limits for a Class A digital devic...

Page 11: ... 2 Características 14 3 Instalación 16 3 1 Instalación del PDU 16 3 2 Conexión del PDU 19 3 3 Conexión en Red del PDU 21 4 Soporte Técnico 21 5 Garantía 22 English 1 Français 23 Póññêèé 34 1111 W 35th Street Chicago IL 60609 EE UU www tripplite com support Copyright 2017 Tripp Lite Todos los derechos reservados 17 10 361 933684 indb 11 11 16 2017 9 46 39 AM ...

Page 12: ...ectamente protegido contra corrientes excesivas cortocircuitos y fallas de conexión a tierra Los tomacorrientes eléctricos que suministran energía al equipo deben instalarse próximos al equipo y ser fácilmente accesibles No conecte El PDU a un toma corriente que no esté a tierra o cables de extensión o adaptadores que eliminen la conexión a tierra Asegúrese de proporcionar un dispositivo local de ...

Page 13: ...tible suministrado por el usuario Adaptador de Entrada de CA PDUMNH20HV El adaptador convierte el cable de alimentación de entrada de CA a una clavija NEMA L6 20P El soporte de retención incluido no mostrado asegura la conexión Tomacorrientes de Salida IEC 320 C13 Estos tomacorrientes distribuyen energía de 208V 230V CA al equipo conectado Tomacorrientes de Salida IEC 320 C19 PDUMNH30HV y PDUMNH32...

Page 14: ...randes de 1U Use estos soportes para instalar horizontalmente el PDU de 1U en un rack o gabinete estándar La profundidad de instalación puede ajustarse fijando los soportes a diferentes posiciones en el PDU Soportes de Instalación Pequeños de 0U Use estos soportes para instalar el PDU en una configuración de rack de 0U pared o bajo el mostrador para modelos de PDUs de 1U Soportes de Instalación de...

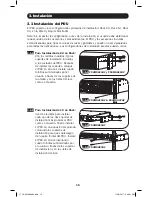
Page 15: ...talación de 2U en Rack Con los tornillos incluidos fije los soportes de instalación incluidos a los costados del PDU Después de instalar los soportes coloque el PDU en el rack e instale cuatro tornillos suministrados por el usuario a través de los soportes de la unidad y en los rieles del rack como se muestra 3 1 2 Para Instalación de 1U en Rack Use tres tornillos para instalar cada uno de los dos...

Page 16: ...istrados por el usuario a través de los soportes de instalación del PDU y en los puntos de instalación en el rack o gabinete 3 1 4 Instalación en Pared Use tres tornillos para instalar cada uno de los dos soportes de instalación más pequeños al PDU como se muestra Instale el PDU en la pared insertando dos o más tornillos suministrados por el usuario a través de los soportes de instalación y en pun...

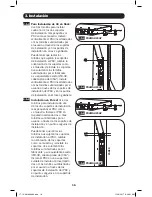
Page 17: ...soportes como se muestra y reinstale los soportes Use solamente los tornillos suministrados por el fabricante o su equivalente exacto 8 32 cabeza plana de 3 16 Instale el PDU en una superficie estable de instalación insertando dos o más tornillos suministrados por el usuario a través de los soportes de instalación del PDU y en puntos seguros en la superficie de instalación 3 1 6 Instalación en Pro...

Page 18: ...las dos mitades del soporte alrededor de la conexión como se muestra Precaución Para evitar el riesgo de una descarga eléctrica garantice que el conductor Neutro L2 haya sido identificado antes de conectar el PDU 3 2 3 Conexión del Cable de Alimentación PDUMNH20HV Solamente Inserte el conector IEC 60320 C19 A del cable de alimentación en la entrada IEC 60320 C20 B del PDU Conecte el otro extremo d...

Page 19: ...rísticas Medidor Digital de Carga Amperímetro para detalles 3 2 4 PDUMNH20HV 3 2 4 PDUMNH30HV 3 3 Conexión a red del PDU Para instrucciones de configuración de red consulte por favor el manual del propietario de la tarjeta WEBCARDLX PN 93358E incluido con este producto 4 Soporte Técnico www tripplite com support Correo Electrónico techsupport tripplite com 17 10 361 933684 indb 19 11 16 2017 9 46 ...

Page 20: ...chos legales específicos y usted puede tener otros derechos que pueden variar de una jurisdicción a otra ADVERTENCIA antes de usar este dispositivo cada usuario debe tener cuidado para determinar si es adecuado o seguro para el uso previsto Ya que las aplicaciones individuales están sujetas a gran variación el fabricante no garantiza la adecuación de estos dispositivos para alguna aplicación espec...

Page 21: ...stiques 25 3 Installation 27 3 1 Montage de la PDU 27 3 2 Raccordement de la PDU 30 3 3 Fonctionnement en réseau de la PDU 32 4 Soutien technique 32 5 Garantie 33 English 1 Español 12 Póññêèé 34 1111 W 35th Street Chicago IL 60609 USA www tripplite com support Droits d auteur 2017 Tripp Lite Tous droits réservés 17 10 361 933684 indb 21 11 16 2017 9 46 44 AM ...

Page 22: ...nt locaux et qui est dûment protégée contre les courants excessifs les courts circuits et les défauts à la terre Les prises électriques qui alimentent l équipement doivent être installées à proximité de l équipement et être facilement accessibles Ne pas connecter la PDU dans une prise non mise à la masse ou des rallonges électriques ou des adaptateurs qui éliminent la connexion à la masse S assure...

Page 23: ...ation compatible fourni par l utilisateur Adaptateur d entrée CA PDUMNH20HV L adaptateur convertit le cordon d alimentation d entrée CA en une fiche NEMA L6 20P Le support de rétention inclus non illustré retient la connexion en place Prises de sortie IEC 320 C13 Ces prises distribuent une alimentation 208 230 V CA à l équipement branché Prises de sortie IEC 320 C19 PDUMNH30HV et PDUMNH32HV Ces pr...

Page 24: ... 1U plus longs Utiliser ces supports pour monter la PDU 1U sur le plan horizontal dans un bâti standard ou un boîtier pour bâtis La profondeur de montage peut être réglée en fixant les supports aux différentes positions sur la PDU Supports de montage 0U plus courts Utiliser ces supports pour monter la PDU dans un bâti 0U dans une configuration murale ou sous le comptoir pour des modèles de PDU 1U ...

Page 25: ... exactes peuvent varier 3 1 1 Montage 2U en bâti Fixer les supports de montage inclus aux côtés de la PDU avec les vis incluses Après avoir installé les supports placer la PDU dans le bâti puis installer quatre vis fournies par l utilisateur à travers les supports de l appareil et dans les rails du bâti comme illustré 3 1 2 Montage 1U en bâti Utiliser trois vis pour fixer chacun des deux supports ...

Page 26: ...ournies par l utilisateur à travers les supports de montage de la PDU et dans les points de montage du bâti ou du boîtier pour bâtis 3 1 4 Montage mural Utiliser trois vis pour fixer chacun des deux supports de fixation plus courts à la PDU comme illustré Monter la PDU au mur en insérant au moins deux vis fournies par l utilisateur à travers les supports de montage et dans les points de montage so...

Page 27: ... supports tel qu illustré et de remettre les supports en place Utiliser uniquement les vis fournies par le fabricant ou leur équivalent exact no 8 32 3 16 po à tête plate Fixer la PDU à une surface stable en insérant au moins deux vis fournies par l utilisateur à travers les supports de montage de la PDU et dans les points de montage solides sur la surface de montage 3 1 6 Montage à profondeur réd...

Page 28: ... inclus pour fixer les deux moitiés du support autour de la connexion comme illustré Mise en garde Pour éviter les risques de décharge électrique s assurer que le conducteur neutre L2 a été identifié avant de raccorder la PDU 3 2 3 Connexion du cordon d alimentation d entrée PDUMNH20HV seulement Insérer le connecteur IEC 60320 C19 A du cordon d alimentation d entrée dans l entrée IEC 60320 C20 B d...

Page 29: ...tre numérique dans la section Caractéristiques pour de plus amples informations 3 2 4 PDUMNH20HV 3 2 4 PDUMNH30HV 3 3 Fonctionnement en réseau de la PDU Pour des instructions sur la configuration en réseau veuillez vous référer au manuel de l utilisateur de la WEBCARDLX n de pièce 93358E inclus avec ce produit 4 Soutien technique Web www tripplite com support Adresse électronique techsupport tripp...

Page 30: ...égaux spécifiques et vous pouvez avoir d autres droits qui varient selon le territoire AVERTISSEMENT L utilisateur individuel doit prendre soin de déterminer avant l utilisation si cet appareil est approprié adéquat et sûr pour l usage prévu Puisque les utilisations individuelles sont sujettes à des variations importantes le fabricant ne fait aucune déclaration ou garantie quant à l aptitude ou l ...

Page 31: ...ные возможности 36 3 Установка 38 3 1 Монтаж PDU 38 3 2 Подключение PDU 41 3 3 Включение PDU в сеть 43 4 Техническая поддержка 43 5 Гарантийные обязательства 44 English 1 Español 12 Français 23 1111W 35th Street Chicago IL 60609 USA www tripplite com support Охраняется авторским правом 2017Tripp Lite Перепечатка запрещается 17 10 361 933684 indb 31 11 16 2017 9 46 46 AM ...

Page 32: ...мам и надлежащим образом защищенной от избыточных токов коротких замыканий и замыканий на землю Электрические розетки через которые осуществляется электропитание оборудования должны быть установлены в легкодоступном месте вблизи него Не подключайте блок распределения питания PDU к незаземленной розетке а также к удлинителям или переходникам не имеющим заземления Обязательно снабжайте любые модели ...

Page 33: ...0HV этот адаптер преобразует входной шнур питания переменного тока в разъем NEMA L6 20P Поставляемый в комплекте зажим для фиксации на рисунке не показан обеспечивает фиксацию соединения Выходные розетки IEC 320 C13 в штатном режиме работы эти розетки распределяют мощность переменного тока напряжением 208 230 В между подключенными к ним элементами оборудования Выходные розетки IEC 320 C19 для мод ...

Page 34: ...я некоторых элементов оборудования после этого переведите автоматический выключатель в положение ON ВКЛ для восстановления электропитания Удлиненные монтажные кронштейны размером 1U используйте эти кронштейны для горизонтального монтажа PDU размером 1U в стандартную стойку или шкаф Монтажная глубина может регулироваться путем крепления кронштейнов к другим точкам PDU Укороченные монтажные кронштей...

Page 35: ...Установочные конфигурации могут различаться в деталях 3 1 1 Монтаж в стойку высотой 2U прикрепите входящие в комплект кронштейны по бокам PDU при помощи винтов также поставляемых в комплекте После установки кронштейнов разместите PDU в шкафу и вверните четыре винта в комплект поставки не входят через кронштейны блока в направляющие шкафа как показано на рисунке 3 1 2 Монтаж в стойку высотой 1U с п...

Page 36: ...ертывания двух или более винтов не входящих в комплект поставки через монтажные кронштейны PDU в монтажные отверстия стойки или шкафа 3 1 4 Настенныймонтаж спомощьютрехвинтов прикрепите оба укороченных кронштейна к корпусу PDU как показано на рисунке Прикрепите PDU к стене путем ввертывания двух или более винтов в комплект поставки не входят через монтажные кронштейны в точках монтажного крепления...

Page 37: ...ить положение кронштейнов как показано на рисунке и прикрепить кронштейны на прежнее место Используйте только винты поставляемые производителем или их полный аналог 8 32 3 16 с потайной головкой Прикрепите PDU к устойчивой монтажной поверхности путем ввертывания двух или более винтов не входящих в комплект поставки через монтажные кронштейныPDUвотверстия расположенные в точках надежного крепления ...

Page 38: ... для фиксации C скрепив входящими в комплект болтами две части зажима охватывающие соединение как показано на рисунке Внимание Во избежание опасности поражения электрическим током необходимо распознать нейтральный провод L2 перед подключением PDU 3 2 3 Подключение входного шнура питания только для мод PDUMNH20HV вставьте разъем IEC 60320 C19 A входного шнура питания во входной разъем IEC 60320 C20...

Page 39: ...ах Подробнее см в разделе 2 Функциональные возможности цифровой измеритель нагрузки амперметр 3 2 4 PDUMNH20HV 3 2 4 PDUMNH30HV 3 3ВключениеPDUвсеть Указания по настройке сети изложены в руководстве пользователя устройстваWEBCARDLX PN 93358E поставляемом в комплекте с ним 4 Техническая поддержка Веб страница www tripplite com support Эл почта techsupport tripplite com 17 10 361 933684 indb 39 11 1...

Page 40: ...е ограниченияилиисключениямогутнаваснераспространяться НастоящаяГарантияпредоставляетвамконкретныеюридическиеправа анабордругих вашихправможетбытьразличнымвзависимостиотюрисдикции ВНИМАНИЕ Доначалаиспользованияданногоустройствапользовательдолженубедитьсявтом чтооноявляетсяпригодным соответствующим илибезопаснымдляпредполагаемогоприменения Всвязисбольшимразнообразиемконкретныхпримененийпроизводител...

Reviews: