background image

TRONICAL

TUNE


PLUS

auto - tunes your guitar in seconds

Summary of Contents for TUNE PLUS

Page 1: ...TRONICALTUNE PLUS auto tunes your guitar in seconds ...

Page 2: ...You play we tune TronicalTune ...

Page 3: ...PACKAGE CONTENT 6 x ROBOHEAD 1 x CONTACTING PCB 1 x LiPo BATTERY 1 x CHARGER INCL WALL PLUG 7 x LOCK NUT RING WASHER 1 x WRENCH ...

Page 4: ...RT BATTERY 6 CHARGE BATTERY 8 REPLACE BATTERY 9 INSTALL THE SYSTEM ON THE GUITAR 10 STRING GUITAR 12 TREBLE STRINGS 14 BASS STRINGS 16 BASIC FUNCTIONS OVERVIEW 18 DEFAULT TUNINGS 20 LOW TUNINGS 22 TronicalTune PLUS Index 4 ...

Page 5: ...ET TEMP GLOBAL 29 RESET FUNCTION 30 HARDWARE FUNCTIONS CALIBRATION MODE 33 ACCURACY 35 ROBOHEAD DELAY 35 ROBOHEAD SPEED 35 INTERFERENCE FILTER 35 SOFTWARE FUNCTIONS GAIN 37 GUITAR TYPE 37 PITCH WINDOW 37 ACTIVATE LOW TUNINGS 39 TUNING OFFSET MODE 39 PER STRING PITCH CORRECTION 40 UNBLOCK BANKS FOR CUSTOM TUNINGS 42 CAPO MODE 44 LEGAL INFORMATION 46 5 ...

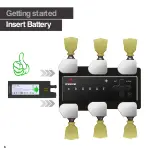
Page 6: ...Getting started Insert Battery BAT e B G D A E MENU 6 ...

Page 7: ...BAT e B G D A E MENU ATTENTION BE CAREFUL INSERTING THE BATTERY PAY ATTENTION TO THE SLOTTED DESIGN TO GUARANTEE PROPER ORIENTATION SLIDE IN THE BATTERY WITH THE TIP SIDE ONLY DO NOT APPLY ANY FORCE AS YOU MAY CAUSE DAMAGE TO THE ELECTRONICS 7 ...

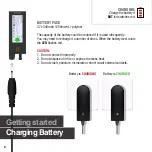
Page 8: ...ld be reduced if it is used infrequently You may need to recharge it a number of times When the battery level is low the LED flashes red CAUTION 1 Do not connect improperly 2 Do not dispose of in fire or expose to excess heat 3 Do not crush puncture incinerate or short circuit external contacts CHARGING Charge the battery if BAT led switches red 8 ...

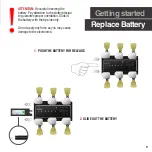
Page 9: ...Pay attention to the slotted design to guarantee proper orientation Slide in the battery with the tip side only Do not apply any force as you may cause damage to the electronics BAT e B G D A E MENU BAT e B G D A E MENU 1 PUSH THE BATTERY FOR RELEASE 2 SLIDE OUT THE BATTERY 9 ...

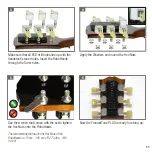
Page 10: ...e RoboHeads is 1 5 Nm 1 65 Nm 13 27 in lbs 14 6 in lbs It is recommended to use a contact cleaning liquid such as ethyl alcohol before installing the RoboHeads to the contacting PCB Ensure that all contacts have a good connection before tightening the Hex Nuts entirely Use caution when inserting the battery Pay attention to the slotted design to guarantee proper orientation Remove all original tun...

Page 11: ...ugh the Tuner holes Apply the Washers and mount the Hex Nuts Use the wrench that comes with the set to tighten the Hex Nuts onto the RoboHeads The recommended torque for the Hex Nuts of the RoboHeads is 1 5 nm 1 65 nm 13 27 in lbs 14 6 in lbs Now the TronicalTune PLUS is ready for string up 3 5 4 6 11 ...

Page 12: ...Getting started String your guitar ...

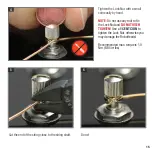
Page 13: ...he set to tighten the Hex Nut NOTE do not use any tools on the Lock Nut and do not over tighten Instead use a 1 CENT COIN to tighten the locknut otherwise you may damage the ROBOHEAD by applying too much force Use only supplied wrench or torque wrench to tighten the Hex Nuts the recommended torque for the Hex Nuts of the RoboHeads is 1 5 Nm 1 65 Nm 13 27 in lbs 14 6 in lbs 13 ...

Page 14: ...key manually or use the string up mode Wind the string around the string shaft under the recess and bring it up through the recess Hold the string tight and apply the Lock Nut Wind up the string CLOCKWISE around the string shaft once above the recess 1 2 3 NOTE The TronicalTune PLUS systems Type C six in a row tuner headstocks do work with bass RoboHeads only 14 ...

Page 15: ...TE Do not use any tool to fix the Lock Nut and DO NOT OVER TIGHTEN Use a 1 CENT COIN to tighten the Lock Nut otherwise you may damage the RoboHeads Recommended max torque is 1 0 Nm 8 85 in lbs Cut the end of the string close to the string shaft Done 4 5 6 15 ...

Page 16: ...use the string up mode Wind the string around the string shaft under the recess and bring it up through the recess Hold the string tight and apply the Lock Nut Wind the string around the shaft once above the recess NOTE To ensure that the 1st e and 2nd B string are securely locked we recommend to perform TWO WINDINGS around the string shaft before tightening the Lock Nut 1 2 3 16 ...

Page 17: ...TE Do not use any tool to fix the Lock Nut and DO NOT OVER TIGHTEN Use a 1 CENT COIN to tighten the Lock Nut otherwise you may damage the RoboHead Recommended max torque is 1 0 Nm 8 85 in lbs Cut the end of the string close to the string shaft Done 4 5 6 17 ...

Page 18: ...Basic Functions Start Here NOT IN TUNE IN TUNE ROBOHEAD MOVING OUT OF SNAP CALCULATING INTERFERENCE ON BACK OFF ENTER LEFT RIGHT UP DOWN ...

Page 19: ...LEDs are RED strum once the tuners start working when you press ENTER When all LEDs are GREEN all six strings are in tune The TronicalTune PLUS turns off The latest tuning is now your default RETURN TO STANDARD TUNING Press the ON button twice 2X Press UP DOWN for the RED tuning bank then press LEFT RIGHT until the RED E LED is on Press ENTER strum once Standard tuning is now set as default again ...

Page 20: ...MainTuning Preset Bank DefaultTunings ...

Page 21: ...A D G B D GREEN MAIN TUNING PRESET BANK LED STRING E A D G B e E Open E E B E G B E A Open A E A E A C E D Open D D A D F A D G Open G D G D G B D B Dobro G B D G B D e All 4ths E A D G C F BLUE MAIN TUNING PRESET BANK LED STRING E A D G B e E A D G B e The BLUE USER TUNING PRESET BANK defaults to standard tuning E A D G B e Use the chart to note your custom tuning names and tunings 21 ...

Page 22: ...LowTuning Preset Bank DefaultTunings ...

Page 23: ...w Tuning Preset Banks LED STRING E A D G B e E Open C C G C G C E A Open C6 C A C G C E D Open B B F B F B D G Double drop C C G C F A C B Double drop C C G C F A C e Double drop B B F B E G B MAGENTA USER TUNING PRESET BANK LED STRING E A D G B e E A D G B e The MAGENTA USER TUNING PRESET BANK defaults to standard C tuning C F A D G C Use the chart to note your custom tuning names and tunings 23 ...

Page 24: ...arge level LED BATTERY Exchangeable rechargeable3 7V Li Polymer approx 300tunings NAVIGATION UNIT up down left right enter Li Po Battery Charger with wall plug RoboHeads in different Designs Neck CPU incl Contacting PCB Wrench Lock Nuts Ring Washers ON OFF BACK NECK CPU INCL CONTACTING PCB black printed circuit board to fit in RoboHeads AVAILABLE SPARE PARTS 24 ...

Page 25: ...dvanced software functions The MAGENTA category handles string pitch offsets When choosing a category the Menu LED flashes in the category s color FUNCTIONS Each category offers various functions After selecting a CATEGORY press the LEFT RIGHT button to select a FUNCTION within the CATEGORY and then press ENTER to access the function When the menu LED lights up in the color of the category you can...

Page 26: ...T SUBCATEGORY Use LEFT RIGHT buttons to select a subcategory E e Press ENTER BAT e B G D A MENU E LEFT RIGHT ENTER SWITCH BETWEEN STRINGS BAT e B G D A MENU E ENTER ON BACK E A D G B E String Up Down Custom Tuning Mode Reference Tuning Firmware Version Battery Level Global Tuning Offset 26 ...

Page 27: ...ree times Press ENTER Press the LEFT RIGHT button to select the WHITE A LED then press ENTER When a string flashes RED pluck it HINT Mute a string after its string LED turns green to speed up the process When a string LED flashes BLUE use the LEFT RIGHT buttons to select a preset slot from the BLUE bank Press ENTER stores the tuning in the selected preset slot A CUSTOM TUNING WITH PITCH ASSISTANCE...

Page 28: ... one string to the new reference pitch Press ON three times Press ENTER Press the LEFT RIGHT button to select the WHITE D string LED Press ENTER E string flashes RED Use the LEFT RIGHT button to select the string you tuned as reference pitch Pluck the string When the string LED lights up GREEN and all others are RED strum to tune the guitar LEDs turn off reference tuning is complete G FIRMWARE VER...

Page 29: ...ver some orchestras tune to A 442 Hz or 443 Hz and some musicians tune to a higher pitch for a brighter sound When the TronicalTune PLUS is switched off press ON three times Press ENTER Press the LEFT RIGHT button to select the WHITE e string LED Press ENTER AllstringLEDsflashWHITE ifanoffsetisalready active theTronicalTunePLUSdisplaystheoffsetamount with GREEN or RED LEDs explanationbelow Each LE...

Page 30: ...g preset bank e Reset MAGENTA Tuning preset bank E Reset to original FACTORY SETTINGS 1 ENTER CATEGORY Press ON three times Use LEFT RIGHT button to select the category E Press ENTER 2 SELECT SUBCATEGORY Use LEFT RIGHT button to select a subcategory E A D G B e E Press ENTER BAT e B G D A MENU E LEFT RIGHT ENTER SWITCH BETWEEN FUNCTIONS BAT e B G D A MENU E ENTER ON BACK e 30 ...

Page 31: ...e color as the bank reset confirmed 6 To reset additional banks repeat steps 3 5 NOTE After a reset use CALIBRATION MODE to re calibrate the guitar P 33 RESTORE TO ORIGINAL FACTORY SETTINGS also highly recommended when changing string gauges When the TronicalTune PLUS is switched off press ON three times Press the LEFT RIGHT button to select RED e string LED Press ENTER Press the LEFT RIGHT button...

Page 32: ... three times Use LEFT RIGHT button to select CYAN category A Press ENTER 2 SELECT SUBCATEGORY Use LEFT RIGHT button to select a subcategory E B Press ENTER BAT e B G D A MENU E ENTER ON BACK A BAT e B G D A MENU E LEFT RIGHT LEFT RIGHT ENTER SWITCH BETWEEN FUNCTIONS 32 ...

Page 33: ...wareupdate if you are facing issues like erratic ROBOHEAD movements strings not tuning properly etc CALIBRATION 1 Press ON three times Press the LEFT RIGHT button to select CYAN A 2 Press ENTER twice The string LEDs blink RED 3 Strum all strings once All lights should shine GREEN briefly then turn off If the LEDs continue to flash RED mute all strings and then strum again 4 Once the strings have t...

Page 34: ...Advanced Hardware Functions Cyan Category ...

Page 35: ...lity degrades tuning accuracy 1 When the TronicalTune PLUS is switched off press ON three times Press the LEFT RIGHT button to select CYAN A Press ENTER 2 Press the LEFT RIGHT button to select the CYAN G Press ENTER 3 Use the LEFT RIGHT button to select the speed Each unlit LED decreases the speed 4 Press ENTER speed setting stored B INTERFERENCE FILTER Reduce the interference among the strings if...

Page 36: ...N three times Use LEFT RIGHT button to select YELLOW category D Press ENTER 2 SELECT SUBCATEGORY Use LEFT RIGHT button to select a subcategory E B Press ENTER BAT e B G D A MENU E ENTER ON BACK LEFT RIGHT D BAT e B G D A MENU E LEFT RIGHT ENTER SWITCHBETWEENFUNCTIONS 36 ...

Page 37: ...EFT RIGHTbutton to select YELLOW D 2 Press ENTER Press the LEFT RIGHTbutton to select the YELLOW A string LED Press ENTER 3 The LEFT RIGHT button selects E for electric A E for acoustic or D A E forshortscaleguitars 4 Press ENTER guitar type setting stored D PITCH WINDOW If you try to use Multi String Tuning mode but a string is considerably out of tune the TronicalTune PLUS switches to Single Str...

Page 38: ...Advanced Software Functions Yellow Category ...

Page 39: ...W D 2 Press ENTER Press the LEFT RIGHT button to select the YELLOW G LED Press ENTER 3 Use LEFT RIGHT button to activate low tunings and additional preset banks e B G LEDs flash GREEN or to deactivate low tunings and addition al preset banks D A E LEDs flash RED 4 Press ENTER low tuning additional banks settings stored B TUNING OFFSET MODE Permanent or Temporary The Global Tuning Offset WHITE CATE...

Page 40: ...hree times Use LEFT RIGHT button to select MAGENTA category G Press ENTER 2 SELECT SUBCATEGORY Use LEFT RIGHT button to select a subcategory E e Press ENTER BAT e B G D A MENU E LEFT RIGHT ENTER SWITCH BETWEEN FUNCTIONS BAT e B G D A MENU E ENTER ON BACK LEFT RIGHT G 40 ...

Page 41: ...ent up to 6 cents Continuing to press the LEFT button lights YELLOW LEDs Each lit YELLOW LED offsets the pitch by another 1 cent 7 to 12 cents maximum Each RIGHT button press lights a RED LED and offsets the pitch by 1 cent up to 6 cents Continuing to press the RIGHT button lights MAGENTA LEDs Each lit MAGENTA LED offsets the pitch by another 1 cent 7 to 12 cents maximum If an offset already exist...

Page 42: ...LEFT RIGHT button to select a subcategory E e Press ENTER 1 ENTER CATEGORY Press ON three times Use LEFT RIGHT button to select BLUE category B Press ENTER BAT e B G D A MENU E LEFT RIGHT ENTER SWITCH BETWEEN FUNCTIONS BAT e B G D A MENU E ENTER ON BACK LEFT RIGHT B 42 ...

Page 43: ... The LEFT RIGHT button enables writing to the selected bank E B G LEDs flash GREEN Or write protects the selected bank D A E LEDs flash RED 4 Press ENTER GREEN or RED LEDs light sequentially to confirm your choice 5 You can now save a custom tuning to any write enabled bank NOTE If a bank is blocked you will not be able to access it with the UP DOWN buttons when saving a custom tuning see page 27 ...

Page 44: ...Capo Mode ...
Page 45: ...fret Then tuning proceeds as usual NOTE Whenever you tune in capo mode the TronicalTune PLUS first indicates CAPO location by the number of lit YELLOW LEDs 5 If any string LEDs aren t GREEN pluck those strings The TronicalTune PLUS turns off automati cally once tuning is complete EXIT CAPO MODE TWO OPTIONS Remove the capo Next time you tune as soon as you strum the TronicalTune PLUS will detect th...

Page 46: ...res DISPOSAL OF OLD ELECTRICAL ELECTRONIC EQUIPMENT This symbol on the product indicates that the product shall not be treated as household waste Instead it shall be handed over to the applicable collection point for the recycling of electrical and electronic equipment By ensuring this product is disposed of correctly you will help to prevent potential negative consequences for the environment and...

Page 47: ...able battery has long service life if treated properly A new battery or one that has not been used for a long period of time could have re duced capacity the first few times it is used Do not expose the battery to extreme temperatures never above 55 C 131 F For maximum battery capacity use the battery in room temperature If the battery is used in low temperatures the battery capacity will be reduc...

Page 48: ...Tronical Components GmbH Heselstuecken 18 22453 Hamburg Germany info tronical com www tronical com Copyright 2014 Tronical Components GmbH All rights reserved ...

Reviews: