background image

Operating manual 

english

TruTool N 500 

(1A1)


Summary of Contents for TruTool N 500

Page 1: ...Operating manual english TruTool N 500 1A1 ...

Page 2: ......

Page 3: ...the tool 10 4 Operation 12 4 1 Working with the TruTool N 500 12 4 2 Changing the cutting direction 14 4 3 Nibbling with templates 15 4 4 Making inner cutouts 15 5 Maintenance 16 5 1 Replacing the tool 17 5 2 Disassembling the punch 18 5 3 Installing the punch 18 5 4 Changing the die and the punch guide 18 5 5 Regrinding the punch 19 5 6 Replacing carbon brushes 20 6 Original accessories and weari...

Page 4: ...egulations of the country of operation Danger Risk of fatal injury from electric shock Pull the plug from plug socket before undertaking any maintenance work on the machine Check the plug cable and machine for damage each time before using the machine Keep the machine dry and do not operate it in damp rooms Connect the earth leakage EL circuit breaker with a maximum release current of 30 mA when u...

Page 5: ...le away from the back of the machine and do not pull it over sharp edges Have servicing and inspections of hand held electric tools carried out by a qualified specialist Only use original acces sories provided by TRUMPF Warning Risk of injury from hot and sharp chips Hot and sharp chips are emitted from the chip dumping at high speed The use of a chip bag is recommended Warning Risk of injury from...

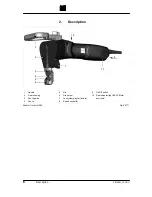
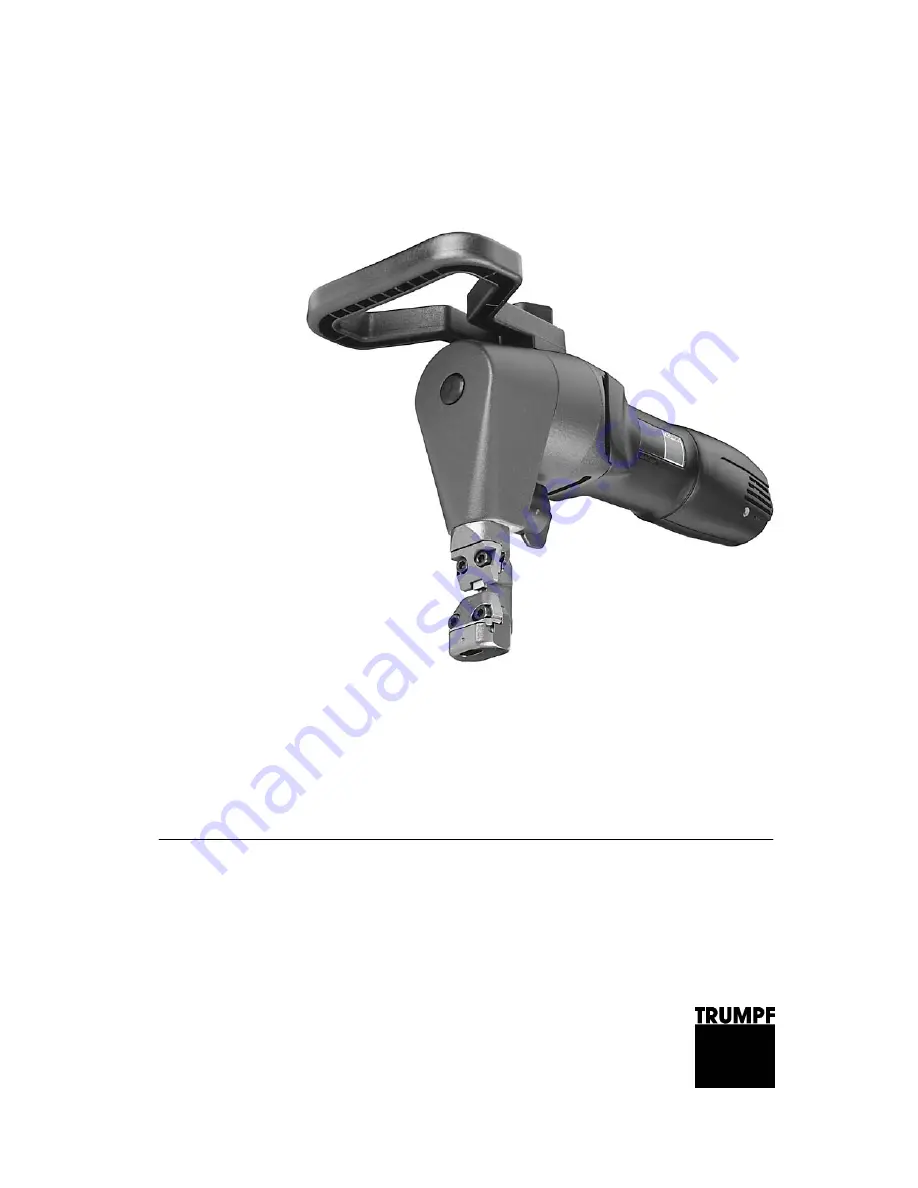
Page 6: ...scription 1 2 3 4 5 6 7 8 9 10 1 Handle 2 Gear housing 3 Punch guide 4 Punch 5 Die 6 Die carrier 7 Lock clamping for the die 8 Speed controller 9 On Off switch 10 Red indicator light LED Motor overload Nibbler TruTool N 500 Fig 52771 ...

Page 7: ...lications Slitting plate shaped workpieces made of a punchable material such as steel aluminum non ferrous heavy metals and plastic Slitting of tubes and machining of edged sheet profiles and or press brake bendings e g for tanks crash barriers troughs etc Nibbling straight or curved exterior and interior cutouts Nibbling along scribed lines or templates Note The nibbling process produces cutting ...

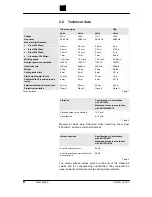
Page 8: ...n Sheet profile 90 bending radius inside 8 mm 8 mm 8 mm 0 31 in Smallest radius with curved cuts 90 mm 90 mm 90 mm 3 54 in Protective insulation Class II Class II Class II Class II Technical data Vibration Specifications in accordance with EN 12096 Measured values in accordance with EN ISO 8662 10 Vibration value at the handle a 14 9 m s Uncertainty K 2 15 m s Measured values were measured while m...

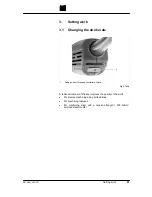
Page 9: ...ke rate 6 1 Setting wheel for speed controller at motor A reduced number of strokes improves the quality of the work For precise machining along scribed lines For machining radiuses For machining steel with a tensile strength 400 N mm improved service life Fig 27948 ...

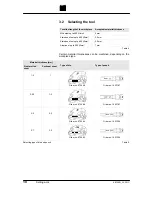
Page 10: ...N mm 2 5 mm Aluminum up to 250 N mm 7 mm Certain material thicknesses can be machined depending on the workpiece type Material thickness mm Single rolled sheet Sectional sheet Type of die Type of punch 1 2 1 Order no 975468 Order no 1453187 2 3 2 1 2 Order no 975466 Order no 1453187 3 5 2 3 Order no 975464 Order no 1451224 5 7 3 5 Order no 975462 Order no 1451224 Selecting type of die and punch Ta...

Page 11: ...nd punch guide Note The distance between the sheet surface and the punch x must remain as small as possible Does severe back and forth movement hammering occur during the cutting process The reason is an unsuitable die Excessive tool wear and in creasing loads on the machine are the result Use the die with the greatest feasible height Use the die with the greatest feasible height Fig 52810 ...

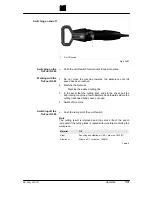
Page 12: ...h the tool while the machine is running Always move the machine during work away from your body Do not operate the machine above your head The appliance may switch off prematurely when affected by electromagnetic interference The appliance will resume operation when the faults have been cleared If the motor temperature is too high the motor will switch off The red indicator light LED with the moto...

Page 13: ...ew millimeters back towards where the cutting track has already been cut open 4 Switch off machine Push the rear part of the on off switch Note The cutting result is improved and the service life of the punch increased if the cutting track is coated with oil before machining the workpiece Material Oil Steel Punching and nibbling oil 0 5 l order no 103387 Aluminum Wisura oil 1 l order no 125874 Swi...

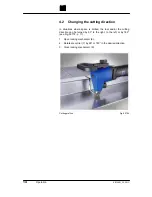
Page 14: ...where space is limited the tool and or the cutting direction can be turned by 90 to the right to the left or by 180 see Fig 52772 p 17 1 Open locking mechanism 9 2 Rotate die carrier 7 by 90 or 180 in the desired direction 3 Close locking mechanism 9 Cutting profiles Fig 52794 ...

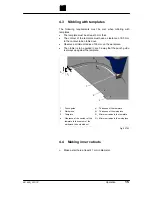
Page 15: ...s of 90 mm on the workpiece The nibbler is to be guided in such a way that the punch guide is always up against the template h1 a h2 R1 R2 2 3 1 1 Punch guide 2 Workpiece 3 Template a Clearance of the contour of the template to the contour of the workpiece to be nibbled out h1 Thickness of the template h2 Thickness of the workpiece R1 Minimum radius in the template R2 Minimum radius in the workpie...

Page 16: ...ly Repair work may only be carried out by a qualified technician Maintenance point Procedure and interval Recommended lubricant Lubricant order no Punch Regrind as needed see section 5 5 p 19 Punch Change as needed see section 5 1 p 17 Ventilation slots Clean as needed Die Replace as necessary Punch and die carrier With each tool change Lubricating grease G1 0344969 Gearbox and gear head After 300...

Page 17: ...F 1 Gear housing 2 Punch guide 3 Screws for fastening the punch guide 4 Screws for fastening the die 5 Die 6 Die carrier 7 Punch 8 Locking mechanism F Lubricating grease G1 40 g order no 0344969 If the punch or die becomes blunt resharpen the punch or change the tool Fig 52772 ...

Page 18: ...no 0344969 2 Rotate the punch 7 to the 45 position 3 Connect the die carrier 6 4 Make the locking mechanism 8 engage 5 4 Changing the die and the punch guide 1 To replace the die and the punch guide unscrew the fixing screws 3 and 4 2 Clean the support areas on the die carrier 6 3 Take care to ensure that the replacement parts are clean 4 Lubricate the guide surfaces of the punch guide with lubric...

Page 19: ... with which it is utilized Note Dies can not be resharpened 1 Regrind the grinding surface making sure that it is well cooled during the process 2 Lightly apply fine grained oil stone to the cutting edge 3 Observe the minimum length X min while grinding 4 Replace shorter punches Punch Die Regrinding reserve of the punch Minimum length X min of the punch 5 P5 P5 0 5 mm 58 8 mm 5 P5 5 2 8 mm 56 5 mm...

Page 20: ...rushes The motor comes to a standstill whenever the carbon brushes are worn out Have the carbon brushes checked and replaced as required by a qualified specialist Note Only use original replacement parts and observe the specifications on the type plate ...

Page 21: ...e 5 0975464 Die P5 0975462 Chip bag 0103557 Punching and nibbling oil for steel 1 l 0103387 Punching and nibbling oil for aluminum 1 l 0125874 Suspension eyelet 0097208 To ensure the correct and fast delivery of original parts and wearing parts 1 Specify the order number 2 Enter further order information Voltage data Quantity Machine type 3 Provide complete shipping information Correct address Des...

Page 22: ...22 Original accessories and wearing parts E614EN_03 DOC ...

Reviews: