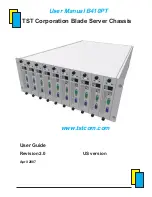
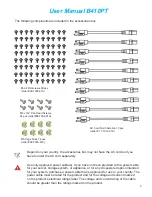
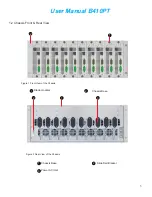
background image

User Manual B410PT

Revision History

B410 PT Blade Chassis Installation Instruction

Rev

Date

Modifications

Update By

1.0

09/21/2006 First Draft 

Sio Fu

2.0

04/03/2007 (1) Add Reset Switch on LED board 16-0123-01A, section 2.1

(2) Change top cover to allow easy HDD installation section 3.2

(3) Add air-recirculation block off form section 3.3

(4) Add additional 2.5” slim HDD section 3.4

Sio Fu

3.0

4/18/2008

(1) Change push button for fix the push button to hard to push issue

(2) Support Two 2.5” slim HDD 

(3) Damper to reduce vibration to the HDD

(4) Plastic damper housing to reduce vibration to the Fan 

(5) Support PCI-express MXM video 

Sio Fu

Summary of Contents for B410PT

Page 1: ...tion 2 1 2 Change top cover to allow easy HDD installation section 3 2 3 Add air recirculation block off form section 3 3 4 Add additional 2 5 slim HDD section 3 4 Sio Fu 3 0 4 18 2008 1 Change push button for fix the push button to hard to push issue 2 Support Two 2 5 slim HDD 3 Damper to reduce vibration to the HDD 4 Plastic damper housing to reduce vibration to the Fan 5 Support PCI express MXM...

Page 2: ...User Manual B410PT TST Corporation Blade Server Chassis www tstcom com User Guide Revision 2 0 US version April 2007 ...

Page 3: ...ty whatsoever for conflicts or incompatibilities arising from future changes to them The TST blade chassis may contain design defects or errors known as errata which may causes the product to deviate from published specifications Current character ized errata are available on TST website Visit www tstcom com This document and function described in it is furnished under license and may only be used...

Page 4: ...or fitness for any specific purpose or freedom from patent infringe ment regardless of origin under no circumstance is TST liable for incidental or con sequential damages Under normal use should the product under warranty fail in material or craftsman ship TST will at its sole discretion 1 2 Products that have been damaged through negligence accident or misue of the purchaser or its agents will be...

Page 5: ...for installation in restricted access areas A restricted access area can be accessed only through the use of a special tool lock and key or other means of security Do not work on the system or connect or disconnect cables during periods of lightning activity Only trained and qualified personnel should be allowed to install replace or service this equipment This equipment must be grounded Never def...

Page 6: ...es are provided to ensure your safety This unit should be mounted at the bottom of the rack if it is the only unit in the rack When mounting this unit in a partially filled rack load the rack from the bottom to the top with the heaviest component at the bottom of the rack If the rack is provided with stabilizing devices install the stabilizers before mounting or servicing the unit in the rack Use ...

Page 7: ...ning off the computer before disconnecting a device from the computer When transporting a sensitive component first place it in an antistatic container or packaging When you disconnect a cable pull on its connector or on its strain relief loop not on the cable itself Some cables have a connector with locking tabs if you are dis connecting this type of cable press in on the locking tabs before disc...

Page 8: ...top cover 12 InstallthePortTownsendboard 13 Install and Remove a Hard Disk Drive 14 Replacing Fans 15 Replacing the Power Supply Module 16 Re placing the System Battery 17 Convert the rackmount blade to stand alone blade 18 3 1 3 2 3 3 3 4 3 5 3 6 3 7 3 8 4 Install the system into the rack 19 Safety Instructions 19 Install the chassis in a rack 20 4 1 4 2 6 Power Supply Information 27 5 System Fan...

Page 9: ...s 15 Change the exhaust fan 15 Take out the PSU mounting screws 16 Replace the Power Supply Unit 16 Replacing the system battery 17 Install the stand alone top cover 18 Install the stand alone bottom cover 18 Install the stand alone wheel bracket 18 Four post rack 21 Four post open rack 21 Rack s mounting hole types 21 Marking on the rack 22 Removing the L shape rack mounting bracket 23 Install th...

Page 10: ...pin assignment 9 CPU fan specification 24 Exhaust fan specification 25 Power supply DC Output characteristics 26 Power supply specification 26 Power budget calculation 275W 27 Total combined wattage calculation 275W 27 BTU calculation 28 Table 1 Table 2 Table 3 Table 4 Table 5 Table 6 Table 7 Table 8 Table 9 Table 10 Table 11 List Of Table ...

Page 11: ...mmediately If the wrong model has been received please call your reseller or TST at 626 968 8851 to ar range for a Return Material Authorization RMA TST cannot accept returns which do not display an RMA number on the outside of the package Return the unit with all the original packing mate rials To complete the system you must purchase some items seperately see below The following components are i...

Page 12: ...u have not been provided with a power cable for your server storage system or appliance or for any AC powered option intended for your system purchase a power cable that is approved for use in your country The power cable must be rated for the product and for the voltage and current marked on the product s electrical ratings label The voltage and current rating of the cable should be greater than ...

Page 13: ...Manual B410PT 3 1 2 Chassis Front Rear View 1 2 Blade modular Chassis Base 1 2 1 2 3 Chassis Base Slide Rail Bracket Power AC Inlet 2 3 1 Figure 1 Front View of the Chassis Figure 2 Rear View of the Chassis ...

Page 14: ...erboard has activity Connect to network devices Speed link Continuous green light indicates the system is connected to the network at 1Gb s Continuous yellow light indicates speed at 100Mb s and OFF indicate speed is 10Mb sec or no connection Activity link Blinking green light indicates data is being transmitted on the NIC port Blinking yellow light indicates data is being received on the NIC port...

Page 15: ...User Manual B410PT 5 1 4 Chassis Dimensions 1 5 Blade Dimensions Figure 4 Chassis Dimension 6 95 28 0 19 0 26 0 6 0 1 8 Figure 5 Blade Dimension ...

Page 16: ...User Manual B410PT 1 3 2 Exhausted Fan Fan 2 5 HDD 1 3 4 Figure 6 Chassis opened view 1 6 Blade components 2 6 4 motherboard ...

Page 17: ...in assignments for connectivity 2 1 1 Front Panel Board cable 17 1035 01A Power Switch HDD ACT LED Power LED Power Switch Power LED HDD ACT LED Pin Color Signal Name J2 1 Black Power LED Positive J2 2 RED Power LED Negative J3 1 Green Power Switch J3 2 Orange Power Switch J4 1 Black Reset Switch J4 2 Yellow Reset Switch J5 1 Black HDD LED Positive J5 2 Purple HDD LED Negative Table 1 Front Panel I...

Page 18: ... documentation You can install replace or reinstall a part by performing the removal procedure in reverse order unless additional information is provided Recommended Tools Phillips head screwdriver Wrist grounding strap The Power Button on the front panel DOES NOT turn off the AC power you MUST unplug the AC power cords To maintain and ensure regulate compliance the fully integrated system should ...

Page 19: ... screw drivers to untight en it as shwon in figure shown Slide the blade forward and grasp the cover at both ends Ensure that the work surface is flat and clean to prevent scratching the computer cover 1 2 3 3 1 1 Removing the blade Figure 14 Indentify the blade you want to remove Figure 15 loosen the thumbscrews Figure 16 Slide out the blade WARNING To reduce the risk of personal injury from hot ...

Page 20: ...scratching the computer cover 1 3 Pull the front cover up and put it aside and away from the immediate working area 6 32 FH screws order 09 1002 01A Untigthen two flat head 6 32 6mm screws of the HDD cover as shown on the figure 2 Figure 17 Remove the HDD top cover Figure 18 Remove the blade top cover 12 ...

Page 21: ...assis and ensure the board I O insert into the I O gasket cutout Tighten and secure the board with the round head 6 32 screw 09 1003 01A from accessories box Install the Front Panel cable Power Supply cable and other device connectors to the system board Refer to your Port Townsend board information document for futher instruction 4 6 Install the air recirculation block off form as shwon 7 Figure ...

Page 22: ...nting bracket thumb screw as shown Remove the blade from the chassis see section 3 1 then remove the front and rear top covers see section 3 2 1 2 Untighten thumb screw Lift the 2 5 HDD mounting bracket from the chas sis blade 3 Figure 22 installing of first 3 5 or slim HDD 14 Install the 2 5 HDD onto the location as shown And secure with the slim HDD with the M4 RH screws on the bottom 4 Install ...

Page 23: ...e fan from the blade Remove the blade from the chassis see section 3 1 then remove the front and rear top covers see section 3 2 1 Unplug the 8pin power cable form the mother board 2 Lift up the fan form the fan plastic housing 4 Replace the new fan into the fan plastic housing and connect the 8pin power cable to the mother board 5 Locate the Two system fan as shown 3 ...

Page 24: ...e 5 6 Replace the power supply unit and reserve the steps above Figure 28 Replace the power supply unit Remove the blade from the chassis see section 3 1 then remove the front and rear top covers see section 3 2 1 Unplug the power cables that is connected to the power supply unit 2 RH screws 09 1003 01A RH screws 09 1003 01A Untighten and take out the round head mounting screws 09 1003 01A from th...

Page 25: ...se you may damage the system board by prying off the socket or by breaking circuit traces on the system board Open the computer cover Locate the battery socket from the server board Remove the battery by carefully prying it out of its socket with your fingers or with a blunt nonconducting object such as a plastic screwdriver Insert the new battery into the socket according to the orientation of th...

Page 26: ...sis Secure by tighten the two M5 mounting screws 1 Snap in the Stand alone bottom cover as shown and tighten the two M5 mounting scres as shown 2 Insert the wheel mounting kits into the rackmount chassis 3 M5 screws M5 screws M4 screws 09 1004 02A0 Secure the wheel mounting kits by tighten the M4 screws as shown 4 Figure 30 Installing the stand alone top cover Figure 31 Installing the stand alone ...

Page 27: ... legs shoulder width apart to maintain balance Bend on your hips and knees not at your waist Use your leg muscles to lift Lift with a smooth motion Keep the chassis close to your body and at waist level to lessen the load on your back To turn while holding the chassis use your feet do not twist your back 4 1 2 Precautions for installing the chassis into the Rack DO not install the blade chassis in...

Page 28: ...rom wall outlet before cleaning Do not use liquid or aerosol cleaners Use a damp not wet cloth for cleaning Use only approved power cable s If you have not been provided with a power cable for your server storage system or appliance or for any AC powered option intended for your system purchase a power cable that is approved for use in your country The power cable must be rated for the product and...

Page 29: ...pen rack that is 19 inches wide and between 28 30 and 36 deep M5 Cage Nuts 09 1053 01A Figure 33 Four post cabinet rack Figure 34 Four post open rack The brackets and screws necessary to attach the system to a four post rack with threaded holes or unthreaded round holes are included with your system Some racks have pre threaded holes Figure 35 Rack s mounting hole types ...

Page 30: ...tical rails may be marked by horizontal lines and numbers in 1U increments You can make a note of the number marking on the rack s vertical rail 1U 1 75 inch 0 5 inch 0 5 inch 0 625 inch 0 625 inch Mark on the narrow area between two holes spacing Following these steps to mark the rack 1 2 Place a mark on the rack s front vertical rails where you want to locate the bottom of the system you are ins...

Page 31: ...acket with M5 mounting screw 09 1052 01A as shown M5 x 3 4 Pan Head Screws order 09 1052 01A 5 With one person on each side of the sys tem lift the system so that the L shape rack mounting bracket aligh with the chassis 6 Push the chassis into the rack secure the chassis by tighten the front mounting screws 4 2 2 Install the chassis in a Rack Figure 37 Removing the L shape rack mounting bracket Fi...

Page 32: ... 14500 9500 R P M Max Air Flow 26 5CFM at zero static pressure Max Air Pressure 1 73 inchH2 0 Acoustical Noise 59dB A Insulation Type UL Class A Over current shut down Yes shut down when locking rotor Starting protection Yes start at low speed after 5 sec full speed Life expectance 50 000 hours continuous at 25 degree C Operating temperature 10 to 50 degree C Operating humidity 5 to 90 RH Material...

Page 33: ...n Yes meet IEC 1000 3 2 Class D EMI Noise Filter FCC Class B CISR22 CLass B Safety UL 1950 CSA 22 2 No 950 TUV IEC 950 MTBF 100000 hours Operating temperature 0 to 50 degree C Efficiency 80 Typical at full load Dimensions 40 5mm H x 82mm W x 150mm D Output Voltage Output Current MIN A MAX A 5V 0 5 18 12V 2 23 12V 0 0 0 5 3 3V 0 5 17 5VSB 0 1 2 5 DC Output Characteristics Specification Table7 275W ...

Page 34: ...n Cards 4 x System Fans 2 8 Total Current Maximum ratings 275W 2 5 17 18 23 0 3 DO NOT OVERLOAD Do not exceed power limit for any DC outputs From the worksheet above enter the total current for each colume multiply the voltage by the total current to get the total wattage for each voltage level Add all the Wattage up and find the total power usage Voltage Level and Current Ohm s Law Volts x Ampere...

Page 35: ... system configuration 50 loading 75 loading and 100 loading 8 BTU usage calculation Table 11 BTU usage calculation 50 75 100 Loading Equation to calculate system power comsumption to BTU Result BTU hr Total Combine Wattage X 4 10 BTU hr Total Combine Wattage X 3 08 BTU hr Total Combine Wattage X 2 05 28 ...

Reviews: