1.
1.
StereoCam
StereoCam
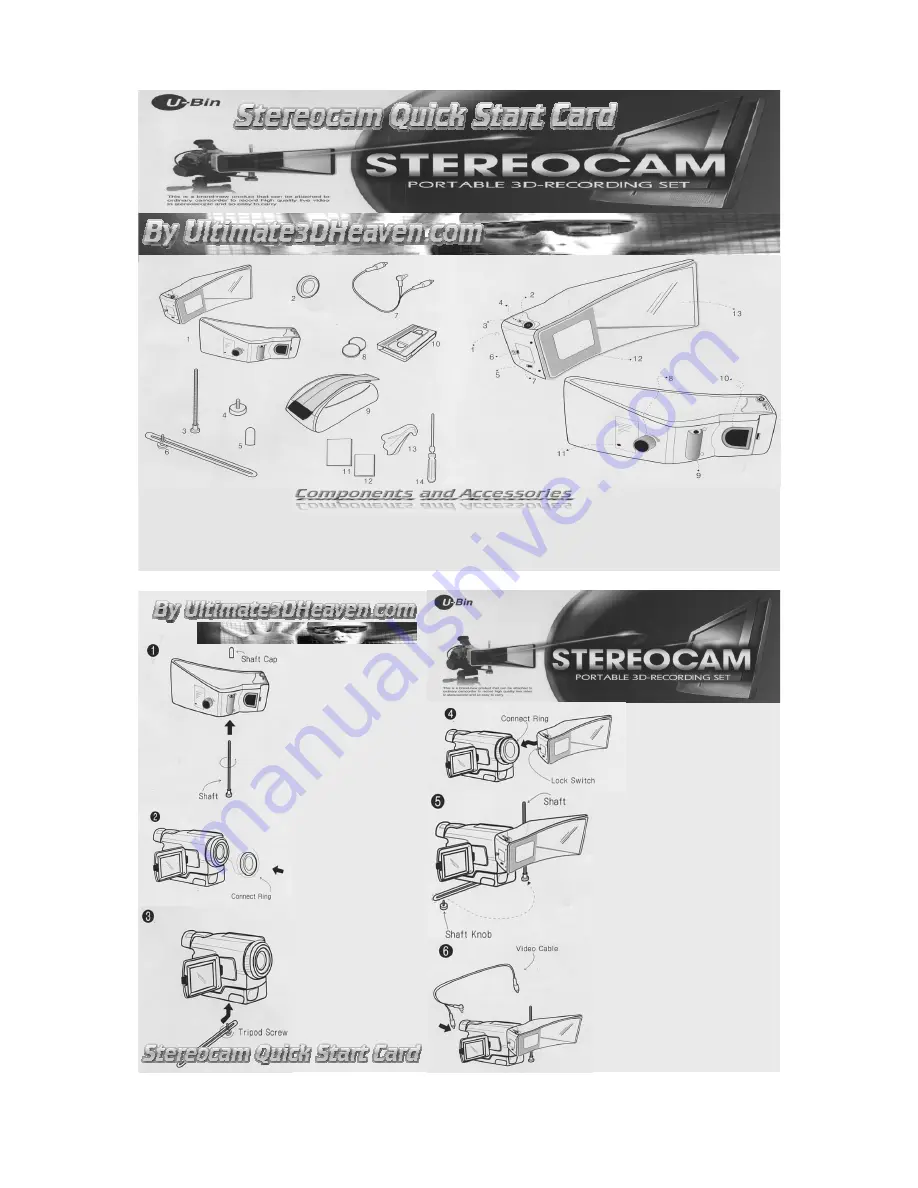
2. Connect Ring
2. Connect Ring
3. Shaft
3. Shaft
4. Shaft Knob
4. Shaft Knob
5. Shaft Cap
5. Shaft Cap
6. Link Arm
6. Link Arm
7. Video Cable
7. Video Cable
8. Battery
8. Battery
9. Carrying Bag
9. Carrying Bag
10. Manual Tape
10. Manual Tape
11. Manual Book
11. Manual Book
12. Warranty Card
12. Warranty Card
13. Lens Cleaner
13. Lens Cleaner
14. Screw Driver
14. Screw Driver
1. Video Socket
1. Video Socket
2. On/Off Switch
2. On/Off Switch
3. Signal Indicator
3. Signal Indicator
4. Battery Indicator
4. Battery Indicator
5. Battery Cover
5. Battery Cover
6. Lock Switch
6. Lock Switch
7. 2D/3D Convert Switch
7. 2D/3D Convert Switch
8. Depth Control Knob
8. Depth Control Knob
9. Hinge
9. Hinge
10. Lens Frame
10. Lens Frame
11. Alignment
11. Alignment
Hole
Hole
12. LCD
12. LCD
13. Mirror
13. Mirror
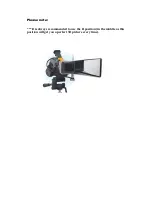
Step 1
Step 1
Attach the threaded mount
Attach the threaded mount
shaft to the housing of the
shaft to the housing of the
Stereocam and attach the
Stereocam and attach the
shaft cap.
shaft cap.
Step 2
Step 2
Screw the Connect Ring into
Screw the Connect Ring into
the lens thread of your
the lens thread of your
camera. Do not over tighten,
camera. Do not over tighten,
finger tight is sufficient.
finger tight is sufficient.
Make sure not to cross
Make sure not to cross
thread the Connect Ring.
thread the Connect Ring.
Step 3
Step 3
Attach Link Arm Assembly
Attach Link Arm Assembly
(loosely tighten) under your
(loosely tighten) under your
camcorder to the tripod
camcorder to the tripod
mounting hole with the
mounting hole with the
Tripod Screw.
Tripod Screw.
Step 4
Step 4
Slide the Stereocam over
Slide the Stereocam over
the flange of the Connect
the flange of the Connect
Ring until it clicks into
Ring until it clicks into
place by fully engaging the
place by fully engaging the
spring loaded latch.
spring loaded latch.
Step 5
Step 5
Insert the shaft knob through the
Insert the shaft knob through the
forward end of the slot of the link arm
forward end of the slot of the link arm
and screwed into the bottom of the
and screwed into the bottom of the
Shaft. Finger tighten both the Shaft
Shaft. Finger tighten both the Shaft
Knob and the Shaft sufficiently so the
Knob and the Shaft sufficiently so the
Stereocam is securely attached and
Stereocam is securely attached and
properly aligned to the camera. The axis
properly aligned to the camera. The axis
of the shaft should be aligned and
of the shaft should be aligned and
parallel to the center vertical axis of the
parallel to the center vertical axis of the
camera and the top and bottom of the
camera and the top and bottom of the
Stereocam should be aligned and
Stereocam should be aligned and
parallel to the top and bottom of your
parallel to the top and bottom of your
camera respectively.
camera respectively.
Step 6
Step 6
Attach the video cable split end into the
Attach the video cable split end into the
camcorder video “OUT” socket and the
camcorder video “OUT” socket and the
standard end of the Video Cable into the
standard end of the Video Cable into the
video “IN” socket of the Stereocam UL
video “IN” socket of the Stereocam UL
-
-
100.
100.


