

6
5
4
1
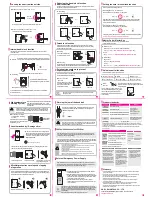
32HOLE 타공
접지선
이 선을 꺽어 문 모서리에 맞춰주십시오.
접지선
이 선을 꺽어 문 모서리에 맞춰주십시오.
User manual
6700SK
6700DK
6700D
6700D
6700S
6700S
6700DK
6700SK
6700 Series
User manual
UNICOR HIGHTECH CO., LTD
www.unicor.co.kr
As this is a keyless digital door lock, damage may occur
to parts of the dead lock system if it is not used according
to the manual. Users should be fully aware of the manual
and how to operate this product.
Caution
Safety precautions
The precautionary measures are for the safety of the user, for the prevention of property
damage, and for the avoidance of any inconveniences due to an accident. These must be read
and followed properly.
•
Do not disassemble or alter the lock.
•
Do not install where the distance over
5mm between the door and door frame.
•
Please do not expose the password and
change the password in regularly.
•
Batteries should not be exposed directly to
heat sources or flames, or submerged in water,
because they may leak or explode, resulting in
severe damage. Please do not use damaged
batteries.
•
Do not press using sharp tools or press
numeric button excessively.
•
Make sure the door is completely locked when
going out.
•
Place the batteries carefully and correctly according
to their polarity (+/-). If the batteries are inserted
in a wrong way, differently from the indicated
direction or polarity, leakage or rupture could occur.
Pay attention to it.
•
Please do not mix old with new batteries or use
different types.
Always use new alkaline batteries.
•
Do not clean the product with flammable materials
such as alcohol, benzene or thinners. Such materials
may damage the surface or cause a fire.
•
Replace the current batteries with new ones within
1 week after the battery replacement notification
melody sounded off for the first time.
Warning
Model
Door opening type
Mechanical key
2way / Password & Digital key
2way / Password & Smart key
3way / Password & Digital key& Mechanical key cylinder
3way / Password & Smart key& Mechanical key cylinder
Components of each model
Components
Front ass’y
Back ass’y
Rubber pad for
the back ass’y
Digital touch key
Strike
Mortise
Handle shaft
Handle shaft stop ring
Battery 4pcs
Installation template
User manual
Front ass’y
Back ass’y
Battery cover
Back handle
Panic release function with handle
The handle is a one-touch type product developed by the company. When it is installed successfully,
the user just needs to swing it down to open the door safely and conveniently when moving from
the inside area to the outside area.
Touch plate
Mortise
Registering and changing the password
The door must be opened while registering the password.
Caution
1.
Open the battery cover of the back ass’y, and
short press the [Reg.] button one time.
2. Check that the front keypad lamp is
turned on.
3. Enter the password of 3-20 digits.
Caution
If no password is entered within 14 seconds after the [Reg.] button is pressed, the registration
process will be cancelled. When a new password is registered (The above 1-4 steps), the
previous one will be automatically deleted. If the registration mode is cancelled, the previous
password will be maintained.
Registering (again) the digital touch key / smart tag (card)
Caution
When it is needed to register digital touch keys, smart tags (cards) and remote control, or
registering them again, it is required to register them all together at once. Remote control is
optinal. purchasing it separetly.
1. Open the battery cover of the back ass’y,
and short press the [Reg.] button one time.
2. Bring the digital touch keys into contact at the
touch plate in order. (When each digital touch
key is comes in contact at the touch plate,
the registration will be completed while a sound is
generated for checking the registration)
※
Bring the smart tag (card) into contact at the touch plate.
3. Press the [Reg.] button after registering
all digital touch keys or smart tags (cards).
4. Registering the remote control (option):
Short press the [Reg.] button of the back ass’y
one time, and the press the [Open]
button for registration.
Attention
Caution
Deleting the digital touch key, smart tag (card),
and remote control
1. Open the battery cover of the back ass’y, and
short press the [Reg.] button one time.
2. Check that the front keypad lamp is turned on.
3.
Press number [0] for 5 seconds. All the digital
touch keys, card keys and remote control will
be deleted while a sound will be generated
for checking.
For 5
seconds
Locking the door from the inside
▶
When the auto lock function is set.
After 3
seconds
When the auto lock function is set, the door will be automatically locked 3 seconds
after the door is closed.
▶
When the Manual lock function is set.
Opening the door from the inside.
Caution
If the user does not open the door within 7 seconds after pulling the handle down,
the door will be automatically locked.
▶
Pulling the back handle down
Pull the handle of the back ass’y down slightly. Then, the Panic release function will be activated,
disabling the locked state and opening the door.
Opening the door from the outside.
▶
Opening the door by
using the password.
Touch the keypad.
Enter the Password and [*] button
needs to bring the handle down
to open the door.
▶
Opening the door by using the digital touch key, smart
tag (card) or the remote control.
1. Bring the registered digital touch key or smart tag key into contact at the touch plate,
or press the [Open] button in case of the remote control.
2. When there is a sound for checking. Then, the user needs to bring the handle down
to open the door.
▶
Opening the door by using
the mechanical key cylinder.
Insert the key into the key hole and turn
it to open the door.
Caution
The lifetime of the batteries is based on the result of the tests by the company and is not an absolute
measurement. It will vary depending on the temperature and humidity of the installed locations as well as
depending on the frequency of usage and the quality of batteries.
The functions, design, and composition of the product may change without prior notification for the purpose
of improving its quality.
- This manual may change without notice in case of product improvement.
- This manual may not be edited or changed without the manufacturer’s prior permission
- Product specifications are subject to change without prior notice.
Smart Key
UNICOR
UNICOR
UNICOR
Mechanical key
cylinder
screws
Option
Video phone
interface,
remote control
UNICOR
Touch keypad
Touch plate,
Emergency key insertion
Front handle
Emergency
power supply
terminal
UN-6700D(2W) and
UN-6700DK(3W)
UN-6700DK(3W) and
UN-6700SK(3W)
Wireless
communication
receiver
Registration
button
Double locking
※
In addition to 2 or 4 pcs of smart tag that are
provided basically, 13.56Mhz ISO 14443A
type RF tags, NFC cards and credit cards can
be also registered as card key
UN-6700S(2W) and UN-6700SK(3W)
4. Press the [Reg.] button. Then, the
registration will be completed while a
sound is generated for checking the
registration.
4.
* Deleting the remote control Press [Reg.]
and then press [1] for 5 seconds.
Press [Double locking] one time
Short press [Double locking] button one time.
then door will be closed.
When it is needed to register additional digital touch keys and smart tags (cards)
(totally 50pcs of keys can be registered), it is required to repeat the above process 2 before
the keypad lamp is turned off.
If neither the digital touch key nor the smart tag (card) is contacted or if the [Open] button is
not pressed, in case of the remote control, for 14 seconds after the [Reg.] button is pressed,
the registration process will be cancelled. When a new digital touch key, smart tag (card) or a
new remote control is registered (The above 1–4 steps), the previous one will be automatically
deleted.
Dead bolt
(locking section)
Latch bolt
This is fixed, the right-hand door mode is set to default, meaning that any additioanl
adjustment isn't needed for the right-hand users. If the door is a left-hand type, the latch bolt
should be adjusted. otherwise, the door will not be closed.
How to change the latch bolt
1.After removing the plate,
set the latch bolt to fit the
left/right hand door.
(Rotates the latch bolt 180
degree to switch the right
/ left hand.)
180 degree rotation
2. After mounting the
mortise on the door,
put the plate and tighten
the screws.
Mortise pin
* Must be used for
installation.
UN-6700D
UN-6700S
UN-6700DK
UN-6700SK


