background image

Table of Contents

Important Safety Instructions . . . . . . . . . . . . . . . . . . . . . . . . . . . . . . . . .  3
Introduction . . . . . . . . . . . . . . . . . . . . . . . . . . . . . . . . . . . . . . . . . . . . . .  5

Features . . . . . . . . . . . . . . . . . . . . . . . . . . . . . . . . . . . . . . . . . . . . . .  5
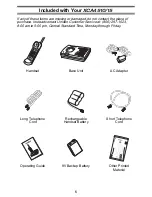
Included with Your 

XCA4510/15

. . . . . . . . . . . . . . . . . . . . . . . . . . . . . . .  6

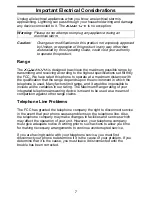
Important Electrical Considerations . . . . . . . . . . . . . . . . . . . . . . . . . . . .  7

Range . . . . . . . . . . . . . . . . . . . . . . . . . . . . . . . . . . . . . . . . . . . . . . . .  7
Telephone Line Problems. . . . . . . . . . . . . . . . . . . . . . . . . . . . . . . . .  7
Radio Interference . . . . . . . . . . . . . . . . . . . . . . . . . . . . . . . . . . . . . .  8
More Than One Cordless Telephone . . . . . . . . . . . . . . . . . . . . . . . .  8

Installation . . . . . . . . . . . . . . . . . . . . . . . . . . . . . . . . . . . . . . . . . . . . . . .  9

Selecting a Location . . . . . . . . . . . . . . . . . . . . . . . . . . . . . . . . . . . . .  9
Telephone Line Outlets . . . . . . . . . . . . . . . . . . . . . . . . . . . . . . . . . .  9
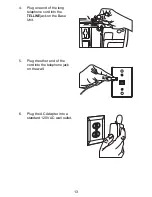
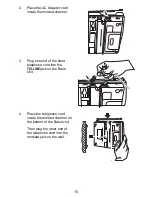
Connecting the Telephone Cords . . . . . . . . . . . . . . . . . . . . . . . . . .  10
Applying Power to the Base Unit . . . . . . . . . . . . . . . . . . . . . . . . . .  10
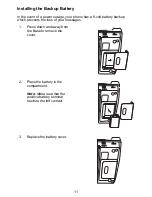
Installing the Backup Battery . . . . . . . . . . . . . . . . . . . . . . . . . . . . .  11
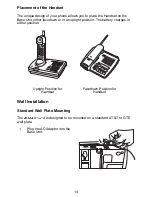
Desk or Tabletop Installation . . . . . . . . . . . . . . . . . . . . . . . . . . . . .  12
Wall Installation . . . . . . . . . . . . . . . . . . . . . . . . . . . . . . . . . . . . . . .  14
Direct Wall Mounting . . . . . . . . . . . . . . . . . . . . . . . . . . . . . . . . . . .  17

Setting up Your Phone. . . . . . . . . . . . . . . . . . . . . . . . . . . . . . . . . . . . .  22

Extending the Antenna . . . . . . . . . . . . . . . . . . . . . . . . . . . . . . . . . .  22
Installing the Handset Battery Pack . . . . . . . . . . . . . . . . . . . . . . . .  22
Cleaning the Battery Contacts . . . . . . . . . . . . . . . . . . . . . . . . . . . .  24
Charging the Handset Battery Pack . . . . . . . . . . . . . . . . . . . . . . . .  25
Low Battery Indicator . . . . . . . . . . . . . . . . . . . . . . . . . . . . . . . . . . .  26
Setting the Pulse/Tone Switch . . . . . . . . . . . . . . . . . . . . . . . . . . . .  27
Adjusting Ringer Controls . . . . . . . . . . . . . . . . . . . . . . . . . . . . . . . .  27
Automatic Digital Code Security . . . . . . . . . . . . . . . . . . . . . . . . . . .  29

Using Your Phone . . . . . . . . . . . . . . . . . . . . . . . . . . . . . . . . . . . . . . . .  31

Making and Receiving Calls . . . . . . . . . . . . . . . . . . . . . . . . . . . . . .  31
Changing Channels, Flash, and Page/Find . . . . . . . . . . . . . . . . . .  32

Using the Two-Way Intercom . . . . . . . . . . . . . . . . . . . . . . . . . . . . . . .  33

Two-Way Paging . . . . . . . . . . . . . . . . . . . . . . . . . . . . . . . . . . . . . .  33
Room Monitor Feature . . . . . . . . . . . . . . . . . . . . . . . . . . . . . . . . . .  35

Programming Your Phone . . . . . . . . . . . . . . . . . . . . . . . . . . . . . . . . . .  36

Storing a Number in Memory . . . . . . . . . . . . . . . . . . . . . . . . . . . . .  36
Storing a Mixed Number with a Pulse System . . . . . . . . . . . . . . . .  38
Storing One-Touch Dialing Numbers . . . . . . . . . . . . . . . . . . . . . . .  40
Dialing a Stored Number . . . . . . . . . . . . . . . . . . . . . . . . . . . . . . . .  41
Chain Dialing . . . . . . . . . . . . . . . . . . . . . . . . . . . . . . . . . . . . . . . . .  41
Erasing a Stored Number . . . . . . . . . . . . . . . . . . . . . . . . . . . . . . . .  42

The Integrated Answering System. . . . . . . . . . . . . . . . . . . . . . . . . . . .  43

Features . . . . . . . . . . . . . . . . . . . . . . . . . . . . . . . . . . . . . . . . . . . . .  43

1

Summary of Contents for XCA4510

Page 1: ...Your Phone 22 Extending the Antenna 22 Installing the Handset Battery Pack 22 Cleaning the Battery Contacts 24 Charging the Handset Battery Pack 25 Low Battery Indicator 26 Setting the Pulse Tone Switch 27 Adjusting Ringer Controls 27 Automatic Digital Code Security 29 Using Your Phone 31 Making and Receiving Calls 31 Changing Channels Flash and Page Find 32 Using the Two Way Intercom 33 Two Way P...

Page 2: ... 60 Using Your Answering System 61 Selecting a Mailbox 61 Playing a Message 62 Repeating a Message 64 Skipping a Message 66 Deleting a Message 69 Deleting All Messages in a Maibox 74 Message Full Indication 76 Voice Guided Help Menu 77 Screening Incoming Calls 78 Leaving a Memo Message 79 Recording a Telephone Conversation 81 Remote Operation 82 Setting Your PIN Code 82 Using a Touch Tone Phone 84...

Page 3: ... heat register This product should not be placed in a built in installation unless proper ventilation is provided 7 This product should be operated only from the type of power source indicated on the marking label If you are not sure of the type of power supply to your home consult your dealer or local power company 8 Do not allow anything to rest on the power cord Do not locate this product where...

Page 4: ... reduce the risk of fire or injury to persons by the battery read and follow these instructions 1 Use only the appropriate type and size Battery Pack specified in this Operating Guide 2 Do not dispose of the Battery Pack in a fire The cell may explode Check the Nickel Cadmium Battery Disposal package insert for disposal instructions 3 Do not open or mutilate the Battery Pack Released electrolyte i...

Page 5: ...new outgoing message monitoring incoming calls setting up the four individual mailboxes or playing and deleting your messages AutoTalk allows you to answer a call by just removing the Handset from the Base so you don t have to waste time pushing buttons or flipping switches AutoStandby allows you to hang up by simply returning the Handset to the Base The UltraClear Plus true compander circuitry vi...

Page 6: ... place of purchase Instead contact Uniden Customer Service at 800 297 1023 8 00 am to 5 00 pm Central Standard Time Monday through Friday Handset Base Unit AC Adapter Long Telephone Cord Rechargeable Handset Battery Short Telephone Cord Operating Guide 9V Backup Battery Other Printed Material 6 ...

Page 7: ...pends upon the environment in which the telephone is used Many factors limit range and it would be impossible to include all the variables in our rating The Maximum Range rating of your integrated telephone answering device is meant to be used as a means of comparison against other range claims Telephone Line Problems The FCC has granted the telephone company the right to disconnect service in the...

Page 8: ...ently hear other voices or distracting transmissions on your phone you may be receiving radio signals from another cordless telephone or other source of interference If you cannot eliminate this type of interference you need to change to a different channel Finally it should be noted that some cordless telephones operate at frequencies that may cause interference to nearby TVs and VCRs to minimize...

Page 9: ...ge the handset retainer so that the tab which holds the Handset faces up See page 20 for more information You should charge your new phone for 15 20 hours before completing the installation or using the Handset Telephone Line Outlets There are two types of phone outlets Modular Jack Most phone equipment available now uses modular jacks Phone cords are fitted with a molded plastic connector which p...

Page 10: ...apter as shown below 1 Wrap the power cord around the convenient notch on the bottom Important Place the power cord so that it does not create a trip hazard or where it could become chafed and create a fire or other electrical hazards 2 When power is first applied the message counter display flashes P quickly while the system s memory initializes When the flashing slows press the STOP button on th...

Page 11: ...e has a 9 volt battery backup which prevents the loss of your messages 1 Press down and away from the Base to remove the cover 2 Place the battery in the compartment Note Make sure that the positive battery terminal touches the left contact 3 Replace the battery cover 11 ...

Page 12: ...Desk or Tabletop Installation 1 Place the Base on a desk or tabletop 2 Plug the AC Adapter into the Base Unit 3 Place the AC Adapter cord inside the molded channel 1 2 3 4 12 ...

Page 13: ...g one end of the long telephone cord into the TEL LINE jack on the Base Unit 5 Plug the other end of the cord into the telephone jack on the wall 6 Plug the AC Adapter into a standard 120V AC wall outlet 13 ...

Page 14: ...acedown or in an upright position The battery charges in either position Wall Installation Standard Wall Plate Mounting The XCA4510 15 is designed to be mounted on a standard AT T or GTE wall plate 1 Plug the AC Adapter into the Base Unit 1 2 3 4 Upright Position for Handset 1 2 3 4 Facedown Position for Handset 14 ...

Page 15: ...el 3 Plug one end of the short telephone cord into the TEL LINE jack on the Base Unit 4 Place the telephone cord inside the molded channel on the bottom of the Base Unit Then plug the other end of the telephone cord into the modular jack on the wall 15 ...

Page 16: ...5 Place the Base Unit on the posts of the wall plate and push down until it s firmly seated 6 Plug the AC Adapter into a standard 120V AC wall outlet 16 ...

Page 17: ...nd the mounting location that could cause a hazard when inserting screws into the wall Make sure the wall material is capable of supporting the weight of the Base Unit Use 10 screws with anchoring devices suitable for the wall material where the Base Unit will be placed 1 Insert two mounting screws 315 16 inches apart Allow about 1 5 of an inch between the wall and screw heads for mounting the pho...

Page 18: ...ce the AC Adapter cord inside the molded channel 4 Plug one end of the long telephone cord into the TEL LINE jack on the Base Unit 5 Place the cord inside the molded channel on the bottom of the Base Unit 18 ...

Page 19: ...6 Place the Base Unit on the screws and push down until it s firmly seated 7 Plug the other end of the telephone line cord into the wall jack 8 Plug the AC Adapter into a standard 120V AC wall outlet 19 ...

Page 20: ...e Handset in place if your phone is mounted on a wall These steps describe how to remove and replace the retainer so that the tab faces up 1 Push up on the Handset Retainer on the Base Unit and slide the tab out 2 Flip the Retainer over so the tab faces up 20 ...

Page 21: ...3 Put the Retainer back into its slot on the Base Unit 4 Push down on the Handset Retainer until it snaps into place 21 ...

Page 22: ...vertical position and then extend the antenna Installing the Handset Battery Pack 1 Press in on the Battery Cover Release RING SW 2 5 TS PULSE TONE TEL LINE DC IN 9V RESET CPC OFF ON REC TIME ANN 1 RING VOL OFF LO HI WARNING Always Install Battery Cable with Black Wire closest to the left RED BLK NOTE 22 ...

Page 23: ...lide the battery cover back on Note The built in Memory Backup feature allows up to 3 minutes to disconnect the old battery pack and install a new one without losing any phone numbers that may be stored in the telephone s memory BLK RED WARNING Always Install Battery Cable with Black Wire closest to the left BLK RED WARNING Always Install Battery Cable with Black Wire closest to the left BLK RED W...

Page 24: ... liquids or solvents Contacts Contacts On Bottom TALK TALK REMOTE BATT LOW ABC JKL GHI TUV PRS TONE MEM INT C 1 R TONE 2 R VOL CHAN RDL P FLASH VOLUME OPR DEF MNO WXY 1 2 5 4 8 0 7 3 6 9 3 9 5 8 6 4 2 1 1 7 Extend A Phone HQ SERIES HQ SERIES IN USE BATTERY POWER MAILBOX 1 2 3 4 STOP PLAY REPEAT ANS ON OFF OGM MEMO INTERCOM SKIP DELETE CHARGE CHANNEL ULTRACLEAR PLUS Digital Answering System MIC PAG...

Page 25: ...r the first time We recommend that the battery pack charge for approximately 15 20 hours without interruption before plugging the phone line into your new phone 1 Place the Handset on the Base Unit Depending on your installation you can charge the Handset in the upright position OR You can charge the Handset in its facedown position 1 2 3 4 1 2 3 4 25 ...

Page 26: ... is programmed to eliminate its functions to save power The table below describes what to do to return your phone to normal operation During a Call In Standby Mode Only the Tbutton operates None of the buttons will operate The Handset beeps and the TALK BATT LOW LED flashes once every three seconds The Handset TALK BATT LOW LED flashes once every three seconds Complete your call as quickly as poss...

Page 27: ...To adjust the ringer volume of your Handset press L when the phone is not in use You can also select one of two different ringer tones for the Handset When the phone is not in use press Oto select a different ringer tone RING SW 2 5 TS PULSE TONE TEL LINE DC IN 9V RESET CPC OFF ON REC TIME ANN 1 RING VOL OFF LO HI PULSE TONE RDL P TONE MEM INT C 1 R TONE 2 R VOL CHAN FLASH VOLUME OPR 0 8 Handset R...

Page 28: ...switch to the desired setting To adjust the Base speaker volume slide the VOLUME control to the desired setting RDL P TONE MEM INT C 1 R TONE 2 R VOL CHAN FLASH VOLUME OPR 0 8 Handset Receiver Volume Control RING SW 2 5 TS PULSE TONE TEL LINE DC IN 9V RESET CPC OFF ON REC TIME ANN 1 RING VOL OFF LO HI RING VOL OFF LO HI VOLUME VOLUME VOLUME 28 ...

Page 29: ... line To avoid unauthorized calls on your phone a Digital Code feature was added to the XCA4510 15 This Digital Code is shared only between the Handset and Base Unit The Code is set automatically when you first use the phone To reset the Digital Code be sure the Handset is on the Base then 1 Press INTERCOM on the Base Unit 2 Remove the Handset from the Base Unit and then set it down again CHAN 29 ...

Page 30: ...ower while the Handset is off the Base the Digital Code may be erased When this happens the Handset will not function To establish communication between the Handset and Base Unit 1 Restore power to the Base Unit and place the Handset back on the Base Unit 2 The CHARGE LED will blink to indicate that the Digital Security Code is set 30 ...

Page 31: ...ssT 3 Listen for dial tone 4 Dial the number 1 PressT 2 Listen for dial tone 3 Dial the number HANG UP PressT OR Return Handset to Base AutoStandby REDIAL 1 Pick up Handset 2 Press T 3 Listen for dial tone 4 PressR 1 PressT 2 Listen for dial tone 3 PressR Note Sometimes when you press Tto hang up the phone you may get an error tone and the phone will not disconnect If this happens place the Handse...

Page 32: ...imilar to when Fis pressed There may be a brief pause as your phone searches for a clear channel FLASH If the Call Waiting tone sounds pressFto accept the waiting call OR If you have finished a call and want to make another call pressFto hang up and get a dial tone A click a short pause then the caller if you were on a call OR A click and then a dial tone so you can make a different call PAGE FIND...

Page 33: ...set to either LO or HI Note If you are on a call while using the Handset and you page the Base Unit the Base Unit will ring even when the Base Ringer Switch is set to the OFF position Two Way Paging Paging the Base Unit 1 3 2 3 1 2 3 4 1 Press Jon the Handset Note If there is no answer press J again to cancel 2 Press Ion the Base Unit to answer page The IN USE and TALK BATT LOW LEDs light To end t...

Page 34: ... 4 1 Press Ion the Base Unit Note If there is no answer press I again to cancel 2 Press Tor J on the Handset to answer the page The IN USE and TALK BATT LOW LEDs light To end the conversation 3 Press Ion the Base or T on the Handset 34 ...

Page 35: ... near the Base Unit To turn the monitor on follow the steps below 1 2 3 1 2 3 4 1 Press Jon the Handset 2 Press Ton the Handset Note Using the Handset you should now be able to monitor the room where the base Unit is located To turn the monitor off 3 Press Ton the Handset 35 ...

Page 36: ...ks 3 Enter the number you want to store up to 16 digits 5551212 TALK TALK REMOTE BATT LOW ABC JKL GHI TUV PRS TONE MEM INT C 1 R TONE 2 R VOL CHAN RDL P FLASH VOLUME OPR DEF MNO WXY 1 2 5 4 8 0 7 3 6 9 3 9 5 8 6 4 2 1 1 7 Use these keys to store a number in memory Note An error tone will sound and the programming procedure will be canceled if more than 20 seconds elapse between each keystroke entr...

Page 37: ... service press R 9R5551212 Note The Rbutton counts as one digit Pressing Rmore than once increases the length of the pause between numbers 5 PressMagain 6 Enter the memory location 0 9 A tone indicates that the number is stored 3 9 5 8 6 4 2 1 1 7 REMOTE IN T C 37 ...

Page 38: ...number to be dialed in pulse mode 5551212 TALK TALK REMOTE BATT LOW ABC JKL GHI TUV PRS TONE MEM INT C 1 R TONE 2 R VOL CHAN RDL P FLASH VOLUME OPR DEF MNO WXY 1 2 5 4 8 0 7 3 6 9 3 9 5 8 6 4 2 1 1 7 Use these keys to store a mixed mode number in memory Note An error tone will sound and the programming procedure will be canceled if more than 20 seconds elapse between each keystroke entry or step T...

Page 39: ...rvice press R R3300 Note The Rbutton counts as one digit Pressing Rmore than once increases the length of the pause between numbers 7 Press Magain 8 Enter the memory location 0 9 A tone indicates that the number is stored TUV PRS TONE MEM INT C 1 R TONE 2 R VOL CHAN RDL P FLASH VOLUME OPR WXY 8 0 7 9 9 5 4 8 3 9 5 8 6 4 2 1 1 7 REMOTE IN T C 39 ...

Page 40: ...essing Rmore than once increases the length of the pause between numbers TALK TALK REMOTE BATT LOW ABC JKL GHI TUV PRS TONE MEM INT C 1 R TONE 2 R VOL CHAN RDL P FLASH VOLUME OPR DEF MNO WXY 1 2 5 4 8 0 7 3 6 9 3 9 5 8 6 4 2 1 1 7 Use these keys to store a number in a One Touch dialing button Note An error tone will sound and the programming procedure will be canceled if more than 20 seconds elaps...

Page 41: ...ss the One Touch Dialing button where the number is stored Press the memory location number 0 9 Chain Dialing On certain occasions after dialing a number you may be requested by the party or service you are calling to enter a special access code such as when performing a banking transaction To do this simply 1 Store the access code into one of the memory locations 2 Dial the main number 3 At the a...

Page 42: ...UCH KEYS Remove the Handset from the Base Unit Remove the Handset from the Base Unit Press Mtwice Press Mtwice Press the memory location number 0 9 Press the One Touch Dialing button you want to clear Note An error tone will sound and the erase procedure will be canceled if more than 20 seconds elapse between each keystroke entry or step 42 ...

Page 43: ...ows you to quickly review your messages saving or deleting the messages you choose You ll never have to worry about a tape wearing out or resetting properly Also the digital recording system provides maximum flexibility by having four individual mailboxes each with its own outgoing message Now you can have callers leave their messages for the person they were trying to call There is also a Voice G...

Page 44: ...nounced in the Handset receiver 2 Press 7 You will hear a tone in the Handset followed by the announcement Answering System on and the message counter turns on 3 Press REMOTE again to return to Standby The TALK BATT LOW LED turns off TALK TALK REMOTE BATT LOW ABC JKL GHI TUV PRS DEF MNO WXY 1 2 5 4 8 7 3 6 9 3 9 5 6 4 2 1 1 7 TALK TALK REMOTE BATT LOW ABC JKL GHI TUV PRS DEF MNO WXY 1 2 5 4 8 7 3 ...

Page 45: ... 7 You will hear a tone in the Handset followed by the announcement Answering System off and the message counter turns off 6 Press REMOTE again to return to Standby The TALK BATT LOW LED turns off TALK TALK REMOTE BATT LOW ABC JKL GHI TUV PRS DEF MNO WXY 1 2 5 4 8 7 3 6 9 3 9 5 6 4 2 1 1 7 TALK TALK REMOTE BATT LOW ABC JKL GHI TUV PRS DEF MNO WXY 1 2 5 4 8 7 3 6 9 3 9 5 6 4 2 1 1 7 45 ...

Page 46: ...indicate the unit is ready to answer calls and the message counter turns on 2 To turn the Answering System OFF press ANS ON OFF again A tone sounds and the Message Counter LED will go off indicating that the Answering System has been turned off Note If you are in a MAILBOX you must wait for the MAILBOX Button LED to turn off or press STOP before pressing ANS ON OFF 46 ...

Page 47: ...The TALK BATT LOW LED lights orange 2 Press Then enter the number which corresponds to the day 3 Enter the two digit number for the hour 01 12 and the minute 00 59 4 To set AM press To set PM press Note A beep indicates the new time is programmed and the new time is announced in the Handset receiver TALK TALK REMOTE BATT LOW ABC JKL GHI TUV PRS DEF MNO WXY 1 2 5 4 8 7 3 6 9 3 9 5 6 4 2 1 1 7 47 ...

Page 48: ... the time day is announced followed by the total number of messages recorded in all mailboxes The TALK BATT LOW LED lights orange 2 To replay the current time day while using the remote keys press 3 The Handset beeps and the time day is replayed followed by the remaining recording time available for new messages 3 Press REMOTE again to return to Standby TALK TALK REMOTE BATT LOW ABC JKL GHI TUV PR...

Page 49: ...n the first preset message below plays and all incoming messages are limited to one minute If the switch is set in the left position i e the Announce Only position the second message below plays and no incoming messages are recorded Hello No one is available to take your call Please leave your message after the tone Hello No one is available to take your call Note If the REC TIME ANN 1 switch is i...

Page 50: ...ng message in each of the other three mailboxes 3 Press 3 to stop recording The message replays in the Handset receiver TALK TALK REMOTE BATT LOW ABC JKL GHI TUV PRS DEF MNO WXY 1 2 5 4 8 7 3 6 9 3 9 5 6 4 2 1 1 7 TALK TALK REMOTE BATT LOW ABC JKL GHI TUV PRS DEF MNO WXY 1 2 5 4 8 7 3 6 9 3 9 5 6 4 2 1 1 7 TALK TALK REMOTE BATT LOW ABC JKL GHI TUV PRS DEF MNO WXY 1 2 5 4 8 7 3 6 9 3 9 5 6 4 2 1 1 ...

Page 51: ...ounter begins to count up 2 Do not get closer than 12 in from the microphone and speak clearly while recording your message When you are finished recording release the OGM Button You hear a tone and your message is played on the Base Unit speaker The message counter resets to zero Note You can leave up to a 60 second outgoing message for Mailbox 1 and up to a 30 second outgoing message in each of ...

Page 52: ...ilbox 1 Handset Operation 1 To change to a different mailbox press REMOTE The TALK BATT LOW LED lights orange 2 Press 9 You will hear a tone followed by the announcement Mailbox 1 You have no messages 3 Press 9 until you select the mailbox you want TALK TALK REMOTE BATT LOW ABC JKL GHI TUV PRS DEF MNO WXY 1 2 5 4 8 7 3 6 9 3 9 5 6 4 2 1 1 7 TALK TALK REMOTE BATT LOW ABC JKL GHI TUV PRS DEF MNO WXY...

Page 53: ... to press 1to access Mailbox 1 because all messages are automatically recorded in Mailbox 1 If however 1is pressed by a caller then Mailbox 1 stays selected 6 For example you might want a caller to leave their message in Mailbox 2 Tell them to press these keys after hearing the tone Note You can leave up to a 60 second outgoing message for Mailbox 1 and up to a 30 second outgoing message in each o...

Page 54: ...different mailbox press MAILBOX You will hear a tone followed by the announcement Mailbox 1 You have no message The Mailbox Button LED and the LED for Mailbox 1 light 2 Press MAILBOX until you select the mailbox you want TALK TALK REMOTE BATT LOW ABC JKL GHI TUV PRS DEF MNO WXY 1 2 5 4 8 7 3 6 9 3 9 5 6 4 2 1 1 7 MAILBOX STOP PLAY REPEAT ANS ON OFF OGM MEMO INTERCOM SKIP DELETE Digital Answering S...

Page 55: ...utton You hear a tone and your message is played on the Base Unit speaker The message counter resets to zero 5 Since the outgoing message for Mailbox 1 always plays first you should explain to callers that to leave a message in another mailbox they must press followed by the mailbox number when they hear the tone Note It is not necessary for a caller to press 1to access Mailbox 1 because all messa...

Page 56: ...ve up to a 60 second outgoing message for Mailbox 1 and up to a 30 second outgoing message in each of the other three mailboxes 2 7 After you have recorded your message your Answering System will automatically return to Standby in 15 seconds The MAILBOX LED goes out and the Message Counter LED resets to zero if you don t have saved messages 56 ...

Page 57: ... Button LED and Mailbox 1 LED light 2 Press OGM Your recorded outgoing message will begin to play 3 While your recorded outgoing message is playing press OGM again A tone will sound and you hear the preset message Hello No one is available to take your call please leave your message after the tone on the Base Unit speaker A second tone sounds after the preset message plays and the Answering System...

Page 58: ...he MAILBOX Button LED and Mailbox 1 LED light 5 Press OGM The preset message will begin to play on the Base Unit speaker 6 While the preset message is playing press OGM again A tone will sound and your recorded message will play on the Base Unit speaker A second tone sounds after your message plays and the Answering System automatically returns to Standby 58 ...

Page 59: ... to off Setting the Toll Saver Switch The Ring Number Toll Saver switch allows you to set the number of rings the caller hears before your Answering System answers You can set the switch to answer after 2 rings or after 5 rings In the TS Toll Saver position the Answering System answers after two rings if you have messages recorded and it answers after five rings if there are no messages So if you ...

Page 60: ...Handset and Base Unit Note The RESET button may also be used in the unlikely event that an AC power line disturbance causes the answering system to malfunction and become inoperative RING SW 2 5 TS PULSE TONE TEL LINE DC IN 9V RESET CPC OFF ON REC TIME ANN 1 RING VOL OFF LO HI RESET When RESET is pressed the Message Counter begins to flash See page 10 Applying Power to the Base Unit for instructio...

Page 61: ...e no message Note The announcement changes depending on how many messages are saved in the mailbox 3 Press 9 until you select the mailbox you want You will hear beeps on the Handset receiver which indicates that the system is waiting for the next command If you don t press another key within 20 seconds a long tone sounds in the Handset receiver and the phone automatically returns to Standby The TA...

Page 62: ...MAILBOX you hear a tone and an announcement However it s not necessary to wait for the announcement to finish before pressing mailbox again After you have selected a mailbox your Answering System waits for the next command if you don t press another button within 15 seconds the system returns to Standby Playing a Message Handset Operation 1 Select the MAILBOX you want to play messages from 2 Press...

Page 63: ...essages from 2 Press PLAY The time and day the message was received is announced and the Message Counter displays the message number of the message playing Note If you want to stop reviewing your messages press the STOP Button 3 A tone sounds when each message ends When all messages have played the announcement End of messages plays TALK TALK REMOTE BATT LOW ABC JKL GHI TUV PRS DEF MNO WXY 1 2 5 4...

Page 64: ...e new or unplayed messages in a mailbox the Mailbox LED on the Base continues to flash If all the messages have been reviewed then the Mailbox LED remains on but doesn t flash Repeating a Message Handset Operation 1 Select the MAILBOX you want to play messages from 2 Press 2 to review your messages TALK TALK REMOTE BATT LOW ABC JKL GHI TUV PRS DEF MNO WXY 1 2 5 4 8 7 3 6 9 3 9 5 6 4 2 1 1 7 64 ...

Page 65: ...ages press until you return to the message you want to replay 4 To return to Standby press REMOTE The TALK BATT LOW LED goes off Base Operation 1 Select the MAILBOX you want to play messages from 2 Press PLAY to review your messages TALK TALK REMOTE BATT LOW ABC JKL GHI TUV PRS DEF MNO WXY 1 2 5 4 8 7 3 6 9 3 9 5 6 4 2 1 1 7 TALK TALK REMOTE BATT LOW ABC JKL GHI TUV PRS DEF MNO WXY 1 2 5 4 8 7 3 6...

Page 66: ...the system to scan back one message If you have several messages press REPEAT until you return to the message you want to replay 4 The system automatically returns to Standby after a 15 second pause The MAILBOX LED goes out and the Message Counter LED shows the total number of messages in all mailboxes Skipping a Message Handset Operation 1 Select the MAILBOX you want to play messages from 66 ...

Page 67: ...f you have several messages press 1 until you get to the message you want to play 4 To return to Standby press REMOTE The TALK BATT LOW LED goes off TALK TALK REMOTE BATT LOW ABC JKL GHI TUV PRS DEF MNO WXY 1 2 5 4 8 7 3 6 9 3 9 5 6 4 2 1 1 7 TALK TALK REMOTE BATT LOW ABC JKL GHI TUV PRS DEF MNO WXY 1 2 5 4 8 7 3 6 9 3 9 5 6 4 2 1 1 7 67 ...

Page 68: ... next message Note Each time SKIP is pressed the system scans foward one message If you have several messages press SKIP until you get to the message you want to play 4 The system automatically returns to Standby after a 15 second pause The MAILBOX LED goes out and the Message Counter LED shows the total number of messages in all mailboxes 68 ...

Page 69: ... during the message Note When you press 6 you are tagging the message A message must be tagged before it can be deleted 4 If you tag a message for deletion and then replay the message again before the end of message announcement then the message is untagged and will not be deleted TALK TALK REMOTE BATT LOW ABC JKL GHI TUV PRS DEF MNO WXY 1 2 5 4 8 7 3 6 9 3 9 5 6 4 2 1 1 7 69 ...

Page 70: ...age and then let the message play you must retag the message or it will not be deleted 5 When the End of messages announcement plays you will hear a series of quick warning tones for five seconds in the Handset This is followed by a long tone Then an announcement such as Two messages deleted plays Note The deletion announcement above depends on how many messages you tag for deletion TALK TALK REMO...

Page 71: ...n The messages are saved and you can either select another menu command from the Handset or press REMOTE and return to Standby Base Operation 1 Select the MAILBOX you want to delete messages from 2 Press PLAY to review your messages TALK TALK REMOTE BATT LOW ABC JKL GHI TUV PRS DEF MNO WXY 1 2 5 4 8 7 3 6 9 3 9 5 6 4 2 1 1 7 TALK TALK REMOTE BATT LOW ABC JKL GHI TUV PRS DEF MNO WXY 1 2 5 4 8 7 3 6...

Page 72: ...uncement then the message is untagged and will not be deleted For example you have received four messages and you tagged the second message for deletion During the fourth message you press REPEAT three times and replay message 2 If you don t tag message 2 for deletion again before the End of message announcement it will not be deleted Note If you use the SKIP Button and scan to a tagged message an...

Page 73: ...se speaker Then an announcement such as Two messages deleted plays Note The deletion announcement above depends on how many messages you tag for deletion 6 The flashing delete warning displayed by the Message Counter allows you to cancel the delete function and save your messages Pressing PLAY cancels the delete function and the messages begin replaying from the beginning 73 ...

Page 74: ...ill not flash Deleting All Messages in a Mailbox You can delete all the messages in a mailbox without tagging each separate message To delete all the messages in a mailbox you must use the DELETE button on the Base Unit 1 Select the MAILBOX you want to delete messages from 2 After the mailbox and number of messages have been announced press and hold DELETE Note If a mailbox contains messages which...

Page 75: ... the Message Counter Note You have five seconds to cancel delete before all of the messages in the mailbox are erased 4 A long tone sounds and then an announcement such as Two messages deleted plays Note The deletion announcement above depends on how many messages are in the mailbox 75 ...

Page 76: ...stem to normal follow these steps 1 When the memory is full the phone will ring 10 times before the announcement No remaining time for incoming messages plays 2 The Message Counter on the Base will flash the FL warning 3 You must review your messages and then delete some or all of the stored messages When you delete messages the Message Counter will reset and the time available for incoming messag...

Page 77: ...hts orange 2 Press A tone sounds and the Voice Guided Menu begins to play 3 There are two ways to exit the Help Menu press 3 anytime during the reveiw or listen to all the options and wait for the system to automatically exit TALK TALK REMOTE BATT LOW ABC JKL GHI TUV PRS DEF MNO WXY 1 2 5 4 8 7 3 6 9 3 9 5 6 4 2 1 1 7 RDL P TONE MEM INT C 1 R TONE 2 R VOL CHAN FLASH VOLUME OPR 0 8 TALK TALK REMOTE...

Page 78: ...n to Standby the TALK BATT LOW LED goes off Screening Incoming Calls If you receive a call while your Answering System is on you can listen to the OGM announcement and the incoming message on the Base Unit speaker If you are away from the Base you can use your Handset to screen incoming calls 1 Press REMOTE The TALK BATT LOW LED lights orange TALK TALK REMOTE BATT LOW ABC JKL GHI TUV PRS DEF MNO W...

Page 79: ...BATT LOW LED goes off Leaving a Memo Message You can use the XCA4510 15 to leave a Memo Message for someone else who uses your Answering System 1 Press MAILBOX on the Base Unit to select the mailbox you want 2 To record your Memo Message press and hold the MEMO Button until you hear a long tone and the message counter begins to count TALK TALK BATT LOW ABC JKL GHI TUV PRS DEF MNO WXY 1 2 5 4 8 7 3...

Page 80: ... have recorded your message the system will automatically return to Standby in 15 seconds The Message Counter LED shows the total number of messages in all the mailboxes Note If you have new or unplayed messages in a mailbox the Mailbox LED on the Base continues to flash If all the messages have been reviewed the Mailbox LED remains on but doesn t flash And if there are no messages in the mailbox ...

Page 81: ... to let the other party know that the call is being recorded 2 To stop recording press REMOTE again The TALK BATT LOW LED changes from orange back to red Note A recorded call is like a message if you use all of the available record time the Recording function cancels automatically TALK TALK REMOTE BATT LOW ABC JKL GHI TUV PRS DEF MNO WXY 1 2 5 4 8 7 3 6 9 3 9 5 6 4 2 1 1 7 81 ...

Page 82: ...tone phone work the same as the function keys on your phone s Handset except you must press before selecting a command You cannot change the Day Time stamp or your PIN code from a touch tone phone Setting Your PIN Code Using the Handset you can set a personal two digit code 00 to 99 for your PIN code You must use your PIN code to access your Answering System from a touch tone telephone 1 Press REM...

Page 83: ... Press your two digit code 4 Press again You will hear a long tone which indicates that the new code is saved Press REMOTE to return to standby RDL P TONE MEM INT C 1 R TONE 2 R VOL CHAN FLASH VOLUME OPR 0 8 83 ...

Page 84: ... Answering System announces the time and day followed by the number of messages stored in memory If messages are recorded in Mailbox 1 the system automatically begins playing them Note Only the messages in Mailbox 1 play automatically You must manually select the other mailboxes and play the messages in them 4 You will then hear intermittent beeps indicating that system is in the Command Waiting M...

Page 85: ...r mailbox and press 2to begin playing the messages in the new mailbox 6 Use this chart to select the function you want 7 When you ve finished hang up to exit the system Your Answering System automatically returns to Standby 85 ...

Page 86: ...nit antenna is fully extended and vertical Move the Handset and or Base Unit to different locations and try again Press the CHAN Button to select another channel Can t make or receive calls Check both ends of the Base Unit telephone line cord Make sure the AC Adapter is plugged into the Base Unit and wall outlet Disconnect the AC Adapter for a few minutes and then reconnect it Handset doesn t ring...

Page 87: ...eted Check the battery backup and replace the battery if necessary Message Counter flashes the letter P There has been a power failure and the battery backup has been completely discharged Replace the battery and press STOP to reset the Answering System The BATTERY LED on the Base Unit flashes Replace the backup battery as soon as possible No sound on the Base Unit speaker during call monitoring o...

Page 88: ...97 MHz 25 Channels Transmit Frequency 48 76 to 49 99 MHz 25 Channels Power Requirements Rechargeable Ni Cd Battery Pack Size 2 3 16 in W x 2 11 16 in D x 12 3 32 in H w antenna Weight Approx 10 oz including battery Battery BT 185 Capacity 270 mAH 3 6V Talk Mode 6 hours Standby Mode 7 days Battery Save Mode 5 weeks Answering System Memory Type Digital Tapeless Recording Memory Capacity 27 min 32 se...

Page 89: ...XCA4510 15 Integrated Telephone Answering Device UDZZ01333ZZ Operating Guide Q ...

Page 90: ...t may explode if disposed of in a fire Do not short circuit the battery Do not charge the Rechargeable Nickel Cadmium Battery used in this equipment in any charger other than the one designed to charge this battery as specified in this Guide Using another charger may damage the battery or cause the battery to explode RECHARGEABLE NICKEL CADMIUM BATTERIES MUST BE RECYCLED OR DISPOSED OF PROPERLY Re...

Page 91: ...LASH VOLUME OPR DEF MNO WXY 1 2 5 4 8 0 7 3 6 9 3 9 5 8 6 4 2 1 1 7 1 5 6 8 9 11 12 4 7 10 2 3 1 Repeat Key 2 Play Key 3 Skip Key 4 Message Erase Key 5 Answering System On Off Key 6 Stop Key 7 OGM Record Key 8 Mailbox Select Key 9 OGM Message Review Key 10 Time Day Stamp Key 11 Voice Guided Help Key 12 PIN Security Key ...

Page 92: ...WXY 1 2 5 4 8 0 7 3 6 9 3 5 8 6 4 2 1 1 7 1 Antenna 2 Talk Battery Low Indicator 3 Talk Button T 4 Numeric Keypad 5 Tone Button 6 Memory Programming Button M 7 Intercom Button J 8 Flash Button F Ringer Tone Select Button O 9 Remote Button 10 Ring On Battery Save Switch 11 One Touch Dialing Buttons 12 Channel Select Button E 13 Redial Pause Button R 14 Volume V Ringer Volume Select Button L ...

Page 93: ... MIC PAGE FIND 0 1 Ring Switch 2 5 TS 14 Message Play Button 2 Pulse Tone Switch 15 Message Skip Button 3 Calling Party Control Switch 16 Intercom Button 4 Record Time Ann 1 Switch 17 Memo Button 5 Ringer Volume Switch 18 Outgoing Message Button 6 Telephone Line Jack 19 Answering System On Off Button 7 DC Power Jack 20 Stop Button 8 Reset Button 21 Message Delete Button 9 Handset Retainer 22 Power...

Page 94: ...other cost except shipping and handling incurred by warrantor or its representatives in connection with the performance of this warranty THE LIMITED WARRANTY SET FORTH ABOVE IS THE SOLE AND ENTIRE WARRANTY PERTAINING TO THE PRODUCT AND IS IN LIEU OF AND EXCLUDES ALL OTHER WARRANTIES OF ANY NATURE WHATSOEVER WHETHER EXPRESS IMPLIED OR ARISING BY OPERATION OF LAW INCLUDING BUT NOT LIMITED TO ANY IMP...

Page 95: ... 1995 Uniden America Corporation All rights reserved Printed in Hong Kong Covered under one or more of the following U S patents 4 511 761 4 523 058 4 595 795 4 797 916 ...

Reviews: